Use the Cookie Extractor to allow cookie setting in advance

The following entry works for the SiteKiosk Online Version 1.0.2098.4728 or higher (https://sitekiosk.online/). Note that it can only be used for windows clients.

In the case you want to predefine cookies of a webpage displayed in SiteKiosk you can use our Cookie Extractor to insert the permit into the project. 

The following example uses the Browser template which contains a webpage element.

The Cookie Extractor can be downloaded here.

Start the Cookie Extra after installation. Enter the URL of the webpage, in which you want to allow the cookies in advance.

Press the button "Start Cookie Gathering" to load the cookies.

Press the "Accept" button in the webpage to allow the chosen cookies.

Close the window.

Press the "Test Cookies" button to test selected Cookies.

Close the window and press the "Copy to Clipboard" button. 

Open your SiteKiosk Online project and go to Settings - Client - Advanced. Then press the "Add setting" button.


Enter the system.browser.predefinedCookies under Path and the clipboard of the Cookie Extractor under Value. 

Save the Advanced Setting.

Open the Settings of the webpage element by double click on the element. 

Enter the URL of the webpage in which you want to allow the cookies in advance and save the setting.

Publish the project to a Windows client to test the setting.

Applying the System Security Manager Settings to other Users

The SiteKiosk System Security Manager helps you to manage the restricted SiteKiosk user. The user is created by the SiteKiosk installer. It is a local standard Windows user account. The System Security Manager further restricts this account to increase the security of the kiosk terminal. The manager enables you to customize the restrictions for the SiteKiosk user to your needs. We strongly recommend to run SiteKiosk with this user, which is the default behaviour when using the Auto Start mode of SiteKiosk.

In case your kiosk environment requires the usage of another user you can do so by using the Customized start options of SiteKiosk. For those scenarios we recommend to use the default Windows options, e.g. local or domain policies, to secure this user to meet your project requirements.

If you want to apply the same restrictions to your user which the System Security Manager applies to the local SiteKiosk Windows user, you can use command line parameters for this. Please note that these parameters are unsupported and provided as is. Use the following information at your own risk. Also note that if you apply the restrictions to a domain user they might only last until the next periodic domain policy update on the computer, because domain policies always overrule local settings if they overlap.

The SystemSecurity.exe is located in the main installation folder of SiteKiosk Windows, e.g. C:\Program Files (x86)\SiteKiosk.

To open the graphical user interface of the SiteKiosk System Security Manager with a user of your choice, use the follwing command line parameters:

SystemSecurity.exe /user:<UserNameOrSID> /pass:<Password> /domain:<DomainName>

To apply the default settings used for the restricted SiteKiosk user to a user of your choice without using the graphical user interface, you can use the following command line parameters:

SystemSecurity.exe /applydefault /user:<UserNameOrSID> /pass:<Password> /domain:<DomainName>

Use SiteKiosk Online to Transfer a HTML File which is displayed in the Content

In case you want to display a HTML file in a webpage element, which is transferred directly by the project, you can use the following entry. The entry works for the SiteKiosk Online Version 1 or higher. 

Generate a project with template Empty.

Import a html file with the name example.html into the media library of the SiteKiosk editor.

Insert a webpage element. 

Open the properties dialog of the webpage element and enter the internet address content://example.html

Publish the project to a client to check the display of the HTML file.

Preload Webviews with the Expert Settings of SiteKiosk Online

The following works for SiteKiosk Online Version 1 or higher.

In case you want to preload webviews in sequences or on certain pages you want to navigate to, you can use two expert settings, which have to be combined. The following example uses a project which consists of a sequence container with an included webpage element.

Open the project and activate the expert mode. For this you have to add &expert at the end of the URL in the URL address field of your browser and then press Enter to reload the project.


After activation of the expert mode, select the webpage element and press the expert edit button in the menu bar.


Scroll in the expert properties on the right to the entry shouldUnloadWhenHidden and deactivate the checkbox.

Scroll to the bottom of the expert settings and in the Add property edit box enter the entry shouldReloadWhenHidden. Choose Boolean in the dropdown menu and activate the checkbox. Then press the plus button.

Scroll again to the bottom of the expert settings and in the Add property edit box enter the entry loadOnCreation. Choose Boolean in the dropdown menu and activate the checkbox. Then press the plus button.

Please save the expert properties by pressing the Save button.

Make a copy of the webpage element and insert it into the sequence.

Set a start URL for each webpage element in the element properties and set the display duration of each webpage element to e.g. 60 seconds. 

Publish the project to a client to check the preload function.

User Logoff on Screensaver Activation or SiteKiosk Logout Button Usage

This script example is suited for environments where SiteKiosk is started when users login to the kiosk terminal with their individual accounts instead of the default SiteKiosk user and the terminal should return to the Windows login screen once the user leaves the terminal. In most cases this means domain environments.

Instead of using the standard Auto Start mode from the SiteKiosk Quick Start menu the Customized mode is used according to the needs of the specific kiosk environment. For example by choosing Run SiteKiosk automatically at Windows startup, unchecking Settings only apply to the restricted SiteKiosk user account and also leaving Disable any keyboard input during startup and Log on automatically at system startup unchecked, this leaves the kiosk terminal at the Windows login screen when turned on, where users can type in their credentials and SiteKiosk will start right after the login of the user.

In order for the kiosk terminal to return to the Windows login screen either when a user presses the default SiteKiosk logout button or the screensaver activates a small script can be added in the configuration tool of SiteKiosk.

The script uses the SiteKiosk Object Model and has this content:

SiteKiosk.OnReset = InitUserLogoff; // Requires the default Screensaver setting to execute a logout to be active

function InitUserLogoff(){
	//Wait 5 seconds to give SiteKiosk time to do the usual screensaver and logout processing, adjust if necessary
	SiteKiosk.Scheduler.AddDelayedEvent(5000, LogoffWindows);
}

function LogoffWindows(){
	//Run the Windows user logoff
	SiteKiosk.LogoffWindows();
}

The script uses the OnReset event to detect the usage of the logout button or the activation of the screensaver. Note that it requires the default screensaver behaviour to execute a logout to be active to work. In case the OnReset event fires, the function InitUserLogoff is called, which uses the AddDelayedEvent method to wait 5 seconds to give SiteKiosk time to perform the usual logout and screensaver actions. You can change the time to match your requirements. After the delay the LogoffWindows function is called, which uses the LogoffWindows method to initiate a Windows logoff while retaining the selected SiteKiosk start settings.

Copy and paste the above code to an editor, e.g. Notepad, and save it as a .js file in the Html subfolder of your SiteKiosk installation (usually located here: C:\Program Files (x86)\SiteKiosk\Html). To add the script to SiteKiosk, go to Start Page & Browser -> Customize -> Advanded and add it as an external script file to be executed on startup of SiteKiosk.

Allowing Custom Fonts for SiteCaster Projects on a SiteRemote Server

When running your own SiteRemote Server, you can easily allow the upload of additional fonts for SiteCaster projects. The requirement is SiteCaster 1.6 or higher. New fonts should be in the .ttf file format.

If you want to allow uploads for all teams, go to C:\Program Files (x86)\PROVISIO\SiteRemote\Config and open the file serverConfig.json with an editor (e.g. Notepad). Look for the line

"uploadAdditionalWebpageFiles": false,

in the teamSettings. Add this line right after it:

"uploadAdditionalFontFiles": true,

Here is an example of the teamSettings with the new value added:

"teamSettings": {
    "variants": false,
    "uploadAdditionalWebpageFiles": false,
	"uploadAdditionalFontFiles": true,
    "richTextVariable": false,
    "createProofOfPlay": false,
    "deleteScreenshotsAfterDays": 14,
    "maxTeamFolderSize": 102400
  },

Alternatively the upload can only be allowed for certain teams. In this case, you have to go into the teamStorage folder of those teams to create a config.json file. To find the folder for a team, go to the Teams tab of the SiteRemote Administration web page. In the table on that page, you will find the ID column, which tells you the ID of a team. Use the ID to identify the correct team folder in C:\Program Files (x86)\PROVISIO\SiteRemote\Common\Teams\teamStorage, e.g. C:\Program Files (x86)\PROVISIO\SiteRemote\Common\Teams\teamStorage\1 (where 1 is the ID of the team).

Directly in that folder you need to create a file with the name config.json and this content:

{
    "uploadAdditionalFontFiles": true
}

Do this for every team, you want to allow uploads for. Note that the teamStorage folder of a team will only show up after the first project has been created.

After one of the above changes has been made, go to a SiteCaster project in a team and then to Settings -> Content Settings to find the new Fonts section with a Select file button.

Fonts uploaded there can then be found and used in all rich text editors of that project.

The team based font upload option is available on request for teams on https://www.siteremote.net as well.

Enabling Tabs When Using Fullscreen Mode for Specific URLs

The default SiteKiosk Windows behaviour when using fullscreen mode for specific URLs with the Chrome engine is to disable tabs. If a link opens an additional website and the URL matches a fullscreen pattern a new window is shown in fullscreen mode. This enables users to use both pages at the same time. If you do not need this kind of usability for a project but want the ability to use tabs instead, you can use the method described below. Be aware that as soon as a navigation in one of the tabs matches a fullscreen URL, the browser will switch to fullscreen. Make sure to include navigations that allow the user to leave the fullscreen mode to make the other tabs usable again.

Note that this feature requires SiteKiosk Windows 9.9.6000 or higher.

First configure the fullscreen mode for specific URLs in the configuration of SiteKiosk under Start Page & Browser -> Fullscreen.

Save the configuration and then open the configuration file with an editor like Notepad. Look for the fullscreen section, e.g.:

"fullscreen": {
    "enabled": true,
    "hideTaskbar": false,
    "activateFullscreenOnAddresses": {
      "enabled": true,
      "urls": [
        "https://www.sitekiosk.com/"
      ]
    }
  },

Add the line "allowTabs": true at the end of it, e.g.:

"fullscreen": {
    "enabled": true,
    "hideTaskbar": false,
    "activateFullscreenOnAddresses": {
      "enabled": true,
      "urls": [
        "https://www.sitekiosk.com/"
      ]
    },
    "allowTabs": true
  },

You also need to edit the file C:\Users\Public\SiteKiosk\data\content\local\files\projects\d97aa96b962543fcb39625a3f8e8d8fb\000000000000000000000000\files\browserSettings.js. It is recommended to make a backup of the file before making the change.

Look for the line:

var canOpenTabs = !!appConfig.visibility.showHideTabBarButton && (!modules["appSettings"].fullscreen.enabled || modules["appSettings"].fullscreen.allowTabs);

Change it to this:

var canOpenTabs = !!appConfig.visibility.showHideTabBarButton && (!modules["appSettings"].fullscreen.enabled || modules["appSettings"].fullscreen.showTabbar);

Now tabs are available. 

Monitoring the Windows Event Log with SiteKiosk Windows

Here is a quick script based solution that describes one way to monitor the Windows event log for certain messages with the help of SiteKiosk Windows.

When you combine SiteKiosk Windows with SiteRemote the errors from the Windows application and system event logs are monitored by default. Depending on your environment you might need to monitor certain warning or even information events. There are numerous ways to achieve this in combination with SiteKiosk and the different SiteKiosk APIs. One of the simplest options is using two Javascript (JScript) files.

Two script files are required because the user you usually run SiteKiosk under does not have the rights to access the Windows event log and in order to write to the SiteKiosk logs by script (which is what we will do in this example) you need to be in the same user context as the running SiteKiosk Windows application.

The first script monitors the Windows event log for certain messages.

//This script needs to be added to the Windows Task Scheduler and set to start at system startup
//Initiating required objects
var fso = new ActiveXObject("Scripting.FileSystemObject");
var gk_locator = new ActiveXObject("WbemScripting.SWbemLocator");
var gk_wmi_service =  gk_locator.ConnectServer(".", "Root/Cimv2");

//Creating the query string
var gstr_wql = "select * from __instancecreationevent where targetinstance isa 'Win32_NTLogEvent' and targetinstance.eventcode = '102' and targetinstance.type = 'information' and targetinstance.sourcename = 'ESENT'";

//Running the query
var gk_objeventsource = gk_wmi_service.execnotificationquery(gstr_wql);

function writeToEventlogstore(message){
	var lobj_timestamp = new Date();
	
	//Make sure the path to the file matches
	var lobj_filehandle = fso.OpenTextFile("C:\\Users\\Public\\Documents\\eventlogstore.txt",8,true,-1);
	lobj_filehandle.WriteLine(lobj_timestamp + " " + message);
    lobj_filehandle.Close();
}

//Using a while loop to constantly monitor
while(true){
	//Getting a new event
	lk_objeventobject = gk_objeventsource.nextevent();
	//Check if the event contains a specific string element 
	if(lk_objeventobject.TargetInstance.Message.indexOf("starting") != -1){
		//Write to the event log store file
		writeToEventlogstore(lk_objeventobject.TargetInstance.Message);
	}
}

The script uses no SiteKiosk specific code, please use your preferred search engine if you want to learn more about the objects and methods that have been used.

This script example listens for information events (targetinstance.type = 'information') with the event ID 102 (targetinstance.eventcode = '102') and the source is ESENT (targetinstance.sourcename = 'ESENT'). It then checks for the occurrance of a specific string fragment in the message, in this case starting (lk_objeventobject.TargetInstance.Message.indexOf("starting")). Doing so, will pick a certain message from events that have the same event ID. If such a message is found, it will be written to a text file. You should place the text file at a location where the user you run SiteKiosk with has the rights to read and delete the file, e.g. C:\Users\Public\Documents\eventlogstore.txt.

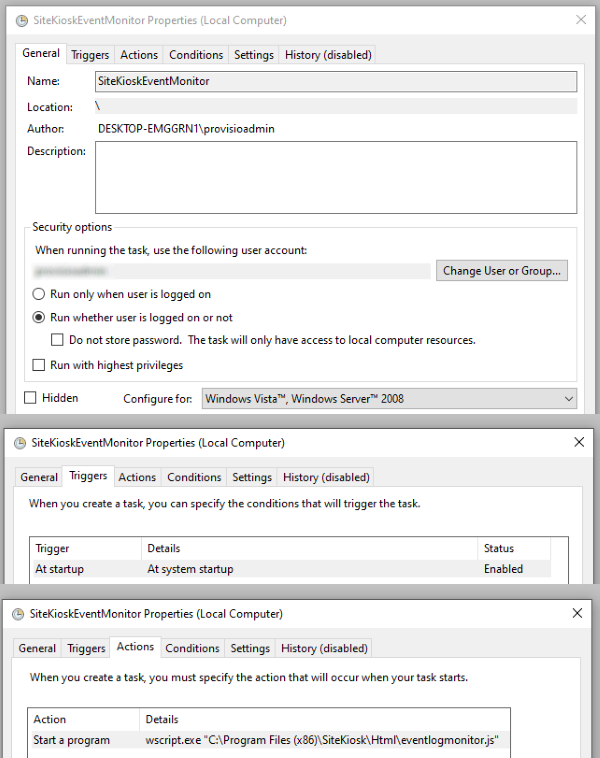
Save the script as eventlogmonitor.js in the folder ..\SiteKiosk\html. Then add the script to the Task Scheduler of Windows. The script needs to run at startup with a user that is allowed to access the Windows event log. Execute it with wscript.exe.

The second script should be saved as eventlogreader.js, also in the folder ..\SiteKiosk\html, and is added to SiteKiosk as an external script by going to Start Page & Browser -> Customize -> Advanced in the SiteKiosk configuration.

//This script needs to be added to the SiteKiosk configuration as an external script 
//Initiating required objects
var fso = new ActiveXObject("Scripting.FileSystemObject");

function ReadFromEventlogstore(){
	//Make sure the path to the file matches
	var lobj_filehandle = fso.OpenTextFile("C:\\Users\\Public\\Documents\\eventlogstore.txt",1,true,-1);
	try{
		var str_eventlogstorecontent = lobj_filehandle.ReadAll();
		//Write to the SiteKiosk Logfile
		SiteKiosk.Logfile.Write(9999, 20, "CustomEventLogStore","Event log store content: " + str_eventlogstorecontent);
	}catch(e){}
	lobj_filehandle.Close();
	fso.DeleteFile("C:\\Users\\Public\\Documents\\eventlogstore.txt",true);
}

//Read the event log store every 5 seconds
SiteKiosk.Scheduler.AddPeriodicEvent(5000, ReadFromEventlogstore);

This script uses Javascript (JScript) and also the SiteKiosk Object Model and checks the text file written by the first script every 5 seconds (SiteKiosk.Scheduler.AddPeriodicEvent(5000, ReadFromEventlogstore)) while SiteKiosk is running. If the file has content it will be written to the SiteKiosk logs (SiteKiosk.Logfile.Write(9999, 20, "CustomEventLogStore","Event log store content: " + str_eventlogstorecontent)) and then the file will be deleted. Of course you also could do something different here, this is just meant as an example.

With the information added to the SiteKiosk logs you could then create a custom SiteRemote error to be notified when the event fires.

Adding Custom Components to the Software Tab of a Machine on a SiteRemote or SiteKiosk Online Server

When running your own SiteRemote or SiteKiosk Online Server you can add custom components to the software tab of a Windows machine in a team on the server. This means you can monitor the version number (must be available as a property of the file) and creation date of any executable (exe) or dynamic link library (dll) that is available on a machine. They will be shown as part of the Components table on the software tab of a machine.

By default the software tab lists the most common components and all installed software that is visible in the Programs and Features list of the Windows control panel.

If you need to monitor exe or dll files that have been copied to the machine without using a standard installation routine or that are not the main part of an application you can go to the Settings tab of the SiteRemote or SiteKiosk Online Server administration. Click on Edit configuration next to the Software component settings on the right side of the page. You will now see a table with the existing components.

Click on the Add New button to create a new entry. Choose a display name to identify the component in the table.

You can either query the component by the Component Object Model'S programmatic identifier (see https://docs.microsoft.com/en-us/windows/win32/com/-progid--key) or by the file path. You can use system environment variables as part of the file path, e.g. %windir% or %ProgramFiles%.

The Type determines under which component category the added component will be listed in the Components table on the software tab of a machine. You can select from Application, System, Additional, Remote Client or Multimedia (the other options in the dropdown field are for SiteKiosk specific usage).

Click Save on the right side of the new entry to save it temporarily, add an additional component if you wish, and then click the Save button at the bottom of the page to save the changes permanently and activate them by restarting the server service.

If the newly added component is present on a machine it will show up after a few machine contacts with the server.

Minimum User Requirements for SiteRemote Server Database Backups

When using the database backup options of the SiteRemote Server Configuration Tool the resulting job will be added to the Windows Task Scheduler. The job requires a user account, the name of which you have to state in the Server Configuration Tool (using [server name or domain name]\[user name], e.g. SRServer\Backupuser).

In order for the job to run successfully the user you choose needs a minimum set of specific rights.

If you use a local SQL database (for the SiteRemote database) and you are not using the SQL Server Management Studio for backups, the user for the SiteRemote database backup needs db_owner rights on the SiteRemote SQL database (the default name of the database is SiteRemoteBackEndServer). Note that there are no special requirements for the user regarding the Mongo DB database used for the SiteCaster part of the server.

The user also needs read and execute rights for the Data and Mongo folders and their subfolders of the SiteRemote directory (by default C:\Program Files (x86)\PROVISIO\SiteRemote\Data and C:\Program Files (x86)\PROVISIO\SiteRemote\Mongo).

Of course the user needs write rights for the backup destination folder (by default C:\Users\Public\Documents\SiteRemoteBackups).

Finally, because the job is added as a Windows task, the user needs the Windows user right to log on as a batch job.


Note that the basics described above also apply to the new SiteKiosk Online Server. Paths and names need to be adjusted.