How to Reposition Buttons in the SiteKiosk Windows Chrome Browser Toolbar

There are many customization options for the SiteKiosk Windows Chrome Browser Toolbar. Both by simply using the configuration tool of SiteKiosk to enable or disable buttons or to change the colors as well as by editing files to give the toolbar a new look. There are several blog posts that deal with this topic, e.g. here and here. This time we are going to learn how to reposition buttons in the toolbar.

As an example, we will move the logout button from the left side of the language selection button the the right side. To do that, we need to open and edit a JSON (JavaScript Object Notation) file that is used by the Chrome Browser of SiteKiosk Windows. The file content.json is located in the folder C:\Users\Public\SiteKiosk\data\content\local\files\projects\d97aa96b962543fcb39625a3f8e8d8fb\000000000000000000000000. Open it with an editor like Notepad++. It is suggested that you make a backup copy of the file before editing it.

The buttons are defined in a number of attribute-value pairs that look like this for the logout button:

{
	"type": "content-button",
	"title": "{{$root.stringTable.strings.buttons.logout.$}}",
	"name": "logoutButton",
	"height": "60px",
	"width": "60px",
	"marginLeft": "0px",
	"marginRight": "0px",
	"_editor_canBeSelected": true,
	"_editor_canBeEdited": true,
	"_editor_canBeDeleted": true,
	"_editor_canAdd": true,
	"layout": {
	},
	"icon": {
		"src": "files/images/logout.svg",
		"color": "[[$root.colors.toolbarButton.icon]]",
		"hoverColor": "[[$root.colors.toolbarButton.iconHover]]",
		"pressedColor": "[[$root.colors.toolbarButton.iconPressed]]"
	},
	"backgroundImage": {
		"src": "files/images/button_background.svg",
		"color": "[[$root.colors.toolbarButton.background]]",
		"hoverColor": "[[$root.colors.toolbarButton.backgroundHover]]",
		"pressedColor": "[[$root.colors.toolbarButton.backgroundPressed]]"
	},
	"action": {
		"target": "{{%main}}",
		"value": "logout"
	},
	"_editor_propertiesToEdit": {
		"applyToAllContentGroups": true,
		"flex": true,
		"margin": true,
		"text": true
	},
	"_editor_propertiesToEditRestrictedUser": {}
},

And like this for the language selection button:

{
	"type": "content-button",
	"title": "{{$root.stringTable.strings.buttons.languages.$}}",
	"name": "languagesButton",
	"height": "60px",
	"width": "60px",
	"marginLeft": "0px",
	"marginRight": "0px",
	"_editor_canBeSelected": true,
	"_editor_canBeEdited": true,
	"_editor_canBeDeleted": true,
	"_editor_canAdd": true,
	"layout": {
	},
	"icon": {
		"src": "files/images/flags.png",
		"height": 32,
		"width": 32
	},
	"outlineImage": {
		"src": "files/images/circle.svg",
		"color": "[[$root.colors.toolbarButton.icon]]",
		"hoverColor": "[[$root.colors.toolbarButton.iconHover]]",
		"pressedColor": "[[$root.colors.toolbarButton.iconPressed]]"
	},
	"backgroundImage": {
		"src": "files/images/button_background.svg",
		"color": "[[$root.colors.toolbarButton.background]]",
		"hoverColor": "[[$root.colors.toolbarButton.backgroundHover]]",
		"pressedColor": "[[$root.colors.toolbarButton.backgroundPressed]]"
	},
	"action": {
		"target": "{{%main}}",
		"value": "showLanguages"
	},
	"_editor_propertiesToEdit": {
		"applyToAllContentGroups": true,
		"flex": true,
		"margin": true,
		"text": true
	},
	"_editor_propertiesToEditRestrictedUser": {}
},

As you can see, the different buttons can be easily identified by the name attribute. All button definitions are in the same order in the JSON document as they appear on the screen if you start SiteKiosk. To reposition a button you simply have to move its definition to the new place you would like the button to have on the screen. In the case of the logout and the language selection button you would simply have to move the complete logout definition shown above behind the definition of the language selection button, also shown above.

This change results in the logout button being shown behind the language selection button, as pictured here:

Please note that you can easily change the general appearance of the SiteKiosk Windows Chrome Browser through the SiteKiosk configuration. Just go to Start Page & Browser -> Chrome Browser -> Customize -> Browser Toolbar. Here you can show/hide the different buttons and also change the overall display size of the toolbar. You can also add custom buttons, if you need more than 2 of those, please have a look here.

Starting an App from a Web Page in SiteKiosk Android

The SiteKiosk Android Object Model can be used to start any Android app available on a device from a web page. This can be used for example to create a fully individualized start page for SiteKiosk Android or to start an application after providing a password. Note that a SiteKiosk Android Object Model documentation is not publicly available yet but a preliminary version can be obtained by contacting PROVISIO support.

In order to start the application you need to know its guid name, e.g. com.android.calculator2. Either you know this information for the app you would like to start or you can use the SiteKiosk logs to find this information. To do so, just add the desired app in the SiteKiosk configuration under Application -> Android App or Application -> Multiple Applications. Next start SiteKiosk and make sure the app has started at least once. Now close SiteKiosk and open the SiteKiosk log file in the ..\SiteKiosk\Logs folder. Look for an entry with the text System app launched, e.g. System app launched: com.android.calculator2. In our example the guid name we are looking for is com.android.calculator2. This information is required to start that specific app from the code of the web page.

The example HTML code to start the app looks like this:

<!DOCTYPE html>
<html>
<head>
<script>
	//method to initialize the SK Object Model as of SKA 2.5 or higher
	(new Function(_siteKiosk.getSiteKioskObjectModelCode()))();
</script>
<script>
    function startApp() {
        //make sure the SiteKiosk Android Object Method is ready
		siteKiosk.ready(function() {
			//start the Android app by its Guid name
			siteKiosk.system.apps.getByGuid("com.android.calculator2").launch("", "systemApp");
		});
    }
</script>
</head>
<body>
	<button onclick="startApp()">Start App</button>
</body>
</html>

The method _siteKiosk.getSiteKioskObjectModelCode initializes the SiteKiosk Android Object Model. The siteKiosk.ready method makes sure that the SiteKiosk Object Model is ready for use. If that is the case, siteKiosk.system.apps.getByGuid accesses the app and the launch method is used to start it (the default parameters for launch, "" and "systemApp", should be left as is).

Of course you need to change the guid name from the above example (com.android.calculator2) to the guid name of your app for the getByGuid method.

Save the complete code as an html file and place it either locally on the Android device or on a web server. For the purpose of testing you can set the file as the start page of the SiteKiosk Android Browser Application.

You also need to give the html file script permission, so it is allowed to use the SiteKiosk Object Model. Do this under Application -> Browser (or Fullscreen Browser) -> Script permission.

Finally you need to add the app you want to start under Security -> Allow assigned apps.

Changing the Date and Time Format in Chrome Browser of SiteKiosk Windows

When using English as the language setting for the Chrome Browser of SiteKiosk Windows the time is shown in AM/PM format and the date is shown as Month/Day/Year. To change that a quick file edit can be done.

Open the file ..\SiteKiosk\Skins\Chrome_NG_Skin\TrayWnd.html with an editor, e.g. Notepad. Look for these lines:

} else {
	// US
	curDateStr = "" + (curDate.getHours() > 12 ? utils.ensureTrailing0(curDate.getHours() - 12) : utils.ensureTrailing0(curDate.getHours()));
	curDateStr += ":" + utils.ensureTrailing0(curDate.getMinutes(), true);
	curDateStr += (curDate.getHours() >= 12 ? " PM" : " AM");
	curDateStr += "<br />"+utils.ensureTrailing0(curDate.getMonth()+1)+"/"+utils.ensureTrailing0(curDate.getDate())+"/"+utils.ensureTrailing0(curDate.getFullYear());
}

Change the code to:

} else {
	curDateStr = utils.ensureTrailing0(curDate.getHours()) + ":" + utils.ensureTrailing0(curDate.getMinutes(), true);
	curDateStr += "<br />"+utils.ensureTrailing0(curDate.getDate())+"/"+utils.ensureTrailing0(curDate.getMonth()+1)+"/"+utils.ensureTrailing0(curDate.getFullYear());
}

The first line displays the time, the second is the date. Both are assigned to the same variable by way of string concatenation. The string basically contains html code to display the time and date section. Feel free to make changes as you wish.

The above example will change the time and date display to this:

Identifiying Individual SiteKiosk Windows Computers

Identifying individual SiteKiosk Windows computers can be helpful to deliver specific content to these machines. You can use either native JavaScript or the SiteKiosk Object Model to retrieve that information.

To use native JavaScript you need to enable the computer identification feature in the SiteKiosk configuration. When using the SiteKiosk Chrome Browser for example, you can find this feature under Start Page & Browser -> Chrome Browser -> Customize -> Settings -> Computer Identification. Tick the Add SiteKiosk to user agent header option and more importantly the Customize user agent field option.

You can leave the default value $(ComputerName) as this is exactly what we want to work with to identify the SiteKiosk Windows machine. That global variable will be replaced by the individual computer name automatically, so you do not need a separate configuration for each of your SiteKiosk computers. The additional information will be added at the end of the user agent string of the browser seperated by a semicolon.

For the Internet Explorer engine you will find the setting under Start Page & Browser -> Internet Explorer -> Advanced -> Computer Identification.

Here is a simple example for a web page that makes redirects based on the extracted computer name.

<!DOCTYPE html>
<html>
<head>
	<meta charset="UTF-8">
	<script>
		//Get the SiteKiosk computer name by extracting the computer name from the user agent string.
		var SiteKioskComputerName = navigator.userAgent.substring(navigator.userAgent.lastIndexOf(";")+1);
		document.write("SiteKiosk Computer Name: " + SiteKioskComputerName);
		
		var url = "";
		
		//Assign different URLs based on the computer name.
		if (SiteKioskComputerName.includes("SITEKIOSK_COMPUTER_1")){
			url = "https://www.provisio.com/";
		}
		else if (SiteKioskComputerName.includes("SITEKIOSK_COMPUTER_2")){
			url = "https://www.siteremote.net/";
		}
		else{
			//Place code for no matching computer name here.
		}
		
		//Redirect to content for this specific SiteKiosk terminal.
		if (url !== "")
			document.location.href = url;
	</script>
	<title>Check ComputerName with User Agent</title>
</head>
<body>
<!-- Place code for your HTML body here -->
</body>
</html>

The example is using only native HTML and Javascript, so it will work both in SiteKiosk with a Chrome based browser and in SiteKiosk with an Internet Explorer based browser.

If for whatever reason you can't or don't want to use the customized user agent string option, you can also use the SiteKiosk Object Model. Note that the Object Model versions are different for the Chrome and Internet Explorer browser versions of SiteKiosk. The following example is for the Chrome browser version. The SiteKiosk Object Model for use in the Chrome Browser engine of SiteKiosk is still work in progress and does not offer all the features the classic SiteKiosk Object Model for the IE based engine offers. That is why the documentation is only available on request from our support department.

<html>
<head>
	<meta charset="UTF-8">
	<script>
		//Initialize the SiteKiosk Object Model for Chrome.
		(new Function(_siteKiosk.getSiteKioskObjectModelCode()))();
		
		//Get the SiteKiosk computer name by using the SiteKiosk Object Model.
		var SiteKioskComputerName = siteKiosk.system.environment.getVariable("computerName");;
		document.write("SiteKiosk Computer Name: " + SiteKioskComputerName);
		
		var url = "";
		
		//Assign different URLs based on the computer name.
		if (SiteKioskComputerName.includes("SITEKIOSK_COMPUTER_1")){
			url = "https://www.provisio.com/";
		}
		else if (SiteKioskComputerName.includes("SITEKIOSK_COMPUTER_2")){
			url = "https://www.siteremote.net/";
		}
		else{
			//Place code for no matching computer name here.
		}
		
		//Redirect to content for this specific SiteKiosk terminal.
		if (url !== "")
			document.location.href = url;
	</script>
	<title>Check ComputerName with User Agent</title>
</head>
<body>
<!-- Place code for your HTML body here -->
</body>
</html>

As you can see, the difference between this and the user agent variant is quite small. You need to initialize the Object Model and then use the getVariable method to retrieve the computer name.

If using a browser based on the Internet Explorer, please have a look at the documentation for the classic SiteKiosk Object Model. Specifically the ComputerName property.

Note that for security reasons you need to add pages that are using either version of the SiteKiosk Object Model to the list of URLs with SiteKiosk Object Model Permission in the configuration of SiteKiosk under Access/Security.

For a quick working demonstration of the above you may save the examples as HTML pages, put the in the html subfolder of your SiteKiosk directory and set them as the start page of SiteKiosk.

Using the Classic SiteKiosk Object Model in SiteKiosk Windows Chrome Browser

The SiteKiosk Object Model for use in the Chrome Browser engine of SiteKiosk is still work in progress and does not offer all the features the classic SiteKiosk Object Model for the IE based engine offers. That is why the documentation is only available on request from our support department. To make life a little easier during the transition phase the SiteKiosk Object Model for Chrome offers a way to run the classic SiteKiosk Object Model in a wrapper. Note that this undocumented method comes as-is, it will not enable you to use the full range of the classic SiteKiosk Object Model, e.g. you cannot use code related to controlling the browser window as this specifically refers to the IE based browser and event based code will most likely be problematic.

A simple example looks like this:

var myReturnValue = _siteKiosk.objectModel.callHostFunction("system.windows.skLegacy.executeScript", "return SiteKiosk.Version.VersionString;");

The callHostFunction method requires two strings. The first string must always be system.windows.skLegacy.executeScript, the second string is the one we use to execute the classic SiteKiosk Object Model code. This can be a single line of code as it is in this example, where we query the version of SiteKiosk installed on the system. The return value is optional, depending on the executed code there may be no return value.

The second string can also have multiple lines, e.g. like in this example that combines the version of SiteKiosk with the build date:

var scriptText = `
	var SKBuildDate = SiteKiosk.Version.BuildDateTime;
	var SKVersionString = SiteKiosk.Version.VersionString;
	return SKVersionString + " " + SKBuildDate;
`;
var myReturnValue = _siteKiosk.objectModel.callHostFunction("system.windows.skLegacy.executeScript", scriptText);

Finally we want to look at a complete html example that uses methods of the SiteKiosk Multimedia object of the classic object model to manipulate the sound volume of the computer.

<!DOCTYPE html>
<html>
<head>
    <title></title>
	<script>
    //method to initialize the SK Chrome Object Model
    (new Function(_siteKiosk.getSiteKioskObjectModelCode()))();
</script>
</head>
    <body>  
		<input id="id_test0" type="button" value="Volume Up" /><br />
		<input id="id_test1" type="button" value="Volume Down" /><br />
		<input id="id_test2" type="button" value="Volume 50%" /><br />
    </body>
    <script type="text/javascript">
        siteKiosk.ready(function (){
            document.getElementById("id_test0").onclick = function () {
				_siteKiosk.objectModel.callHostFunction("system.windows.skLegacy.executeScript", "SiteKiosk.Multimedia.IncreaseVolume(0.1);");
            };
			document.getElementById("id_test1").onclick = function () {
				_siteKiosk.objectModel.callHostFunction("system.windows.skLegacy.executeScript", "SiteKiosk.Multimedia.DecreaseVolume(0.1);");
            };
			document.getElementById("id_test2").onclick = function () {
				_siteKiosk.objectModel.callHostFunction("system.windows.skLegacy.executeScript", "SiteKiosk.Multimedia.Volume=0.5;");
            };
        }());
    </script>
</html>

You can copy and paste the example to notepad (or another text editor), save it as an html file, e.g. objectmodeltest.html, in the ..\SiteKiosk\html folder. You can then set it as the start page for the Chrome browser of SiteKiosk to see the classic SiteKiosk Object Model at work in the SiteKiosk Chrome browser.

Adding Terms of Use to SiteKiosk Windows and SiteKiosk Android

There are two ways to present terms of use to the user of a SiteKiosk Windows kiosk system, one is also working for SiteKiosk Android. You can either make use of the Fullscreen feature which works in SiteKiosk Windows and SiteKiosk Android or create an overlay by using the SiteKiosk Object Model which works in SiteKiosk Windows only.

1. Fullscreen method (for SiteKiosk Windows and SiteKiosk Android)

The easiest way to present terms of use is to use the Fullscreen feature of SiteKiosk Windows and SiteKiosk Android. Just set your terms of use page as the start page for SiteKiosk.

Under SiteKiosk Windows you then go to Start Page & Browser, click on Fullscreen and set the fullscreen mode for the same URL, you may also select the option to hide the task bar. This works for the Chrome and Internet Explorer browser engines.

Under SiteKiosk Android you go to Application -> Browser -> Fullscreen Zones and also set your start page (which is your terms of use page) to be displayed in fullscreen mode.

Your terms of use page can be stored locally or online. The code for the terms of use page should include on option to accept the terms. If this option is selected the code of the terms of use page simply navigates to a different URL, which is then shown with the normal browser elements.

Sample code for such a page can look like this:

<!DOCTYPE html>
<html>
<meta charset="utf-8">
<head>
<script>
	//Terms of use accepted, close the dialog
    function acceptTermsofuse() {
        document.location = "https://www.provisio.com/";
	}
</script>
</head>
<body style="text-align:center;"> 
	Use at your own risk <input type="button" value="OK" onclick="acceptTermsofuse();" />
</body>
</html>

2. Overlay method (for SiteKiosk Windows only)

The other method to show terms of use is to use an overlay over your start page. This can be done by using the SiteKiosk Object Model. First we will create a javascript file, that shows the overlay with the help of the CreateHTMLDialog method. It also shows or hides the overlay on different events (please see the SiteKiosk Object Model documentation for further information). The code for this script file looks like this:

//Initialization of the terms of use dialog
var termsofuseDialog = SiteKiosk.SiteKioskUI.CreateHTMLDialog();
//Path to the terms of use page, this does not have to be local
termsofuseDialog.URL = SiteKiosk.SiteKioskDirectory + "Html/termsofuse.html";
termsofuseDialog.Parent = SiteKiosk.WindowList.MainWindow.Handle;
termsofuseDialog.TopMostWindow = true;
termsofuseDialog.Closable = false;
termsofuseDialog.Title = false;
termsofuseDialog.Border = true;
termsofuseDialog.Scrollbars = false;
termsofuseDialog.Sysmenu = false;
termsofuseDialog.Type = "TERMSOFUSE";
termsofuseDialog.Height = 800;
termsofuseDialog.Width = 1200;
termsofuseDialog.CloseOnInput = false;

//Function that calls the terms of use dialog
function showWindowDelay(){
	termsofuseDialog.ShowModal();
}

//Function that closes the terms of use dialog
function closeDialog(){
	try{
		SiteKiosk.SiteKioskUI.CloseHtmlDialogs('TERMSOFUSE');
	}
	catch(e){}
}

//Show the terms of use dialog when the screensaver ends
SiteKiosk.ScreenSaver.OnScreenSaverEnd = OnScreenSaverEnd;
function OnScreenSaverEnd(){
	SiteKiosk.Scheduler.AddDelayedEvent(1000, showWindowDelay);
}

//Close the terms of use dialog when the screensaver begins
SiteKiosk.ScreenSaver.OnScreenSaverBegin = OnScreenSaverBegin;
function OnScreenSaverBegin(){
	SiteKiosk.Scheduler.AddDelayedEvent(2000, closeDialog);
}

//Show the terms of use dialog when someone uses the logout button
SiteKiosk.OnReset = OnReset;
function OnReset(){
	//Make sure the screensaver is not running
	if (SiteKiosk.ScreenSaver.Active === false){
		SiteKiosk.SiteKioskUI.CloseHtmlDialogs('TERMSOFUSE');
		SiteKiosk.Scheduler.AddDelayedEvent(1000, showWindowDelay);
	}
}

//Show the terms of use dialog when SiteKiosk starts
OnReset();

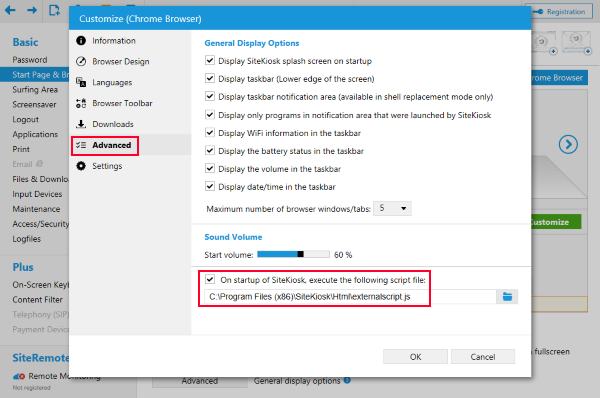
You can copy and paste the code and save it as a .js file. Put the file into the ..\SiteKiosk\html folder and then add it as an external script to SiteKiosk. For both Internet Explorer and Chrome this is under Start Page & Browser -> Advanced. The following image shows the setting for the Chrome browser engine:

For the actual terms of use page you have two options. The first option does not require any specific code within the terms of use page. Just change the line termsofuseDialog.CloseOnInput = false; to termsofuseDialog.CloseOnInput = true; and any user input, e.g. mouse click, will close the overlay. The second option requires to add SiteKiosk Object Model code to the terms of use page. It makes use of the CloseHtmlDialogs method to close the overlay when the user accepts the terms. Here is a code example of how this can look:

<!DOCTYPE html>
<html>
<meta charset="utf-8">
<head>
<script>
	//SiteKiosk Object Model initialization
	window.external.InitScriptInterface();
			
	//Terms of use accepted, close the dialog
    function acceptTermsofuse() {
        SiteKiosk.SiteKioskUI.CloseHtmlDialogs('TERMSOFUSE');
	}
</script>
</head>
<body style="text-align:center;background-color:red;"> 
	Use at your own risk <input type="button" value="OK" onclick="acceptTermsofuse();" />
</body>
</html>

The page can be stored locally under ..\SiteKiosk\html or online. When you store it online or under another local path, you will need to give the URL script permission in the SiteKiosk configuration under Access/Security. Just make sure the line termsofuseDialog.URL = SiteKiosk.SiteKioskDirectory + "Html/termsofuse.html"; from the script above contains the correct path to your terms of use page.

Here is a picture of the above example code at work while using the Chrome browser engine of SiteKiosk Windows:

How to Build an Extended Script Watchdog for External Applications

This time we are going to have a second look at a script watchdog for an external application. The first time we have learned how to monitor an external application and start it again, if it has been closed. Due to some customer requests based on that script watchdog, we are now going to enhance the script by also monitoring if the application has been minimized.

Before you start writing your own script for a SiteKiosk application watchdog please note that you can have SiteKiosk autostart an application and restart it after logout or screensaver activity by just configuring this behaviour in the SiteKiosk configuration. Go to Applications, click Add and select that SiteKiosk starts the application automatically.

The script we are about to create comes in handy, if you want the application to run permanently and you also want it to stay maximized. Whether or not an application can be closed or minimized is beyond what SiteKiosk can directly control, its based on what the original code of the application itself allows. If you have control of that code you should alter it, to prevent the user from doing these things if you do not want that. The script watchdog can take action if you cannot control the code of the application.

The script uses the SiteKiosk Object Model. As it is going to be a an external script and not part of the code of a website it will run with both IE- and Chrome-based versions of SiteKiosk.

We will add the monitoring for minimization of the application to the existing script that already monitors if the application is running. Please refer to the original post to learn more about that part of the code.

First we will add the OnInsert event and a global variable for the object required to handle our application. If OnInsert fires and the title of the application window matches the application to be monitored, we will assign the window object we receive through the event to the global object variable gk_skwin.

...
SiteKiosk.WindowList.OnInsert = OnInsert; //fires if a windows is inserted

var gk_skwin; //global variable for the window object to monitor the application

...
 
function OnInsert(skwin){
	//check if our application has been started
	if(skwin.ItemText === "WindowTitleOfApplicationToWatch"){
        gk_skwin = skwin; //application has been started, assign returned window object to global variable
	}
}
...

The next step is to add a periodic event that will check if our application has been minimized. The check runs every 5000 milliseconds. You can change the time to your liking.

SiteKiosk.Scheduler.AddPeriodicEvent(5000, CheckAppIsMinimized);

The CheckAppIsMinimized function called by the periodic event uses the IsMinimized method to check the application by using the handle from the global object that represents the monitored application. If the monitoried application is minimized, the Maximize method is called to maximize it again.

function CheckAppIsMinimized(){
   //use try/catch in case our application is not started and can therefore not be monitored
   try{
		//check if application is minimized
		if(SiteKiosk.WindowList.IsMinimized(gk_skwin.Handle)){
			//maximize the minimzed application
			SiteKiosk.WindowList.Maximize(gk_skwin.Handle);
		}
   }catch(e){}
}

If we put the code together we will get the follwing script. It uses Notepad to demonstrate its usability. Please note that the script could be a lot more elegant in handling the task at hand but has been kept as straight forward as possible for the purpose of this demonstration

SiteKiosk.WindowList.OnRemove = OnRemove; //fires if a window has been closed
SiteKiosk.WindowList.OnInsert = OnInsert; //fires if a windows is inserted

var gk_skwin; //global variable for the window object to monitor the application

SiteKiosk.Scheduler.AddDelayedEvent(5000, StartMyApp); //starts the desired application the first time after 5000 ms
SiteKiosk.Scheduler.AddPeriodicEvent(5000, CheckAppIsMinimized); //monitors whether application is minimzed every 5000 ms
 
function StartMyApp(){
    SiteKiosk.ExternalApps.Run("c:\\windows\\notepad.exe", true);
}

function OnInsert(skwin){
	//check if our application has been started
	if(skwin.ItemText === "Untitled - Editor"){
        gk_skwin = skwin; //application has been started, assign returned window object to global variable
	}
}
 
function OnRemove(skwin){
    //checks if the application that should run has been closed
    if(skwin.ItemText === "Untitled - Editor"){
        //the application has been closed, restart it again
        SiteKiosk.Scheduler.AddDelayedEvent(500, StartMyApp); //starts the desired application the next time after 500 ms
    }
}

function CheckAppIsMinimized(){
   //use try/catch in case our application is not started and can therefore not be monitored
   try{
		//check if application is minimized
		if(SiteKiosk.WindowList.IsMinimized(gk_skwin.Handle)){
			//maximize the minimzed application
			SiteKiosk.WindowList.Maximize(gk_skwin.Handle);
		}
   }catch(e){}
}

Copy and paste the script into an editor and save it as a javascript file (.js). It is recommended to store it in the ..\SiteKiosk\html folder, to make sure the SiteKiosk user can access it in Autostart mode.

To run the watchdog script with SiteKiosk, open the configuration, go to Start Page & Browser, select your browser engine and click on Advanced. Add the script to be executed on startup of SiteKiosk.

Creating Custom SiteKiosk and Windows Control Elements for the Start Screen

The HTML Widget of the SiteKiosk Start Screen allows you to create custom buttons with your own HTML code. This helps you to create a vast amount of individual features that you can add to your Start Screen.

To demonstrate some of the functionalities you can add, we will create elements that will enable the user to initiate a SiteKiosk restart and logout as well as a Windows logout, shutdown and restart.

Because the design of the SiteKiosk Start Screen is Chrome-based, it uses the new SiteKiosk Object Model for Chrome. This Object Model is still in the making, the most current state of the preliminary documentation can be obtained through our support department. Interested developers can just send us a short email.

To create an HTML Widget, go to the Start Screen Editor in the SiteKiosk configuration (Start Page & Browser -> Select the Start Screen -> Click on Customize -> Start Screen Editor -> Open Editor). Select the blank by default Template 3 and choose to add a new element. Select HTML Widget.

After the new widget has been created, use the edit button to open the properties dialog. On the HTML page you can overwrite the default example code with the custom HTML code.

Let us start with an element that does a SiteKiosk Logout. This is the code needed for it:

<script type="text/javascript">
    function DoSiteKioskLogout() {
        parent.siteKiosk.logout();
    }
</script>
<div style="background-color:FF235A;height:100%;padding:10px;font-family:Arial;cursor:pointer;" onclick="DoSiteKioskLogout();">
	<div style="height:100%;width:100%;font-size:30px;text-align:center;margin-top:42%;">SiteKiosk<br/>Logout</div>
</div>

You can copy and paste it into the HTML editor of the widget. The div tags are used to design the element. Clicking on the main div will call the DoSiteKioskLogout method. This method calls the siteKiosk.logout() method from the SiteKiosk Object Model. Note the leading parent, this is required to access the SiteKiosk Object Model that has already been initialized by the Start Screen, which is the parent of the HTML Widget element.

Next is a SiteKiosk Restart:

<script type="text/javascript">
    function DoSiteKioskRestart() {
        parent.siteKiosk.restart();
    }
</script>
<div style="background-color:1EFF47;height:100%;padding:10px;font-family:Arial;cursor:pointer;" onclick="DoSiteKioskRestart();">
	<div style="height:100%;width:100%;font-size:30px;text-align:center;margin-top:3%;">SiteKiosk<br/>Restart</div>
</div>

You will note that most of the code is the same as before. This is true for all of the five elements we will create in this example. Besides some changes in the CSS to give the element a different look, it calls the DoSiteKioskRestart method which calls siteKiosk.restart() from the SiteKiosk Object Model to execute the restart of the SiteKiosk application.

The last three elements will perform Windows tasks. The code for a Windows Logoff looks like this:

<script type="text/javascript">
    function DoWindowsLogoff() {
        parent.siteKiosk.system.logoff();
    }
</script>
<div style="background-color:FFEC21;height:100%;padding:10px;font-family:Arial;cursor:pointer;" onclick="DoWindowsLogoff();">
	<div style="height:100%;width:100%;font-size:30px;text-align:center;margin-top:3%;">Windows<br/>Logoff</div>
</div>

Clicking this element will logoff the current Windows user and present the Windows login screen. It uses the siteKiosk.system.logoff() mehtod.

A Windows Shutdown will be executed with this code added to an HTML Widget element:

<script type="text/javascript">
    function DoWindowsShutdown() {
        parent.siteKiosk.system.shutdown();
    }
</script>
<div style="background-color:DB28FF;height:100%;padding:10px;font-family:Arial;cursor:pointer;" onclick="DoWindowsShutdown();">
	<div style="height:100%;width:100%;font-size:30px;text-align:center;margin-top:42%;">Windows<br/>Shutdown</div>
</div>

The siteKiosk.system.shutdown() from the SiteKiosk Object Model is used here.

The final example will do a Windows Restart with the help of these lines:

<script type="text/javascript">
    function DoWindowsRestart() {
        parent.siteKiosk.system.restart();
    }
</script>
<div style="background-color:2DA7FF;height:100%;padding:10px;font-family:Arial;cursor:pointer;" onclick="DoWindowsRestart();">
	<div style="height:100%;width:100%;font-size:30px;text-align:center;margin-top:3%;">Windows<br/>Restart</div>
</div>

siteKiosk.system.restart() is the method of the SiteKiosk Object Model that comes into play for this task.

If you add all five examples to the Template 3 and save the configuration, you will get this colorful result when starting SiteKiosk.

Using the External Script Option of SiteKiosk to Automate Processes

SiteKiosk allows you to run an external script, that you can use to automate processes within SiteKiosk. The external script can contain the SiteKiosk Object Model as well as Wsript. That enables you to script a broad spectrum of tasks.

The example we want to build, will demonstrate an automated Gmail login, that will work with the IE and Chrome browser engines of SiteKiosk.

Our example code looks like this:

//Helper variable to prevent multiple SendKeys at once
var currently_sending_keys = false;

//Initialization of the WScript Shell object used for sending keys
var objShell = new ActiveXObject("WScript.Shell");

//OnMessage event fired by the browser used to start looking for the login page
SiteKiosk.Logfile.OnMessage = OnMessage;

//Handling the OnMessage event
function OnMessage(seq, time, utcoff, awtype, awlevel, facility, text){  
   //Check the navigation to identify the login page and whether the script is already sending keys
   if((text === "Navigation: http://www.gmail.com/" || text === "Navigation: http://gmail.com/") && !currently_sending_keys){
	   //Start sending keys so set the helper variable to true
	   currently_sending_keys = true;
	   //Wait a short period of time to give the page time to load and then send the user name
	   SiteKiosk.Scheduler.AddDelayedEvent(1500, SendTheUsername);
   }
}

//Send the user name
function SendTheUsername(eventID){
	objShell.SendKeys("username@gmail.com");
	objShell.SendKeys("{enter}");
	//Wait a short period of time to give the page time to the password part and then send the password
	SiteKiosk.Scheduler.AddDelayedEvent(1500, SendThePassword);
}

//Send the password
function SendThePassword(eventID){
	objShell.SendKeys("password");
	objShell.SendKeys("{enter}");
	//We are done sending keys so set the helper variable to false
	currently_sending_keys = false;
}

Let us have a closer look at some parts of the script.

...
//Handling the OnMessage event
function OnMessage(seq, time, utcoff, awtype, awlevel, facility, text){  
   //Check the navigation to identify the login page and whether the script is already sending keys
   if((text === "Navigation: http://www.gmail.com/" || text === "Navigation: http://gmail.com/") && !currently_sending_keys){
...

The script uses the OnMessage event of the SiteKiosk Object Model to track navigations. If it finds matching navigations to either www.gmail.com or gmail.com and it is currently not sending keys it triggers the automated login.

...
SiteKiosk.Scheduler.AddDelayedEvent(1500, SendTheUsername);
...

Utilizing the AddDelayedEvent method, the script gives the page some time to load. You may need to adjust the time depending on your Internet connection. The function to send the first set of keys for the user name of the Gmail login process is called next.

...
objShell.SendKeys("username@gmail.com");
...

The SendKeys method of the WScript Shell object is used to send key strokes to the browser. First the user name, then the enter key to trigger the password request. Finally the script starts a similar process for the password input mask.

Save the above example code as a javascript file (e.g. automated_gmail_login.js), preferably in the html subfolder of your SiteKiosk installation. Now in the SiteKiosk configuration you have to add the file as an external script. Go to Start Page & Browser and click on the Advanced button. Now you can tick the option that SiteKiosk should execute the script on startup.

Save the configuration and for testing purposes use the Run Once Mode of SiteKiosk. Type in gmail.com or www.gmail.com in the address field of the SiteKiosk browser. The script will attempt to make an automated login with the provided user name and password. Note that the above example script may stop working if the Gmail page layout changes.

Debugging Webpages in the SiteKiosk Windows Chrome Browser

When you are using the SiteKiosk Windows Chrome Browser you can activate the Chrome DevTools to debug web pages in SiteKiosk.

To activate this option, you need to create an empty text file with the file name debug.txt. This file must be placed in the folder ..\SiteKiosk\Chromium\.

When you start SiteKiosk with the Chrome Browser engine after that change, you can click on the browser pane of SiteKiosk and hit the F11 button to open up the Chrome DevTools window.

Remember to delete or rename the debug.txt file after you are done with debugging.