Using the SiteKiosk Object Model in SiteCaster

The PROVISIO Developer Blog has many examples of how to use the SiteKiosk Object Model in the browsers of SiteKiosk Windows and SiteKiosk Android or as an external script in SiteKiosk Windows. This time we will look at a short example that shows you how to use the Object Model in SiteCaster as well.

Because SiteCaster is Chrome-based, it uses the new SiteKiosk Object Model for Chrome. This Object Model is still in the making, the most current state of the preliminary documentation can be obtained through our support department. Interested developers can just send us a short email.

The example code is for SiteKiosk Windows and will show you how you can start an external application from a SiteCaster element.

The first step is to create an html page that will open an application by using the SiteKiosk Object Model. The code for the simple test web page looks like this:

<!DOCTYPE html>
<html>
<head>
    <title></title>
	<script>
    //method to initialize the SK Object Model for SiteKiosk Windows (Chrome) and SiteKiosk Android
    (new Function(_siteKiosk.getSiteKioskObjectModelCode()))();
</script>
</head>
    <body style="margin:0px;text-align:center;background-color:#FFD932;">
        <input id="id_test" type="button" value="Test" style="margin-top:50px;" />
    </body>
    <script type="text/javascript">
        siteKiosk.ready(function (){
             document.getElementById("id_test").onclick = function () {dotest();};
             
            function dotest(){
                //will only work in SiteKiosk Windows and open the specified application
				siteKiosk.system.windows.skLegacy.externalApps.run("C:\\Program Files (x86)\\Notepad++\\notepad++.exe", false); 
            }
        }());
    </script>
</html>

You need to initialize the SiteKiosk Object Model by running _siteKiosk.getSiteKioskObjectModelCode(). The method siteKiosk.system.windows.skLegacy.externalApps.run(path,checkifalreadyrunning) will start the specified application. The first parameter is a string containing the path (and optional start parameters) to the local application on the machine SiteCaster is running on. The second parameter is a boolean value that specifies whether SiteKiosk should check if the application is alreay running or start additional instances. The page can either be stored locally on the machine where SiteCaster is running or on a web server. Either way, you need to make sure that the URL or path of the file has been added in the SiteCaster configuration of SiteKiosk as an URL with script permission.

The second step is to add the page to SiteCaster. Go to your SiteCaster team and either edit an existing project or create a new one. In this example I use the Start Screen template and add a new Webpage element to the left of the existing center elements.

Step three is publishing the project to the assigned machines where you can then push a button to start a local Windows application from SiteCaster.

Note that depending on the nature of the started application you might want to consider making additional configuration and/or script changes to handle closing the application or allowing/blocking certain dialogs of the application.

How to Build an Extended Script Watchdog for External Applications

This time we are going to have a second look at a script watchdog for an external application. The first time we have learned how to monitor an external application and start it again, if it has been closed. Due to some customer requests based on that script watchdog, we are now going to enhance the script by also monitoring if the application has been minimized.

Before you start writing your own script for a SiteKiosk application watchdog please note that you can have SiteKiosk autostart an application and restart it after logout or screensaver activity by just configuring this behaviour in the SiteKiosk configuration. Go to Applications, click Add and select that SiteKiosk starts the application automatically.

The script we are about to create comes in handy, if you want the application to run permanently and you also want it to stay maximized. Whether or not an application can be closed or minimized is beyond what SiteKiosk can directly control, its based on what the original code of the application itself allows. If you have control of that code you should alter it, to prevent the user from doing these things if you do not want that. The script watchdog can take action if you cannot control the code of the application.

The script uses the SiteKiosk Object Model. As it is going to be a an external script and not part of the code of a website it will run with both IE- and Chrome-based versions of SiteKiosk.

We will add the monitoring for minimization of the application to the existing script that already monitors if the application is running. Please refer to the original post to learn more about that part of the code.

First we will add the OnInsert event and a global variable for the object required to handle our application. If OnInsert fires and the title of the application window matches the application to be monitored, we will assign the window object we receive through the event to the global object variable gk_skwin.

...
SiteKiosk.WindowList.OnInsert = OnInsert; //fires if a windows is inserted

var gk_skwin; //global variable for the window object to monitor the application

...
 
function OnInsert(skwin){
	//check if our application has been started
	if(skwin.ItemText === "WindowTitleOfApplicationToWatch"){
        gk_skwin = skwin; //application has been started, assign returned window object to global variable
	}
}
...

The next step is to add a periodic event that will check if our application has been minimized. The check runs every 5000 milliseconds. You can change the time to your liking.

SiteKiosk.Scheduler.AddPeriodicEvent(5000, CheckAppIsMinimized);

The CheckAppIsMinimized function called by the periodic event uses the IsMinimized method to check the application by using the handle from the global object that represents the monitored application. If the monitoried application is minimized, the Maximize method is called to maximize it again.

function CheckAppIsMinimized(){
   //use try/catch in case our application is not started and can therefore not be monitored
   try{
		//check if application is minimized
		if(SiteKiosk.WindowList.IsMinimized(gk_skwin.Handle)){
			//maximize the minimzed application
			SiteKiosk.WindowList.Maximize(gk_skwin.Handle);
		}
   }catch(e){}
}

If we put the code together we will get the follwing script. It uses Notepad to demonstrate its usability. Please note that the script could be a lot more elegant in handling the task at hand but has been kept as straight forward as possible for the purpose of this demonstration

SiteKiosk.WindowList.OnRemove = OnRemove; //fires if a window has been closed
SiteKiosk.WindowList.OnInsert = OnInsert; //fires if a windows is inserted

var gk_skwin; //global variable for the window object to monitor the application

SiteKiosk.Scheduler.AddDelayedEvent(5000, StartMyApp); //starts the desired application the first time after 5000 ms
SiteKiosk.Scheduler.AddPeriodicEvent(5000, CheckAppIsMinimized); //monitors whether application is minimzed every 5000 ms
 
function StartMyApp(){
    SiteKiosk.ExternalApps.Run("c:\\windows\\notepad.exe", true);
}

function OnInsert(skwin){
	//check if our application has been started
	if(skwin.ItemText === "Untitled - Editor"){
        gk_skwin = skwin; //application has been started, assign returned window object to global variable
	}
}
 
function OnRemove(skwin){
    //checks if the application that should run has been closed
    if(skwin.ItemText === "Untitled - Editor"){
        //the application has been closed, restart it again
        SiteKiosk.Scheduler.AddDelayedEvent(500, StartMyApp); //starts the desired application the next time after 500 ms
    }
}

function CheckAppIsMinimized(){
   //use try/catch in case our application is not started and can therefore not be monitored
   try{
		//check if application is minimized
		if(SiteKiosk.WindowList.IsMinimized(gk_skwin.Handle)){
			//maximize the minimzed application
			SiteKiosk.WindowList.Maximize(gk_skwin.Handle);
		}
   }catch(e){}
}

Copy and paste the script into an editor and save it as a javascript file (.js). It is recommended to store it in the ..\SiteKiosk\html folder, to make sure the SiteKiosk user can access it in Autostart mode.

To run the watchdog script with SiteKiosk, open the configuration, go to Start Page & Browser, select your browser engine and click on Advanced. Add the script to be executed on startup of SiteKiosk.

Creating Custom SiteKiosk and Windows Control Elements for the Start Screen

The HTML Widget of the SiteKiosk Start Screen allows you to create custom buttons with your own HTML code. This helps you to create a vast amount of individual features that you can add to your Start Screen.

To demonstrate some of the functionalities you can add, we will create elements that will enable the user to initiate a SiteKiosk restart and logout as well as a Windows logout, shutdown and restart.

Because the design of the SiteKiosk Start Screen is Chrome-based, it uses the new SiteKiosk Object Model for Chrome. This Object Model is still in the making, the most current state of the preliminary documentation can be obtained through our support department. Interested developers can just send us a short email.

To create an HTML Widget, go to the Start Screen Editor in the SiteKiosk configuration (Start Page & Browser -> Select the Start Screen -> Click on Customize -> Start Screen Editor -> Open Editor). Select the blank by default Template 3 and choose to add a new element. Select HTML Widget.

After the new widget has been created, use the edit button to open the properties dialog. On the HTML page you can overwrite the default example code with the custom HTML code.

Let us start with an element that does a SiteKiosk Logout. This is the code needed for it:

<script type="text/javascript">
    function DoSiteKioskLogout() {
        parent.siteKiosk.logout();
    }
</script>
<div style="background-color:FF235A;height:100%;padding:10px;font-family:Arial;cursor:pointer;" onclick="DoSiteKioskLogout();">
	<div style="height:100%;width:100%;font-size:30px;text-align:center;margin-top:42%;">SiteKiosk<br/>Logout</div>
</div>

You can copy and paste it into the HTML editor of the widget. The div tags are used to design the element. Clicking on the main div will call the DoSiteKioskLogout method. This method calls the siteKiosk.logout() method from the SiteKiosk Object Model. Note the leading parent, this is required to access the SiteKiosk Object Model that has already been initialized by the Start Screen, which is the parent of the HTML Widget element.

Next is a SiteKiosk Restart:

<script type="text/javascript">
    function DoSiteKioskRestart() {
        parent.siteKiosk.restart();
    }
</script>
<div style="background-color:1EFF47;height:100%;padding:10px;font-family:Arial;cursor:pointer;" onclick="DoSiteKioskRestart();">
	<div style="height:100%;width:100%;font-size:30px;text-align:center;margin-top:3%;">SiteKiosk<br/>Restart</div>
</div>

You will note that most of the code is the same as before. This is true for all of the five elements we will create in this example. Besides some changes in the CSS to give the element a different look, it calls the DoSiteKioskRestart method which calls siteKiosk.restart() from the SiteKiosk Object Model to execute the restart of the SiteKiosk application.

The last three elements will perform Windows tasks. The code for a Windows Logoff looks like this:

<script type="text/javascript">
    function DoWindowsLogoff() {
        parent.siteKiosk.system.logoff();
    }
</script>
<div style="background-color:FFEC21;height:100%;padding:10px;font-family:Arial;cursor:pointer;" onclick="DoWindowsLogoff();">
	<div style="height:100%;width:100%;font-size:30px;text-align:center;margin-top:3%;">Windows<br/>Logoff</div>
</div>

Clicking this element will logoff the current Windows user and present the Windows login screen. It uses the siteKiosk.system.logoff() mehtod.

A Windows Shutdown will be executed with this code added to an HTML Widget element:

<script type="text/javascript">
    function DoWindowsShutdown() {
        parent.siteKiosk.system.shutdown();
    }
</script>
<div style="background-color:DB28FF;height:100%;padding:10px;font-family:Arial;cursor:pointer;" onclick="DoWindowsShutdown();">
	<div style="height:100%;width:100%;font-size:30px;text-align:center;margin-top:42%;">Windows<br/>Shutdown</div>
</div>

The siteKiosk.system.shutdown() from the SiteKiosk Object Model is used here.

The final example will do a Windows Restart with the help of these lines:

<script type="text/javascript">
    function DoWindowsRestart() {
        parent.siteKiosk.system.restart();
    }
</script>
<div style="background-color:2DA7FF;height:100%;padding:10px;font-family:Arial;cursor:pointer;" onclick="DoWindowsRestart();">
	<div style="height:100%;width:100%;font-size:30px;text-align:center;margin-top:3%;">Windows<br/>Restart</div>
</div>

siteKiosk.system.restart() is the method of the SiteKiosk Object Model that comes into play for this task.

If you add all five examples to the Template 3 and save the configuration, you will get this colorful result when starting SiteKiosk.

Using the External Script Option of SiteKiosk to Automate Processes

SiteKiosk allows you to run an external script, that you can use to automate processes within SiteKiosk. The external script can contain the SiteKiosk Object Model as well as Wsript. That enables you to script a broad spectrum of tasks.

The example we want to build, will demonstrate an automated Gmail login, that will work with the IE and Chrome browser engines of SiteKiosk.

Our example code looks like this:

//Helper variable to prevent multiple SendKeys at once
var currently_sending_keys = false;

//Initialization of the WScript Shell object used for sending keys
var objShell = new ActiveXObject("WScript.Shell");

//OnMessage event fired by the browser used to start looking for the login page
SiteKiosk.Logfile.OnMessage = OnMessage;

//Handling the OnMessage event
function OnMessage(seq, time, utcoff, awtype, awlevel, facility, text){  
   //Check the navigation to identify the login page and whether the script is already sending keys
   if((text === "Navigation: http://www.gmail.com/" || text === "Navigation: http://gmail.com/") && !currently_sending_keys){
	   //Start sending keys so set the helper variable to true
	   currently_sending_keys = true;
	   //Wait a short period of time to give the page time to load and then send the user name
	   SiteKiosk.Scheduler.AddDelayedEvent(1500, SendTheUsername);
   }
}

//Send the user name
function SendTheUsername(eventID){
	objShell.SendKeys("username@gmail.com");
	objShell.SendKeys("{enter}");
	//Wait a short period of time to give the page time to the password part and then send the password
	SiteKiosk.Scheduler.AddDelayedEvent(1500, SendThePassword);
}

//Send the password
function SendThePassword(eventID){
	objShell.SendKeys("password");
	objShell.SendKeys("{enter}");
	//We are done sending keys so set the helper variable to false
	currently_sending_keys = false;
}

Let us have a closer look at some parts of the script.

...
//Handling the OnMessage event
function OnMessage(seq, time, utcoff, awtype, awlevel, facility, text){  
   //Check the navigation to identify the login page and whether the script is already sending keys
   if((text === "Navigation: http://www.gmail.com/" || text === "Navigation: http://gmail.com/") && !currently_sending_keys){
...

The script uses the OnMessage event of the SiteKiosk Object Model to track navigations. If it finds matching navigations to either www.gmail.com or gmail.com and it is currently not sending keys it triggers the automated login.

...
SiteKiosk.Scheduler.AddDelayedEvent(1500, SendTheUsername);
...

Utilizing the AddDelayedEvent method, the script gives the page some time to load. You may need to adjust the time depending on your Internet connection. The function to send the first set of keys for the user name of the Gmail login process is called next.

...
objShell.SendKeys("username@gmail.com");
...

The SendKeys method of the WScript Shell object is used to send key strokes to the browser. First the user name, then the enter key to trigger the password request. Finally the script starts a similar process for the password input mask.

Save the above example code as a javascript file (e.g. automated_gmail_login.js), preferably in the html subfolder of your SiteKiosk installation. Now in the SiteKiosk configuration you have to add the file as an external script. Go to Start Page & Browser and click on the Advanced button. Now you can tick the option that SiteKiosk should execute the script on startup.

Save the configuration and for testing purposes use the Run Once Mode of SiteKiosk. Type in gmail.com or www.gmail.com in the address field of the SiteKiosk browser. The script will attempt to make an automated login with the provided user name and password. Note that the above example script may stop working if the Gmail page layout changes.

Debugging Webpages in the SiteKiosk Windows Chrome Browser

When you are using the SiteKiosk Windows Chrome Browser you can activate the Chrome DevTools to debug web pages in SiteKiosk.

To activate this option, you need to create an empty text file with the file name debug.txt. This file must be placed in the folder ..\SiteKiosk\Chromium\.

When you start SiteKiosk with the Chrome Browser engine after that change, you can click on the browser pane of SiteKiosk and hit the F11 button to open up the Chrome DevTools window.

Remember to delete or rename the debug.txt file after you are done with debugging.

How to Use a Proxy Auto-Config File with SiteKiosk Windows

This time, we will have a look at the different ways to use a proxy auto-config (PAC) file with SiteKiosk.

There are two different methods, depending on the SiteKiosk browser engine you plan to use. No matter which engine you are using, you need to disable the Use proxy server setting of SiteKiosk, otherwise SiteKiosk will use the proxy settings defined in its configuration file instead of those from the PAC file.

When you are using the Internet Explorer engine, SiteKiosk uses the Microsoft IE settings, including a PAC file assigned there. Note that the IE settings are user dependent, so make sure to make these settings within the Internet Explorer of the user you want to run SiteKiosk with.

When you are using the Chrome Browser engine, you need to add your PAC file manually to the configuration of SiteKiosk. Open your SiteKiosk configuration with an editor like notepad. Search for this line:

"showTaskBar": true,

Add these lines right before the showTaskBar line:

"browserEngine": {
       "commandLineArguments": {
           "set": ["proxy-pac-url=urlzuihrerpacdatei"],
           "remove": []
       }
   },

It should look like this:

…
"system": {
    "password": {
      "enabled": false
    },
    "browserEngine": {
       "commandLineArguments": {
           "set": ["proxy-pac-url=UrlToYourPacFile"],
           "remove": []
       }
	},
    "showTaskBar": true,
    "userAgent": {
…

Of course you need to change UrlToYourPacFile to the actual path to your PAC file, e.g. something like file://C:/mylocalpacfile/proxy.pac or http://192.168.99.1:8088/proxy.pac. The configuration part would then look like this:

…
"system": {
    "password": {
      "enabled": false
    },
    "browserEngine": {
       "commandLineArguments": {
           "set": ["proxy-pac-url=file://C:/mylocalpacfile/proxy.pac"],
           "remove": []
       }
    },
    "showTaskBar": true,
    "userAgent": {
…

Please note that the content filter of SiteKiosk does not support using PAC files. Please use the proxy configuration settings of SiteKiosk instead.

Specifically Deny Downloads of Certain File Types

SiteKiosk enables you to only allow the download of certain file types only. You can do this in the configuration editor under Files & Downloads. In rare cases you might need to do the opposite, because you only want to block a handful of file types instead of allowing only a handful of file types.

There are two different ways to achieve this. In both cases you would generally allow downloads in the configuration of SiteKiosk under Files & Downloads. Then, one option is to use the Surfing Area settings. Just create deny entries for each file type you want to block. Use * for the protocol and *.filetypetoblock (e.g. *.zip) for the URL. This only works if the download is a direct link to the file.

The second option applies to the IE engine of SiteKiosk only. You can edit the file ..\SiteKiosk\xml\downloadmanager.xml with a text editor (e.g. Notepad). In the file there is a file extension list that already includes a number of default entries. Just add additional entries for the file types you want to block and set both the values for download and for open to 0. Just like this:

<extension name='zip' download='0' open='0'/>

This tells SiteKiosk to neither download nor open the file. Place the entries at the end of the existing list. You may also edit an existing entry. Make sure to not use the same extension twice, SiteKiosk will only use the first match in the list.

<extension-list>
	<extension name='exe' download='2' open='0'/>
	<extension name='dll' download='2' open='0'/>
	<extension name='htm' download='1' open='2'/>
	<extension name='html' download='1' open='2'/>
	<extension name='pdf' download='2' open='1'/>
	<extension name='jpg' download='2' open='2'/>
	<extension name='gif' download='2' open='2'/>
	<extension name='png' download='2' open='2'/>
	<extension name='txt' download='2' open='2'/>
	<extension name='zip' download='0' open='0'/>
</extension-list>

This will block matching download attempts in SiteKiosk.

Using the Blackboard Information Page on a SiteRemote Server

NOTE: This only applies to customers running their own SiteRemote Server (5.2 and above).

The Blackboard is used by the SiteRemote Server and the SiteKiosk Windows and SiteKiosk Android clients to exchange some internal information. There have been two Developer Blog posts (SiteKiosk Windows, SiteKiosk Android) that have shown how this information can be used on a client with the help of the SiteKiosk Object Model. This post will show how to view all available Blackboard information of a single client machine by adding a page to the teams of a SiteRemote Server. This also enables you to easily search the Blackboard information.

Please be aware that the Blackboard information is limited in its use for purposes other than the internal processes of the SiteRemote server and client communication, under specific project circumstances the option to use it might still be very helpful.

To add the Blackboard page to teams on your SiteRemote Server version 6.1 or higher, go to the Settings page of the SiteRemote Server Administration and check the option Show Blackboard information page per machine and Blackboard machine list filter settings on Team settings page. Save the change. Note that in SiteRemote Server version 6.1 or higher, this will also provide you with the option to create your own machine list blackboard filters. Go to the Administration -> Settings page in a SiteRemote team and look for the Machine List Settings. There you can create machine list filters that search through the blackboard entries of machines.

To add the Blackboard page to teams on your SiteRemote Server version 5.2 to 6.0, you need to edit the file ..\PROVISIO\SiteRemote\Web\Web.sitemap. Open it with an editor and look for these lines:

<siteMapNode url="terminal/logs/view.aspx" title="$(String:683)" accesstype="LogFileTab" displayTreeView="true">
	<siteMapNode url="terminal/logs/createexport.aspx" displayTreeView="true"></siteMapNode>
</siteMapNode>

Add this new line directly after:

<siteMapNode url="terminal/blackboard/blackboard.aspx" title="Blackboard" accesstype="LogFileTab" displayTreeView="true"/>

Afterwards you should get this result:

<siteMapNode url="terminal/logs/view.aspx" title="$(String:683)" accesstype="LogFileTab" displayTreeView="true">
	<siteMapNode url="terminal/logs/createexport.aspx" displayTreeView="true"></siteMapNode>
</siteMapNode>
<siteMapNode url="terminal/blackboard/blackboard.aspx" title="Blackboard" accesstype="LogFileTab" displayTreeView="true"/>

If you now login to a team on your SiteRemote Server and select a machine from the treeview on the left, you will have a new Blackboard tab next to the Logfiles tab of that machine.

The page can slightly differ based on the available Blackboard information of that specific machine.

You can now also use the SiteRemote search feature to search the value fields of the Blackboard. To search through the Blackboard use the bs macro. Let's look at an example, the Blackboard contains the current SiteKiosk configuration of a machine in the key CtS.SiteRemote.Config.Files/d/SiteKiosk. If you now want to find all machines that use the www.your-comp.com URL as the start page, you would simply search vor bs:www.your-comp.com and the result lists all machines with that URL in the configuration.

Starting SiteKiosk Windows Chrome Browser with Multiple Tabs

By default SiteKiosk Chrome starts with the one start page you have configured in the SiteKiosk configuration tool under Start Page & Browser. If you need more than one start page, each using its own tab, you can do this with a little bit of script editing.

The editing needs to be done in the file browserSettings.js. The file is located in the folder C:\Users\Public\SiteKiosk\data\content\local\files\projects\d97aa96b962543fcb39625a3f8e8d8fb\000000000000000000000000\files. Make a backup of the file first and then open it with an editor like Notepad or Notepad++.

Look for the first (applies to SiteKiosk 9.5) occurrence of:

tabControl.newTab();

It is the last line (applies to SiteKiosk 9.5) within the definition of the function exports.initializeTabView.

This line opens the start page configured in your SiteKiosk configuration.

To open additional tabs you need to add the newTab function call as many times as the number of tabs you need. Within those additional function calls, you state the starting URL for a tab.

tabControl.newTab({
	startUrl: "https://www.siteremote.net/"
});

For example, if you want to add two extra tabs to the existing start page, you will need this script code (the active tab is the last tab in the list):

tabControl.newTab();
tabControl.newTab({
	startUrl: "https://www.siteremote.net/"
});
tabControl.newTab({
	startUrl: "http://devblog.provisio.com/"
});

Please note a few things you should consider when using this customization. If you allow the new window button (Start Page & Browser -> Chrome Browser -> Customize -> Browser Toolbar -> Show New Window Button), new windows will also open with the added tabs. You should not add more tabs than allowed in the SiteKiosk configuration (Start Page & Browser -> Chrome Browser -> Customize -> Advanced -> Maximum number of browser windows/tabs), the default number is 5.

When starting the above example with SiteKiosk the result will look like this:

In case you are having display problems with the tab content you can use the following example, which adds a short delay when creating the tabs (it also sets the first tab as the active tab):

tabControl.newTab();
setTimeout(() => tabControl.newTab({startUrl: "https://www.siteremote.net/"}));
setTimeout(() => tabControl.newTab({startUrl: "http://devblog.provisio.com/"}));
setTimeout(() => tabControl.activateTab(null, tabControl .tabs[0].tabPage));

Customizing the Digital Signage Player of SiteKiosk Windows

Please note that this article refers to a legacy product. We recommend to use the SiteCaster Kiosk CMS instead.

Based on the article "Customize the SiteCaster Player in SiteKiosk" (http://devblog.provisio.com/post/2012/01/17/Control-SiteCaster-Player-in-SiteKiosk.aspx) we will examine another scenario for the customization of the Digital Signage player of SiteKiosk Windows.

The example scenario is from a specific customer project and the requirements are as follows ():
1. Digital signage is running in full screen mode.
2. The screensaver (showing the SiteKiosk Player) is allowed and while the screensaver is active, the campaign stops.
3. When the screensaver is deactivated, the campaign needs to be played from the beginning.

This can be useful when having a video playing in the campaign and you do not want any distraction from what you are showing as the screensaver. The requirements can be realized by adding some script to the Digital Signage player of SiteKiosk Windows.

Scripting preparations:
We start by first creating a backup of the file "Start.html" under
"...\SiteKiosk\Skins\Public\ Startpages\SiteCaster".
Then open the file with an editor. It will look like this:

<html>
<head><meta http-equiv="X-UA-Compatible" content="IE=10" />
	<style>
		*
		{
			margin: 0;
			padding: 0;
			border: 0;
			font-family: sans-serif;
			font-size: 1em;
			font-weight: normal;
			font-style: normal;
			text-decoration: none;
		}
	</style>
</head>
<body scroll=no>
	<object id="Player" classid="clsid:719D9061-22DA-4D25-9BB9-116404372496" style="width: 100%;
		height: 100%; position: absolute; background: transparent;">
	</object>
</body>
</html>


Below the <object> tag (and before the closing </body> tag) we now will insert the required script part.
The first entry is for enabling the SiteKiosk Object Model on that page, needed to get the events for screensaver activated and deactivated.

<script>window.external.InitScriptInterface();</script>

The second entry is for loading a script that exposes the SiteCaster player functionality using an API called RequireJS (further information you will find in the article "Customize the SiteCaster Player in SiteKiosk").

<script src="../../External/require.js"></script>


Let’s come to the decisive part of the script.
First we load the "SiteCaster.js" script for controlling the SiteCaster object and ask it to give us a Player object of SiteCaster.

//load our dependent script (in this case it is only SiteCaster.js)
        require.config({
            baseUrl: "../.."
        });
        require(['Scripts/SiteCaster'],
                function (context, siteCaster) {
 
                    //ask it to give us a Player object of SiteCaster
					var player = siteCaster.Player(); …

Before we continue, we make sure that any scheduled campaign is stopped and check that a broadcast is loaded.

//switch off the scheduled playing of the broadcast in case it is activated
player.setAutoSchedule(false);

//check that the broadcast is loaded
player.broadcastLoaded(function () { …


Next we ask for all campaign items of the broadcast.

//get all campaign items of the current broadcast
var campaignItems = player.getCampaignItems();


Then we create a variable containing the ID of the first campaign.

//call the first Campaign of the array in the broadcast by id
var ToPlay = campaignItems[0]['id'];


And execute the command to play:

//play the fist campaign
player.play(ToPlay);


This function using the campaignEnd event makes sure that the campaign plays from the beginning again, when it has reached the end:

//play fist campaign again when campaign ends
player.campaignEnd(function (id) {player.play(ToPlay);});


The above just makes sure that our campaign plays in a loop, just as if using a "usual" scheduled campaign. This preparation is necessary for the following part, where we stop the campaign on screensaver start and play the campaign from the beginning, when the screensaver ends.

This script part will fire when the screensaver activates and is using the "OnScreenSaverBegin Event" of the SiteKiosk Object Model (remember we initialized it above) for getting the event.
Then it just uses player.stop(ToPlay);to stop the campaign playing.

//stop playing content when the screensaver activates
SiteKiosk.ScreenSaver.OnScreenSaverBegin = OnScreenSaverBegin;
	function OnScreenSaverBegin() {
        	player.stop(ToPlay);
}


To start the campaign from the beginning, when the screensaver stops, is very similar. It is using the "OnScreenSaverEnd Event" of the SiteKiosk Object Model and starts playing the campaign from start with player.play(ToPlay);

//start playing content when the screensaver deactivates
SiteKiosk.ScreenSaver.OnScreenSaverEnd = OnScreenSaverEnd;
function OnScreenSaverEnd() {
   player.play(ToPlay);
}


When we put all of this together, our page code now looks like this (download: Start.html (2.35 kb)):

<html>
<head><meta http-equiv="X-UA-Compatible" content="IE=10" />
	<style>
		*
		{
			margin: 0;
			padding: 0;
			border: 0;
			font-family: sans-serif;
			font-size: 1em;
			font-weight: normal;
			font-style: normal;
			text-decoration: none;
		}
	</style>
</head>
<body scroll=no>
	<!--object tag to embed the SiteCasterPlayer into the html page-->
	<object id="Player" classid="clsid:719D9061-22DA-4D25-9BB9-116404372496" style="width: 100%;
		height: 100%; position: absolute; background: transparent;">
	</object>
	
	<!--activate SiteKiosk Oject Model-->
	<script>window.external.InitScriptInterface();</script> 
	
	<!-- load a script that exposes the SiteCaster player functionality using an API called RequireJS (http://requirejs.org)-->
	<script src="../../External/require.js"></script>
    
	
	<script>
	//load our dependent script for RequireJS (in this case it is only SiteCaster.js)
        require.config({
            baseUrl: "../.."
        });
        require(['Scripts/SiteCaster'],
                function (context, siteCaster) {
 
                    //ask it to give us a Player object of SiteCaster
					var player = siteCaster.Player();
					
					//switch off the scheduled playing of the broadcast in case it is activated				
					player.setAutoSchedule(false);

					
					//check that the broadcast is loaded
                    player.broadcastLoaded(function () {
					
						//get all campaign items of the current broadcast									
						var campaignItems = player.getCampaignItems();
					
						//call the first Campaign of the array in the broadcast by id
						var ToPlay = campaignItems[0]['id'];
					
						//play the fist campaign
						player.play(ToPlay);
					
						//play fist campaign again when campaign ends
						player.campaignEnd(function (id) {player.play(ToPlay);});
						
					
						//stop playing content when the screensaver activates
						SiteKiosk.ScreenSaver.OnScreenSaverBegin = OnScreenSaverBegin;
						function OnScreenSaverBegin() {
							player.stop(ToPlay);
						}
					
						//start playing content when the screensaver deactivates
						SiteKiosk.ScreenSaver.OnScreenSaverEnd = OnScreenSaverEnd;
						function OnScreenSaverEnd() {
							player.play(ToPlay);
						}
                    
					});
                });
	</script>
</body>
</html>


Configuring SiteKiosk:
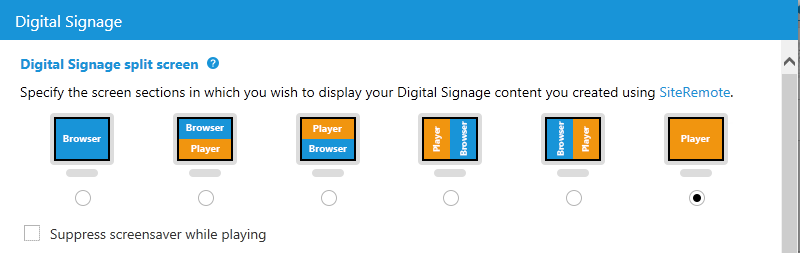
In the SiteKiosk configuration you just need to choose the "Player" at Start Page & Browser-->Digital Signage and deactivate the option "Suppress screensaver while playing".


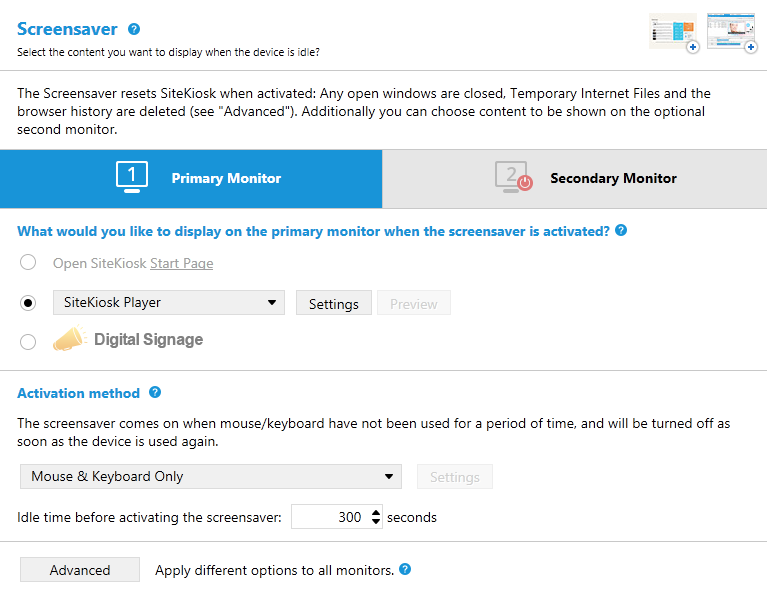
On the Screensaver page, you configure the idle time before activating the screensaver and the content for the screensaver.
In this scenario I have configured the “SiteKiosk Player” with default settings, but you can of course also add other content to the SiteKiosk Player or even choose Digital Signage to display different content than is displayed in the main Digital Signage player.


Publishing the campaign:
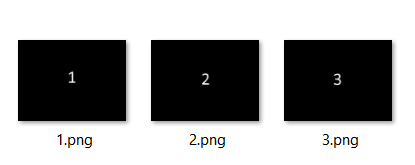
To keep it simple for this example, we just publish a campaign with 3 pictures in a row. Of course you can also add any content of your choice, that can be displayed with the Digital Signage feature of SiteKiosk Windows (e.g. a video that will stop playing when the screensaver is activated and plays from the beginning when the screensaver is deactivated).


In the settings of the broadcast make sure you enable the checkbox "Disabled" because the campaign should only start to play when our script from above will execute the play command.


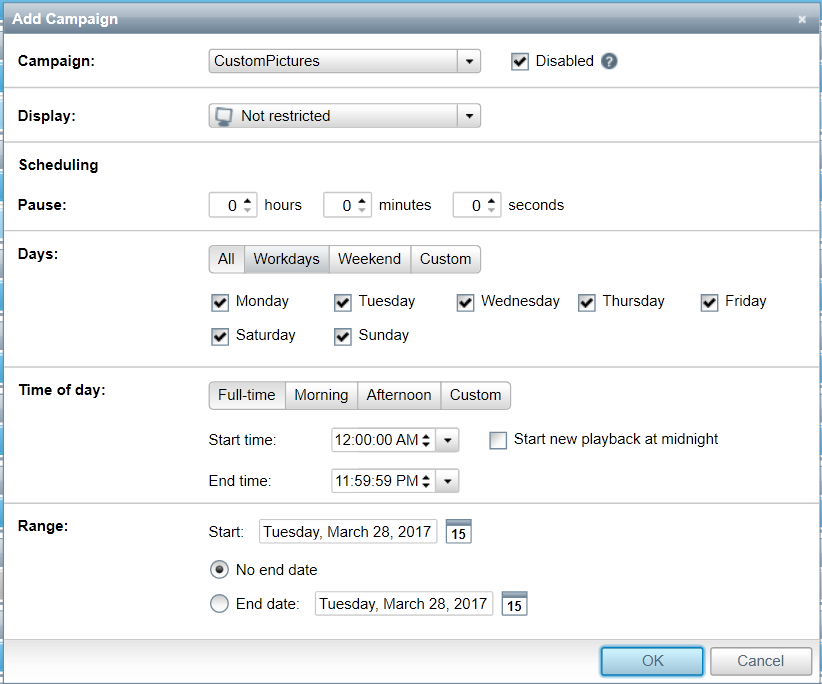
You can also add a second campaign to that broadcast, e.g. to be played during the screensaver, if you select the Digital Signage option on the Screensaver settings page of the SiteKiosk configuration. Make sure to explicitly set this campaign to be displayed during screensaver only and do not tick the "Disabled" option:


Our broadcast schedule for this example will look like this:

Now we publish the broadcast with our campaign:


After publishing the campaign the Digital Signage content displayed in SiteKiosk will always stop when the screensaver activates and start from the beginning when the screensaver will be deactivated.