Starting External Applications from Web Pages

Here are two examples that show how you can start external applications from a web site in the SiteKiosk browser. One example is for the Internet Explorer engine of SiteKiosk, the other for the Chrome engine.

The first example is a simple HTML page with two buttons for the IE engine of SiteKiosk. The first button just starts the Notepad application of Windows. The second button starts Notepad with a parameter that includes the full path to a file that should be displayed in Notepad.

<!DOCTYPE html>

<html lang="en" xmlns="http://www.w3.org/1999/xhtml">
<head>
    <meta charset="utf-8" />
    <title>App Start with the SiteKiosk Object Model (IE Engine)</title>

    <script>
        //Initializing the SiteKiosk Object Model for IE engine
        window.external.InitScriptInterface();

        //Running the external application using a universal method for optional parameter usage
        function runExtApp(extapppath, extappparameter) {
            var completepath = extapppath;

            //Check if parameter is not empty and adding parameter to path
            if (extappparameter !== "")
                completepath += " " + extappparameter;

            SiteKiosk.ExternalApps.Run(completepath, false);
        }
    </script>
</head>
<body style="margin-left:auto;margin-right:auto;margin-top:50px;text-align:center;">
    <input type="button" value="Start Notepad without parameter" onclick="runExtApp('c:/windows/notepad.exe','');"/><!--You can either use single forward slashes in the path-->
    <input type="button" value="Start Notepad with parameter" onclick="runExtApp('c:\\windows\\notepad.exe', 'C:\\Program Files (x86)\\SiteKiosk\\Html\\extapptest.txt');"/><!--Or you can use double backward slashes in the path-->
</body>
</html>

Embedded in the normal HTML and Javascript code is the SiteKiosk Object Model. The Run method of the ExternalApps object is used to start an external application.

SiteKiosk.ExternalApps.Run(completepath, false);

You can learn more about the Run method here.

For security reasons you need to specifically allow pages you are using the SiteKiosk Object Model on in the SiteKiosk configuration.

To test the above example code you can either put it on your web server but you can also save it locally as an html file in the ..\SiteKiosk\html folder of your SiteKiosk installation. The test code also assumes that there is a local text file available in ..\SiteKiosk\html named extapptest.txt for the parameter variant.

The result will look like this:

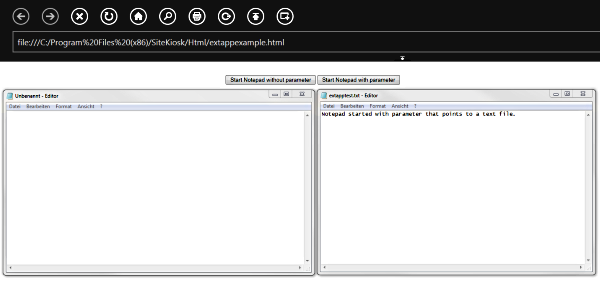
The second example is a slight variation from the first and demonstrates the same behaviour in SiteKiosk when using the Chrome engine. The SiteKiosk Object Model for the Chrome engine differs from the one for the Internet Explorer engine. The HTML and Javascript parts are identical but note the different way to initialize the Object Model.

<!DOCTYPE html>

<html lang="en" xmlns="http://www.w3.org/1999/xhtml">
<head>
    <meta charset="utf-8" />
    <title>App Start with the SiteKiosk Object Model (Chrome Engine)</title>

    <!--Initializing the SiteKiosk Object Model for Chrome engine-->
    <script>(new Function(_siteKiosk.getSiteKioskObjectModelCode()))();</script>

    <script>
        //Running the external application using a universal method for optional parameter usage
        function runExtApp(extapppath, extappparameter) {
            var completepath = extapppath;

            //Check if parameter is not empty and adding parameter to path
            if (extappparameter !== "")
                completepath += " " + extappparameter;

            siteKiosk.system.windows.skLegacy.externalApps.run(completepath, false);
        }
    </script>
</head>
<body style="margin-left:auto;margin-right:auto;margin-top:50px;text-align:center;">
    <input type="button" value="Start Notepad without parameter" onclick="runExtApp('c:/windows/notepad.exe', '');"/><!--You can either use single forward slashes in the path-->
    <input type="button" value="Start Notepad with parameter" onclick="runExtApp('c:\\windows\\notepad.exe', 'C:\\Program Files (x86)\\SiteKiosk\\Html\\extapptest.txt');"/><!--Or you can use double backward slashes in the path-->
</body>
</html>

The line that actually starts the external application is also specifically suited for the Chrome engine:

siteKiosk.system.windows.skLegacy.externalApps.run(completepath, false);

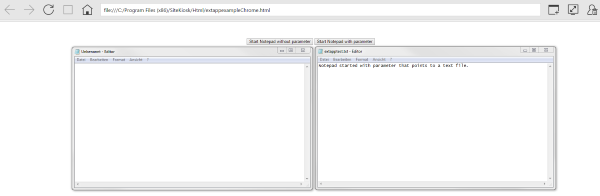
The functionality and accepted parameters of the run method are the same as for the IE version. Currently there is no detailed documenation available for the SiteKiosk Object Model for Chrome-based browsers in SiteKiosk Windows and SiteKiosk Android, please contact our support to receive a basic documentation.

Using the Chrome example in one of the Chrome browser versions of SiteKiosk will look like this:

When working with external applications please note the information from the SiteKiosk documentation.

Allowing Android System Dialogs to set SiteKiosk Android as Default Browser for another App

As a secure kiosk solution SiteKiosk Android blocks Android system dialogs by default. Depending on the requirements of your kiosk project you might want to allow other apps to be started from within the SiteKiosk browser, for example the Android payment solution Adyen (Note: all of what is described here applies to apps that are called through specific links in the SiteKiosk browser, not to apps you are starting as an external app in SiteKiosk Android). If you need one of these apps to use SiteKiosk Android as the browser of choice to process the response of the app this selection needs to be done trough a system dialog that is called by your app while SiteKiosk is running. The aforementioned secure default behaviour of SiteKiosk Android will block this dialog. To be able to make your choice you need to temporarily allow Android system dialogs while SiteKiosk Android is running.

In order to allow another app to use SiteKiosk Android as its browser of choice you first need to open your SiteKiosk configuration editor, go to Security -> Allow assigned apps and add your app there.

The actual change required to allow Android system dialogs must be done by manually editing the SiteKiosk Android configuration. There are two ways you can do this.

If your Android device is registered with SiteRemote, you can log in to your SiteRemote team and go to SiteKiosk -> Configuration to import the existing configuration from the device, edit the configuration and publish it to one or more terminals.

If your Android device is not using SiteRemote, you can open the SiteKiosk configuration editor, go to System and select Export configuration from SD card. Now either edit the configuration locally on the Android device or copy it to computer to make the necessary change with an editor like Notepad. Afterwards copy it back to the SiteKiosk/config folder on your Android device and use the Import configuration from SD card option to activate the changed configuration.

Before editing your configuration you should make a backup, then you can skip reverting the following change that is only temporarily needed.

When you edit your SiteKiosk Android configuration look for:

</Apps></AllowedApps>

Right before that section you need to add:

<App-android enabled="true"/>

The result should look like this:

<App-android enabled="true"/></Apps></AllowedApps>

Once you use your edited SiteKiosk configuration on your Android device, start your app from within the SiteKiosk Android browser and trigger the system dialog that lets you choose SiteKiosk Android as the default browser for that app. Select SiteKiosk Android in the dialog and make sure to use the option in the dialog to make this a permanent decision.

Now that you don't need to use the system dialog anymore you can switch to your configuration backup from before the change or remove the added XML tag from your configuration. For security reasons you should not permanently run SiteKiosk Android with system dialogs being allowed.

Using Self-signed Certificates in a SiteKiosk Chrome Browser Skin

Note: The following is no longer required when using SiteKiosk 9.5.4033 or higher.

In case your kiosk deployment is depending on self-signed certificates here are a few usesful hints in handling those for the Chrome engine version of SiteKiosk.

The certificate store for the Chrome Browser variants of SiteKiosk is generated from the Windows certificate store. This means that you can easily install self-signed certificates into your Windows certificate store, e.g. into the Trusted Root Certification Authorities. Make sure that you install the certificate into the right store, either for a user or the computer, based on your needs.

On the first start of one of the Chrome Browser skins of SiteKiosk under a user SiteKiosk will generate its own certificate list from the Windows store. The file is named SiteKioskNGCef-CA.perm and placed in the Temp folder of the user SiteKiosk is running under (%tmp%\SiteKioskNGCef-CA.pem). In case you make changes to the certificates you need to delete this file in order for SiteKiosk to regenerate the list.

Depending on your needs the file can be deleted in many different ways to force SiteKiosk to generate a new version. For example you can delete it periodically by using a batch file and the Windows Task Scheduler. You can also use the SiteRemote job system to create a two step job that deletes the file and then restarts SiteKiosk.

Distributing the SiteKiosk Windows Start Screen with SiteRemote

The SiteKiosk Windows Start Screen is a powerful and easy to use tool to create a customized kiosk terminal experience. If you want to use the same Start Screen setup, either newly created or changed, on more than one kiosk system, you can distribute the required files using different methods. In case your environment only includes a handful of PCs at the same location you may just use a USB stick, otherwise the more comfortable method is to use SiteRemote.

For our test scenario we create a very simple Start Screen using Template 3, that only includes a monochrome background and a text. Note that the complexity of the Start Screen you create does not alter the described scenario in any way. This is what our starting design will look like:

Once you are done creating or changing your Start Screen you need to save it by clicking on the corresponding icon in the Start Screen Editor. Once this is done you are presented with a dialog that tells you where all the files associated with the Start Screen are located. It will be the same location on all your SiteKiosk Windows installations (C:\Users\Public\SiteKiosk\content):

You will get this information dialog whenever you make any changes. This is a reminder that you now may need to distribute the changed files to all your PCs. You can now copy the content folder onto a USB stick and then copy the folder to the exact same location on all your machines, overwriting the previous version or use SiteRemote to achieve this. How to use SiteRemote for this purpose is what we want to look at in a little more detail.

First we create a new simple Start Screen design that will look different than the original design to symbolize the changes:

Again the changes need to be saved when leaving the Start Screen Editor. Once this has been successfully done, we open the Windows Explorer and browser to the content folder at C:\Users\Public\SiteKiosk. If you right click the content folder you can select Send to and then choose Compressed (zipped) folder. This results in a content.zip file at this very location:

Now we need a small tool that will unzip the folder once we have distributed it through SiteRemote. You can for example use the command line version of 7-Zip. The application is called 7za.exe and is available here in the 7-Zip Extra package.

Next just login to your SiteRemote team, go to the SiteKiosk tab and select Jobs from the submenu. Create a new job (you may save it as a job template if you like):

Set Job Name and Description to your liking and select SiteKiosk Windows as the Client Type. Now you need to add three job steps. The first one will be a File Upload that will place the 7za.exe file in the C:\Users\Public\ folder. Make sure to use the slash at the end of the file path. Also choose Overwrite to make sure any existing version at that location is overwritten:

The second step will again be a File Upload and upload the content.zip file with the complete Start Screen content. Use the same settings as with the first step:

The third and last step will be of the Run Executable type. If will use the following command line to run 7za.exe and unzip the content of the content.zip archive to its final destination:

"C:\Users\Public\7za.exe" x "C:\Users\Public\content.zip" -aoa -oC:\Users\Public\SiteKiosk

Leave the other options as they are, especially leave Invisible execution with administrative rights selected:

Finally assign the jobs to the desired machines and wait for it to complete. Note that the changes will only come into play once the Start Screen is refreshed, to speed things up you can send another SiteRemote job that restarts SiteKiosk.

Using Adobe Flash with Chrome Browser Skins of SiteKiosk 8.91-9.1

Please note that the description below, describing how to manually make changes to the configuration of SiteKiosk to enable Flash, will no longer be required with the release of SiteKiosk 9.2. In SiteKiosk 9.2 you can enable Flash support in the configuration under Start Page & Browser -> Chrome Browser -> Customize -> Settings.

For security reasons using Adobe Flash with the Chrome Browser skins (“Chrome Browser” skin and “Chrome Fullscreen Browser” skin) is not supported by default in SiteKiosk 8.91-9.1.

If Adobe Flash is required you will normally need to switch to an Internet Explorer skin where Adobe Flash is supported with the corresponding Adobe Flash Plug-in for IE (for historical reasons).

If you require using Adobe Flash with the Chrome Browser skins you can proceed as follows:
1. First you need to download and install the 32-bit Adobe Flash Player “for Opera and Chromium – PPAPI” on your Windows operating system:
https://get.adobe.com/flashplayer/otherversions/

2. Next step is to add the Adobe Flash PPAPI Plug-In to SiteKiosk’s Chromium Engine.
To do this you need to edit the SiteKiosk configuration file (…\SiteKiosk\Config\YourConfig.skcfg).

- Open the SiteKiosk configuration file you want to use with an editor like Notepad or Notepad++.
- Search for the line
"showTaskBar": true,
- Then add these lines right before:

"browserEngine": {
        "commandLineArguments": {
            "set": ["ppapi-flash-path=C:\\Windows\\SysWOW64\\Macromed\\Flash\\pepflashplayer32_20_0_0_267.dll","ppapi-flash-version=20.0.0.267"],
            "remove": []
        }
    },


It should look like this:

…
"system": {
    "password": {
      "enabled": false
    },
    "browserEngine": {
        "commandLineArguments": {
            "set": ["ppapi-flash-path=C:\\Windows\\SysWOW64\\Macromed\\Flash\\pepflashplayer32_20_0_0_267.dll","ppapi-flash-version=20.0.0.267"],
            "remove": []
        }
    },
    "showTaskBar": true,
    "userAgent": {
…


"ppapi-flash-path" gives the information where to find the PPAPI Flash Plug-In
"ppapi-flash-version" reports the given version for the PPAPI Flash Plug-In

In this example we have installed the Adobe Flash PPAPI version 20.0.0.267 to the default path (32 Bit) "C:\Windows\SysWOW64\Macromed\Flash\pepflashplayer32_20_0_0_267.dll".

When installing other (newer) Adobe Flash versions you need to adjust these entries.

3. Finally save the changes and start SiteKiosk.
When you start SiteKiosk and e.g. go to http://www.adobe.com/de/software/flash/about/ you will see the Adobe Plug-In is activated:

Automatic Video Playback under SiteKiosk Android

In a few days 2015 will come to an end, therefore PROVISIO wants to wish you all the best for 2016 and we want to keep the last post for 2015 short. In the past we had a few support requests asking about automated video playback on an Android device. If you are not using the Digital Signage feature of SiteKiosk Android, with which you can create a campaign to automatically playback and even loop a video by using the Digital Signage editor of SiteRemote, there are some limitations you need to be aware of.

Automated video playback is limited in Android. This is not special to SiteKiosk Android but a general behaviour of the operating system. That feature is meant to save bandwidth and battery power. It has been added to the Android operating system on purpose and affects browsers running on Android. This means it also affects the browser part of SiteKiosk Android.

There are code examples floating around the web that can work around this behaviour to a certain degree. One of these examples can be found on github, the  code to autoplay a video is available here (https://gist.github.com/BCdmlap/5339273).

If you not only want to use autoplay but also would like to loop the video, you can find an example here (http://stackoverflow.com/questions/11225927/html5-video-will-not-loop-on-android-devices).

At the time of this writing the above examples have been tested with SiteKiosk Android 2.4 on different Android 4.x versions and was working.

Accessing 64-Bit System Folders and Registry Paths from the SiteRemote Job System

The SiteRemote component on the Windows client side is a 32-bit application. This means that the SiteRemote jobs you are running on the client are executed within a 32-bit context. This is relevant when your are using a 64-bit system and you for example want to access the SOFTWARE folder in the Windows registry. By default you will then target the HKEY_LOCAL_MACHINE\SOFTWARE\Wow6432Node path instead of HKEY_LOCAL_MACHINE\SOFTWARE. The same applies to applications from the System32 folder, by default a 32-bit application will be redirected to C:\Windows\SysWOW64 instead of using C:\Windows\System32.

What to do, when you explicitly need to access the 64-bit part of the registry or start a 64-bit system application? Microsoft offers solutions that you can use in your SiteRemote jobs to mitigate the behaviour described above.

First let's look at the Windows registry. To for example set registry values for a 64-bit application by using a SiteRemote job you can create a job with the action type Run Ececutable and use the following command line:

reg import C:\Windows\Temp\test.reg /reg:64

This calls the reg.exe application with the parameter import that specifies the path to .reg file that includes the registry data you want to write to the registry (for this example we assume that there is already a test.reg file in c:\Windows\Temp). After that you use the /reg:64 switch to specify that you want to import the data from the .reg file to the 64-bit part of the registry. For the purpose of this test the content of the .reg file will look like this:

Windows Registry Editor Version 5.00

[HKEY_LOCAL_MACHINE\SOFTWARE\TEST]
"TEST"="Test Value"

A SiteRemote job step that includes the above will look like this:

A successful execution will show this result:

When not applying what has been described above the test value would have been written to the HKEY_LOCAL_MACHINE\SOFTWARE\Wow6432Node path.

Next we will look at starting a 64-bit application. For this demonstration we will use the 64-bit version of notepad.exe located in C:\Windows\System32 on a 64-bit Windows system. In order to be able to start this application from the 32-bit environment of the SiteRemote client we need to use a batch file that makes use of the Sysnative folder redirection of Windows. Using Sysnative as the folder name will redirect any request, even those from a 32-bit application, to the native system folder of 64-bit Windows system it is used on. Our batch will look like this:

start %windir%\Sysnative\notepad.exe

For this demonstration we will place it in C:\Windows\Temp as test.bat. Of course you could also create another SiteRemote job step that uploads the file to the client. Next we create the job step that executes the batch file. The command line looks like this:

c:\windows\syswow64\cmd.exe /c "start c:\windows\temp\test.bat"

For the path to the cmd.exe we could actually also use c:\windows\system32\cmd.exe. This will automatically be translated to the SysWOW64 folder on a 64-bit system.

Our job will look like this:

For the purpose of this demonstration we will choose the option Visible execution with user rights to make notepad.exe show up. Executing the job on the target system will give us this result:

Note that the task manager shows that this is actually the 64-bit version of notepad.exe (visible from the missing 32 bit appendix).

Using Input Devices in the SiteKiosk Start Screen

The Start Screen start page of SiteKiosk is Chrome-based and allows you to freely configure a start page for SiteKiosk that matches your requirements. It also supports the SiteKiosk Object Model to further increase the customization options. Because the design is Chrome-based it uses the new SiteKiosk Object Model for the Chrome-based part of SiteKiosk. This Object Model is still in the making so the most current state of the preliminary documentation can be obtained through our support department. Interested developers can just send us a short email.

The following demonstration shows you how to use the SiteKiosk Object Model in the Start Screen (there is also one other example usage documented here). We will use the new SiteKiosk 9 feature to read input from any USB input device that uses keyboard emulation as an example how to achieve this goal.

First create a new configuration for SiteKiosk and select the Start Screen on the Start Page & Browser page. Click the customize button and for the purpose of this demonstration pick Template 3. Create a new HTML widget and edit it to add the code that contains the SiteKiosk Object Model.

The code to add is loosely based on the general Chrome-based example described in more detail in the SiteKiosk help. The code we will use for the Start Screen looks like this:

<script>
	var callbackFunc = function (data, deviceName) {
		parent.siteKiosk.log.info("TEST",0,deviceName + " registered the following data: " + data);
	};

	function registerDevice() {
		var deviceName = document.getElementById("devicename").value;

		if(deviceName == "")
			parent.siteKiosk.log.info("TEST",0,"No input device found!");

		var device = parent.siteKiosk.devices.getByName(deviceName);

		if(device == null)
			parent.siteKiosk.log.info("TEST",0,"No input device found!");

		device.valueChanged(callbackFunc);

		parent.siteKiosk.log.info("TEST",0,"Registered input device: " + JSON.stringify(device));
	}
</script>
<div style="background:white;padding:10px;">
	Test page for reading the input of keyboard emulation 
	devices configured in the configuration of SiteKiosk 
and writing the received data into the SiteKiosk log.<p />
	<div>
		Listen to input from this device that has been 
		configured in SiteKiosk: 
		<input id="devicename" tpye="text" /> (state the device name) <button onclick="registerDevice()">Register the listener</button>
	</div>
</div>

The most significant changes to the original code example are that you leave out the line that initializes the external script for the Object Model:

<script>(new Function(_siteKiosk.getSiteKioskObjectModelCode()))();</script>

This is because the Object Model is already initialized in the parent of the HTML widget, therefore you can access all objects, methods, etc. of the Chrome-based SiteKiosk Object Model by adding parent when you use it in the Start Screen:

parent.siteKiosk.log.info("TEST",0,deviceName + " registered the following data: " + data);

After you copied the code to the HTML widget you can save the changes to the Start Screen and go to the configuration page for Input Devices. Add an input device. For testing you may just attach an additional keyboard to your computer, but do not use the one attached to your computer already or a keyboard that is exactly the same model, as the device will be exclusively used for the input device feature and therefore does not accept keystrokes for normal usage, e.g. hitting Escape to close SiteKiosk, once you start SiteKiosk. Choose a display name for your device, this will be necessary to identify the device in the script, as it is used to register the device listener:

For this example you should also enable the debug output window under Logfiles in the configuration of SiteKiosk. Then save the configuration and start SiteKiosk in Run Once mode. Type the device name you used in the SiteKiosk configuration into the input field and click on the button to register the device listener. If the registration succeeded you will see a log entry. The same applies if you now create input from the attached device:

Using the Blackboard to Transfer Machine Information from SiteRemote to SiteKiosk Android

A previous post has explained how to use the blackboard feature of SiteRemote and SiteKiosk to work with machine information provided by SiteRemote on the Windows client version of SiteKiosk. This handy tool is available for the SiteKiosk Android version as well. Just like with the Windows version you can read information like team name or machine name used on the SiteRemote server to work with it on the SiteKiosk Android client side.

Note that at the time of writing this post the available blackboard information is not as extensive for the Android version as it is for the Windows version but that will change with time. The strings of the blackboard for Android are also in JSON format but currently none of the available values uses complex strings, so you do not need to convert the strings before working with them.

The SiteKiosk Android Object Model provides the siteKiosk.siteRemote.blackboard.getAll method to query blackboard entries. It accepts a string that contains either the full name of a blackboard value or part of it combined with an asterisk (*). The method returns an array that includes all matching blackboard entries. Each entry has a key and a value property. Key is the name of the blackboard entry and value obviously contains the value of that blackboard entry. The following example will demonstrate the different variants.

<html>
<head>
    <title></title>
<!--The following line is required and links to the local SiteKiosk Object Model.//-->
	<script type="text/javascript" src="sk:///siteKiosk/siteKiosk.js"></script>
</head>
    <body>
		<div>
			This machine is part of the SiteRemote Team <span id="teamname">[Information not yet available.]</span> and 
			its display name on the SiteRemote server is <span id="machinename">[Information not yet available.]</span>.
			<br /><br />
			These are available blackboard keys:
			<br />
			<span id="blackboardkeys">[Information not yet available.]</span>
		</div>
    </body>
    <script type="text/javascript">
        //Wait until the SiteKiosk Object Model is loaded.
		siteKiosk.ready(function (){
			//First check if the machine is registered with SiteRemote.
			if (siteKiosk.siteRemote.registration.isRegistered()){
				//Registered. Trigger the initial blackboard request. Note: the first request will most likely come back empty.
				ReadSiteRemoteBlackboard();
			}
			else{
				//Not registered. Show message on screen.
				window.alert("This machine is not registered with SiteRemote!");
			}
			
			function ReadSiteRemoteBlackboard(){
				//Get the name of the SiteRemote team the machine is registered with.
				var array_teamname = siteKiosk.siteRemote.blackboard.getAll('StC.TeamInfo.Name');
				array_teamname.forEach(function (entry) {
					document.getElementById("teamname").innerHTML = entry.value;
				});
				
				//Get the display name of the machine in the SiteRemote team it is registered with.
				var array_machinename = siteKiosk.siteRemote.blackboard.getAll('StC.MachineInfo.Name');
				array_machinename.forEach(function (entry) {
					document.getElementById("machinename").innerHTML = entry.value;
				});
				
				//Get all available blackboard keys.
				var array_allblackboardkeys = siteKiosk.siteRemote.blackboard.getAll("StC.*");
				document.getElementById("blackboardkeys").innerHTML = "";
				array_allblackboardkeys.forEach(function (entry) {
					document.getElementById("blackboardkeys").innerHTML += entry.key + "<br />";
				});
			}
        }());
    </script>
</html>

Note that a SiteKiosk Android Object Model documentation is not publicly available yet but a preliminary version can be obtained by contacting PROVISIO support.

In order to make use of the above code the SiteKiosk Android machine needs to be registered with a SiteRemote server. After the machine has been registered it can take a few minutes until the information is available on the client. You may just refresh the example page or change the code to automatically refresh it using default Javascript methods. Periodically checking the blackboard information will also ensure that changes will become available on the client shortly after they happen on the server.

This is the test setup used for the example code test scenario:

You can place the example code in an HTML file and either place it locally on the Android device or put it on a web server. Then configure the page to for example be your SiteKiosk Android start page and do not forget to give it script allowance in the SiteKiosk Android configuration. This is how it will look once you run the page in the SiteKiosk Android browser:

Using the SiteRemote Database from other Applications

In case you are using your own SiteRemote Server you are able to access the valuable data of the SiteRemote database from other applications. The SiteRemote database includes a great number of information that is useful for other purposes as well, such as address information, software and hardware information etc.

The SiteRemote database utilizes the common Microsoft SQL engine, so start with having a look at the SiteRemote database tables by using the Microsoft SQL Management Studio and connect to your SiteRemote Server. You will see that most of the tables are using pretty obvious names.

You can use the default coding methods of your preferred programming language to access the database, either locally or remotely. Make sure that you have a database user with appropriate user rights and that you configured the SQL database access according to the Microsoft SQL Server documentation.

A simple C# code for such an SQL query, that finds all terminals that are in the time zone with idx 72 (GMT+01:00, you will find the time zones in the table tblTimeZone) and writes them into a text file, can look like this:

using System;
using System.Collections.Generic;
using System.Data.SqlClient;
using System.Linq;
using System.Text;
using System.Threading.Tasks;

namespace SRdbAccess
{
    class Program
    {
        static void Main(string[] args)
        {
            //Required information to connect to the database.
            SqlConnection obj_sqlconnection = new SqlConnection("Server=127.0.0.1;Database=SiteRemoteBackEndServer;User Id=TheUserName;Password=TheUserPassword;");
		    
            //Query that retrieves all terminals that are in a specific time zone.
            string str_sqlquery = "SELECT * FROM tblTerminal WHERE TimeZone_Idx = @Timezone";
		    
            //Build the SQL command.
            SqlCommand obj_sqlcommand = new SqlCommand(str_sqlquery, obj_sqlconnection);
		    
            //Look for terminals from time zone with idx 72, which is GMT+01:00. You will find the time zones in the table tblTimeZone.
            obj_sqlcommand.Parameters.AddWithValue("@Timezone", 72);
		    obj_sqlconnection.Open();

            //Use the data reader to show the display name of all terminals that are from the same time zone and write them to a file.
		    SqlDataReader obj_sqldatareader = obj_sqlcommand.ExecuteReader();
            using (System.IO.StreamWriter obj_filetowriteto = new System.IO.StreamWriter(@"C:\Users\Public\Documents\SiteRemoteSQLQueryResult.txt", true))
            {
                while (obj_sqldatareader.Read())
                    obj_filetowriteto.WriteLine(obj_sqldatareader["DisplayName"]);
            }

            //Close the data reader after the read process.
            obj_sqldatareader.Close();

            //Close the connection to the database.
		    obj_sqlconnection.Close();
        }
    }
}

The following screenshot shows you an example result of the above query. The search returns the display name of the three terminals that are in the time zone with idx 72: