Use the Cookie Extractor to allow cookie setting in advance

The following entry works for the SiteKiosk Online Version 1.0.2098.4728 or higher (https://sitekiosk.online/). Note that it can only be used for windows clients.

In the case you want to predefine cookies of a webpage displayed in SiteKiosk you can use our Cookie Extractor to insert the permit into the project. 

The following example uses the Browser template which contains a webpage element.

The Cookie Extractor can be downloaded here.

Start the Cookie Extra after installation. Enter the URL of the webpage, in which you want to allow the cookies in advance.

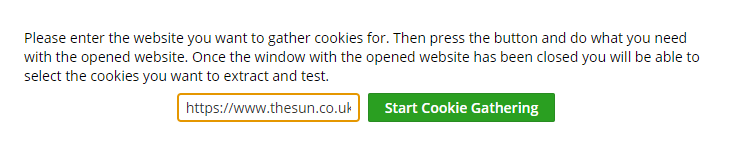
Press the button "Start Cookie Gathering" to load the cookies.

Press the "Accept" button in the webpage to allow the chosen cookies.

Close the window.

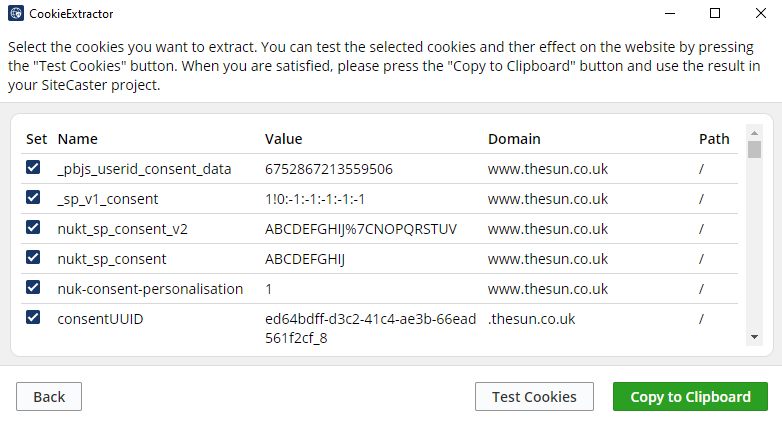
Press the "Test Cookies" button to test selected Cookies.

Close the window and press the "Copy to Clipboard" button. 

Open your SiteKiosk Online project and go to Settings - Client - Advanced. Then press the "Add setting" button.


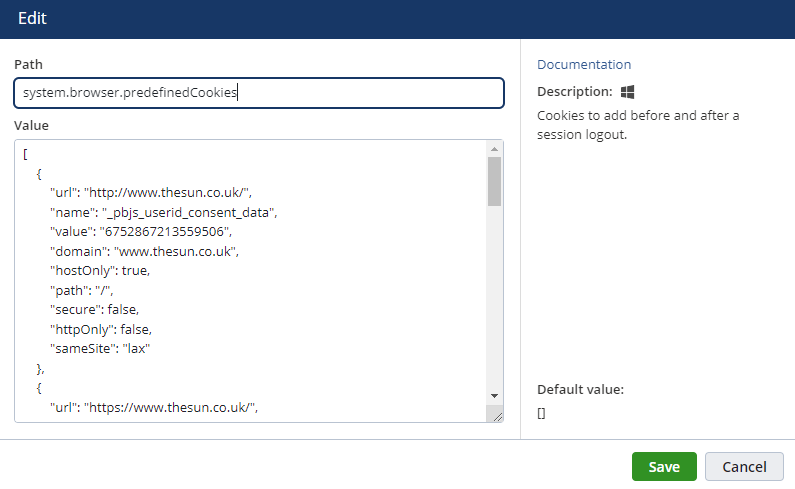
Enter the system.browser.predefinedCookies under Path and the clipboard of the Cookie Extractor under Value. 

Save the Advanced Setting.

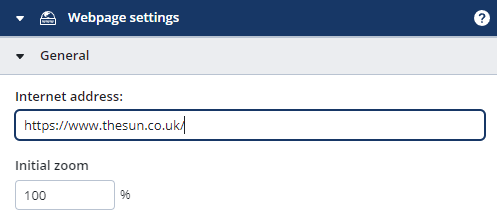
Open the Settings of the webpage element by double click on the element. 

Enter the URL of the webpage in which you want to allow the cookies in advance and save the setting.

Publish the project to a Windows client to test the setting.

Use SiteKiosk Online to Transfer a HTML File which is displayed in the Content

In case you want to display a HTML file in a webpage element, which is transferred directly by the project, you can use the following entry. The entry works for the SiteKiosk Online Version 1 or higher. 

Generate a project with template Empty.

Import a html file with the name example.html into the media library of the SiteKiosk editor.

Insert a webpage element. 

Open the properties dialog of the webpage element and enter the internet address content://example.html

Publish the project to a client to check the display of the HTML file.

Preload Webviews with the Expert Settings of SiteKiosk Online

The following works for SiteKiosk Online Version 1 or higher.

In case you want to preload webviews in sequences or on certain pages you want to navigate to, you can use two expert settings, which have to be combined. The following example uses a project which consists of a sequence container with an included webpage element.

Open the project and activate the expert mode. For this you have to add &expert at the end of the URL in the URL address field of your browser and then press Enter to reload the project.


After activation of the expert mode, select the webpage element and press the expert edit button in the menu bar.


Scroll in the expert properties on the right to the entry shouldUnloadWhenHidden and deactivate the checkbox.

Scroll to the bottom of the expert settings and in the Add property edit box enter the entry shouldReloadWhenHidden. Choose Boolean in the dropdown menu and activate the checkbox. Then press the plus button.

Scroll again to the bottom of the expert settings and in the Add property edit box enter the entry loadOnCreation. Choose Boolean in the dropdown menu and activate the checkbox. Then press the plus button.

Please save the expert properties by pressing the Save button.

Make a copy of the webpage element and insert it into the sequence.

Set a start URL for each webpage element in the element properties and set the display duration of each webpage element to e.g. 60 seconds. 

Publish the project to a client to check the preload function.

Adding Custom Components to the Software Tab of a Machine on a SiteRemote or SiteKiosk Online Server

When running your own SiteRemote or SiteKiosk Online Server you can add custom components to the software tab of a Windows machine in a team on the server. This means you can monitor the version number (must be available as a property of the file) and creation date of any executable (exe) or dynamic link library (dll) that is available on a machine. They will be shown as part of the Components table on the software tab of a machine.

By default the software tab lists the most common components and all installed software that is visible in the Programs and Features list of the Windows control panel.

If you need to monitor exe or dll files that have been copied to the machine without using a standard installation routine or that are not the main part of an application you can go to the Settings tab of the SiteRemote or SiteKiosk Online Server administration. Click on Edit configuration next to the Software component settings on the right side of the page. You will now see a table with the existing components.

Click on the Add New button to create a new entry. Choose a display name to identify the component in the table.

You can either query the component by the Component Object Model'S programmatic identifier (see https://docs.microsoft.com/en-us/windows/win32/com/-progid--key) or by the file path. You can use system environment variables as part of the file path, e.g. %windir% or %ProgramFiles%.

The Type determines under which component category the added component will be listed in the Components table on the software tab of a machine. You can select from Application, System, Additional, Remote Client or Multimedia (the other options in the dropdown field are for SiteKiosk specific usage).

Click Save on the right side of the new entry to save it temporarily, add an additional component if you wish, and then click the Save button at the bottom of the page to save the changes permanently and activate them by restarting the server service.

If the newly added component is present on a machine it will show up after a few machine contacts with the server.

Adding Links to the SiteKiosk Online Server Sidebar Menu

As of June 2021 the new SiteKiosk Online product family is available for custom projects. Please contact PROVISIO for more information on how to use SiteKiosk Online for your own project.

Customers running their own SiteKiosk Online server can add custom links to the menu on the left hand side of the team view. This enables you to integrate other web applications.

To add links, open the file ..\PROVISIO\SiteKiosk Online Server\Web\Web.sitemap with an editor. Look for

<!-- Menu C -->

and add this code for your own link right above it

<!-- Your Link -->
<siteMapNode url="http://www.your-comp.com/" title="Your Link" icon="link.svg" singlelink="true" />

The siteMapNode uses url for the path to the linked content, title for the caption visible in the menu, icon for the icon image file name and singlelink set to true to identify this specific type of link. Note that the icon image file needs to be in the ..\PROVISIO\SiteKiosk Online Server\Web\pub\img\sidebar folder. Additionally note that you may need to create the folder if it does not exist.

You can add more than one custom link.