Different Ways to Create SiteKiosk Windows and Android Logfile Entries

SiteKiosk logfiles are text files that contain runtime information about SiteKiosk. The logs are stored on the SiteKiosk client by default. If a SiteKiosk client is registered with a SiteRemote Server the log information is also transferred to the server, where it is used for the remote monitoring and management features of SiteRemote. This applies to SiteKiosk Windows (information can be found here) as well as SiteKiosk Android (the logs are under SiteKiosk\Logs on the sdcard of the device).

Besides containing information about SiteKiosk the logs can also be used to include entries from a website or an external application. This way you could for example generate a custom alert on a SiteRemote Server.

There are different ways to create SiteKiosk log entries from an external source, depending on the client, Windows or Android, and the type of the external source, either html code running in the SiteKiosk browser or another application.

In html code you can use the SiteKiosk Object Model, which is available in a Windows version and one for Android (the Android documentation is not publicly available yet but a preliminary version can be obtained by contacting PROVISIO support).

Note that all html examples require that the pages using the code are allowed to use the SiteKiosk Object Model. In the SiteKiosk Windows configuration you can configure this option under Access/Security -> URLs with Script Permission. In SiteKiosk Android you will find the option under Application -> Browser -> Script Permission (if you use another application option the path will vary).

Our first example demonstrates how to write a log message from a web page running in SiteKiosk Android:

<html>
<head>
	<title></title>
	<script src="sitekiosk.min.js"></script>
</head>
	<body>
		<input id="id_write" type="button" value="Write SiteKiosk Android Log Entry" />
	</body>
	<script type="text/javascript">
		siteKiosk.ready(function (){
			document.getElementById("id_write").onclick = function () {writeLog();};
			
			function writeLog(){
				var lk_logfile = siteKiosk.log;
				lk_logfile.log(20,"TEST",0,"A test log message.");
			}
		}());
	</script>
</html>

The sitekiosk.min.js script file that is referenced in the above example can be obtained from PROVISIO support. If you are using SiteKiosk Android 2.4.118 you do not need the external script anymore, instead you can reference the internal script file that is included in the installation:

<script type="text/javascript" src="sk:///siteKiosk/siteKiosk.js"></script>

With the release of SiteKiosk Android 2.5 you have a third option to access the SiteKiosk Object Model, that does not require to link a script file at all:

<script>
	//method to initialize the SK Object Model as of SKA 2.5
	(new Function(_siteKiosk.getSiteKioskObjectModelCode()))();
</script>

The log method that is used to create the log entry has four parameters. The first is the log level, possible values are 0 (verbose), 10 (debug), 20 (info), 30 (warning) and 40 (error). Mostly you will work with either 10, 20 or 30. The second parameter is the facility that triggered the log message. For most log entries this is usually SiteKiosk. If you generate your own log entries you should use your own facility name, you can choose whatever name you want for it (though you should stick to a standard character set ;-)). The next parameter is the log type, you should either use 0, which stands for a generic log message, or choose one above 9000 as the rest is already used by SiteKiosk for internal log messages. The final parameter is the text string of the actual log entry.

The example for SiteKiosk Windows (see below for a script example for the new SiteKiosk Chrome Fullscreen Browser) is similar to the Android example with slight variations due to differences in the two SiteKiosk Object Model versions:

<html>
	<SCRIPT TYPE="text/javascript">
		window.external.InitScriptInterface();
		function WriteToLog()
		{
			SiteKiosk.Logfile.Write(9001,20,"TEST","A test log message.");
		}
	</SCRIPT>
	<body>
		<input type="button" value="WriteToLog" onclick="WriteToLog()">
	</body>
</html>

The method used here is named Write and expects the same parameters as the Android log method, allthough in a different order. Further information can be found here.

Next is a script example for the new SiteKiosk Chrome Fullscreen Browser (available since SiteKiosk 8.91). The Object Model for the Chrome-based SiteKiosk browser is still in the making, but you can already write log messages. As you may note, this script has a lot of similarities with the Android version:

<!DOCTYPE html>
<html>
<head>
	<title></title>
	<script type="text/javascript" src="file://C:/Program Files (x86)/SiteKiosk/SiteKioskNG/assets/siteKiosk/sitekiosk.js"></script>
</head>
	<body>
		<input id="id_note" type="button" value="note" />
		<input id="id_warn" type="button" value="warn" />
		<input id="id_error" type="button" value="error" />
	</body>
	<script type="text/javascript">
		siteKiosk.ready(function (){
			 document.getElementById("id_note").onclick = function () {writeLog('note');};
			 document.getElementById("id_warn").onclick = function () {writeLog('warn');};
			 document.getElementById("id_error").onclick = function () {writeLog('error');};
			
			function writeLog(caseid){
				var lk_logfile = siteKiosk.log;
				
				switch(caseid){
					case "note":
						lk_logfile.info("TEST",0,"A test notification.");
						break;
					case "warn":
						lk_logfile.warn("TEST",0,"A test warning.");
						break;
					case "error":
						lk_logfile.error("TEST",0,"A test error.");
						break;
					default:
						break;
				}
			}
		}());
	</script>
</html>

There are three different methods, info for informational messages, warn for warning messages and error for error messages. They all accept three parameters. The first is a string for the facility that triggered the log message. For most log entries this is usually SiteKiosk. If you generate your own log entries you should use your own facility name, you can choose whatever name you want for it (though you should stick to a standard character set ;-)). The next parameter is the log type, you should either use 0, which stands for a generic log message, or choose one above 9000 as the rest is already used by SiteKiosk for internal log messages. The final parameter is the text string of the actual log entry.

The SiteKiosk Object Model can also be used from other applications to generate log messages, e.g. applications written in C#. SiteKiosk must run in order for the other application to write to the log files and both applications must run under the same user. A C# example that writes to the SiteKiosk logs has a few more lines than the html versions:

using System;
using System.Collections.Generic;
using System.Text;
using System.Runtime.InteropServices;
using SiteKioskRuntimeLib;

namespace SKControl
{
    class Program
    {
        [DllImport("ole32.dll", CallingConvention = CallingConvention.StdCall)]
        public static extern int CoGetClassObject(ref Guid rclsid, uint dwClsContext, IntPtr pServerInfo, ref Guid riid, out IntPtr ppv);

        public bool IsSiteKioskActive()
        {

            /*
                returns false, if SiteKiosk is not currently running
                returns true, if SiteKiosk is running
            */


            // initialize GUID's for classes and interfaces
            Guid lr_FactoryGuid = typeof(ISiteKioskFactory).GUID;
            Guid lr_FactoryClass = typeof(SiteKioskFactoryClass).GUID;
            Guid lr_SiteKioskGuid = typeof(ISiteKiosk).GUID;

            ISiteKiosk mk_pSiteKiosk;

            // try to get the ISiteKioskFactory interface of the instance
            // of SiteKioskFactoryClass
            IntPtr lk_FactoryPtr = new IntPtr();
            CoGetClassObject(ref lr_FactoryClass, 4, new IntPtr(), ref lr_FactoryGuid, out lk_FactoryPtr);
            if (lk_FactoryPtr == IntPtr.Zero)
                // SiteKiosk is not running
                return false;

            // convert the received IntPtr to the requested ISiteKioskFactory
            // interface
            ISiteKioskFactory lk_Factory = (ISiteKioskFactory)Marshal.GetObjectForIUnknown(lk_FactoryPtr);

            if (lk_Factory == null)
                return false;

            // call CreateSiteKiosk to get the ISiteKiosk interface of the
            // current instance of SiteKiosk
            IntPtr lk_SiteKioskPtr = new IntPtr();
            lk_Factory.CreateSiteKiosk(ref lr_SiteKioskGuid, out lk_SiteKioskPtr);

            if (lk_SiteKioskPtr == IntPtr.Zero)
                return false;

            // convert the received IntPtr to the requested
            // ISiteKioskFactory interface
            mk_pSiteKiosk = (ISiteKiosk)Marshal.GetObjectForIUnknown(lk_SiteKioskPtr);

            if (mk_pSiteKiosk == null)
                return false;

            // write to the SiteKiosk log file
            ILogfile2 lk_SKLog = (ILogfile2)mk_pSiteKiosk.Logfile;
            lk_SKLog.Write(9001, 20, "TEST", "A test log message from an external application.");

            return true;
        }

        static void Main(string[] args)
        {
            bool lb_ReturnValue = false; //false if SiteKiosk is not running, true if SiteKiosk is running; not used in this example
            
            Program lk_Prog = new Program();
            lb_ReturnValue = lk_Prog.IsSiteKioskActive();
        }
    }
}

As the C# example is basically using the SiteKiosk Windows Object Model the syntax of the Write method is the same as if you would use it in html code. Make sure to read the part about using the SiteKiosk Object Model in C# from the SiteKiosk Object Model documentation. Running the example code from within Visual Studio while SiteKiosk is running and the debug output window is enabled (SiteKiosk Windows configuration -> Logfiles -> Show output window) will give you something like this:

Note that you may need to build your C# application for an x86 target platform rather than any cpu, otherwise it may fail to detect SiteKiosk on a 64-bit system, because SiteKiosk runs as a 32-bit application.

Using the Blackboard to Transfer Machine Information from SiteRemote to SiteKiosk Windows

A team on the remote management solution SiteRemote enables you to manage your SiteKiosk machines by assigning them to folders and tags. You can also assign address information like the location of the machine or the responsible maintenance person. This information can also come in handy on the client machines. For example you may use it to display different content based on the location address or the assignment to a specific folder or tag. This also means, that whenever you change this information on the server you can directly make use of that change on the client.

Let's find out how to get the information from the SiteRemote server. We will use the SiteKiosk Object Model inside an HTML page running in the SiteKiosk Windows browser. The SiteKiosk Object Model provides the ReadBlackboardAsString method. We will use that method to get the name of the SiteRemote team the machine is registered to, the SiteRemote display name of the machine, the folder and tags the machine is associated to and the address information assigned to the machine. For our example the setup lools like this:

The ReadBlackboardAsString method accepts a string as parameter that specifies the requested information (see the Remarks part here for further information) as shown in this example excerpt:

//Get the name of the SiteRemote team the machine is registered with.
document.getElementById("teamname").innerHTML = SiteRemotePlugin.ReadBlackboardAsString('StC.TeamInfo.Name');
//Get the display name of the machine in the SiteRemote team it is registered with.
document.getElementById("machinename").innerHTML = SiteRemotePlugin.ReadBlackboardAsString('StC.MachineInfo.Name');
//Get the folders and tags the machine is part of.
document.getElementById("groupstags").innerHTML = SplitBlackBoardStrings(SiteRemotePlugin.ReadBlackboardAsString('StC.MachineInfo.LocationInTreeview'));
//Get address information for the machine, e.g. location, maintenance contact.
document.getElementById("supportinfo").innerHTML = SplitBlackBoardStrings(SiteRemotePlugin.ReadBlackboardAsString('StC.MachineInfo.SupportInfo'));

The method returns a string with the SiteRemote blackboard information. Be aware that the string is in JSON format. You can either handle it as a normal string, just like in the above example, which is why the information for the group/tag membership and the address information is processed in an additional method (see the full example code below to see the code of that method) that splits the string at every comma. You can also work with the string in JSON format, for which you may need to add additonal script, see the Examples part here for more information.

The full example code we can build around the reading of the SiteRemote blackboard looks like this:

<html>
	<head>
		<title>SiteKiosk Blackboard Example</title>
		
		<style type="text/css">
			div { color:black; font-style:arial; font-size:18px; }
			span { color:red; font-style:arial; font-size:24px; }
		</style>

		<script type="text/javascript">
			window.external.InitScriptInterface();
			
			SiteRemotePlugin = SiteKiosk.Plugins("SiteRemote");
			
			//First check if the machine is registered with SiteRemote.
			if (SiteRemotePlugin.IsRegistered){
				//Registered. Trigger the initial blackboard request. Note: the first request will most likely come back empty.
				ReadSiteRemoteBlackboard();
			}
			else{
				//Not registered. Show message on screen.
				document.getElementById("registered").stlye.display = "none";
				document.getElementById("notregistered").stlye.display = "inline";
			}
			
			function ReadSiteRemoteBlackboard(){
				try{
					//Get the name of the SiteRemote team the machine is registered with.
					document.getElementById("teamname").innerHTML = SiteRemotePlugin.ReadBlackboardAsString('StC.TeamInfo.Name');
					//Get the display name of the machine in the SiteRemote team it is registered with.
					document.getElementById("machinename").innerHTML = SiteRemotePlugin.ReadBlackboardAsString('StC.MachineInfo.Name');
					//Get the folders and tags the machine is part of.
					document.getElementById("groupstags").innerHTML = SplitBlackBoardStrings(SiteRemotePlugin.ReadBlackboardAsString('StC.MachineInfo.LocationInTreeview'));
					//Get address information for the machine, e.g. location, maintenance contact.
					document.getElementById("supportinfo").innerHTML = SplitBlackBoardStrings(SiteRemotePlugin.ReadBlackboardAsString('StC.MachineInfo.SupportInfo'));
				}catch(e){
					//Blackboard information is not yet available, try again in 10 seconds.
					window.setTimeout("ReadSiteRemoteBlackboard()", 10000);
				}
			}
			
			function SplitBlackBoardStrings(blackboardstring){
				//Split the Blackboard string for better readability.
				var blackboardstringelements = blackboardstring.split(",");
				var composedelements = "";
				
				for (var i = 0; i < blackboardstringelements.length; i++){
					composedelements += blackboardstringelements[i] + "<br />";
				}
				
				return composedelements;
			}
		</script>
	</head>
	<body>
		<div id="registered" style="display:inline;">
			This machine is part of the SiteRemote Team <span id="teamname">[Information not yet available. Please wait.]</span> and 
			its display name on the SiteRemote server is <span id="machinename">[Information not yet available. Please wait.]</span>.
			<br /><br />
			The machine is assigned to the following groups and tags:
			<br />
			<span id="groupstags">[Information not yet available. Please wait.]</span>
			<br /><br />
			These addresses are available for the machine:
			<br />
			<span id="supportinfo">[Information not yet available. Please wait.]</span>
		</div>
		<div id="notregistered" style="display:none;">
			This machine is not registered with SiteRemote!
		</div>
	</body>
</html>

If you save the example code as an HTML page and place it in the html subfolder of your SiteKiosk installation and then configure SiteKiosk to use it as a start page you will get output similar to this:

Note that of course this requires that you register your SiteKiosk Windows client with a SiteRemote server and assign tags and address information to it. As you can see above the address information may include empty fields, if those values have not been provided when creating the address information. You can sort through those with standard Javascript string handling procedures.

For further reading you may want to have a look at the AttachBlackboardListener and DetachBlackboardListener methods, that will enable you to automatically and continously listen for changes to blackboard information on the SiteRemote server, so that the client can immediately react to those changes.

How to Manually Map the File Manager Folder of SiteRemote in Your Windows Explorer

The File Manager of SiteRemote is also accessible via WebDAV. Usually you just need to download a JavaScript from the SiteRemote File Manager web page and then execute the script locally to map the file manager folder of your SiteRemote Team as a WebDav Network Drive into the Windows Explorer.

But if for any reason it is not possible to use the JavaScript option you can proceed as follows to manually map the file manager folder of SiteRemote in your Windows Explorer.

Please note: One reason you need to manually map the file manager folder is when you installed your SiteRemote server into a virtual directory of a web page. In that case the Javascript file you can download from the File Manager web page of your SiteRemote team cannot create the WebDAV mapping for you.

The following example demonstrates the manual mapping procedure under Windows 8, it is very similar on other Windows operating systems:

1. Open the Windows Explorer and press the button “Map network drive”.


2. Choose a drive letter that is not in use and add https://www.siteremote.net/TeamRoot (replace www.siteremote.net with the URL of any other SiteRemote server if you are not using the service provided by PROVISIO) to the input field “Folder”. Enable the checkbox “Connect using different credentials”.
If you want that the folder also will be reconnected after a Windows Reboot you can activate the checkbox “Reconnect at logon”.


3. After pressing the “Finish” button you will be prompted for a login.

4. Then you need to enter the user name and password of your SiteRemote user.
Optionally enable the checkbox “Remember my credentials” (e.g. if you also enabled “Reconnect at logon” before).


5. Finally the folder will be accessible through the Windows Explorer and you can use it like any other (Network) drive.


In case you want to disconnect the folder just right click on it in the Windows Explorer and choose “Disconnect” from the context menu.

Using SiteRemote to Change Windows Registry Settings

The SiteRemote job system enables you to make Windows registry changes on your SiteKiosk Windows clients that are registered with your team. This can be used for example to change a Windows setting remotely or add a registry key to make Windows or an application behave differently than before.

The registry changes can be made in Javascript using methods of the Windows Script Host. The scripts can be distributed to the clients by creating a SiteRemote job with the action type 'Execute Script'.

After you selected the 'Execute Script' action type you can copy and paste the following to the script text box:

var gk_WshShell = new ActiveXObject("WScript.Shell");
//Create a test registry key 
gk_WshShell.RegWrite("HKLM\\Software\\SiteRemoteTest\\Test", "SiteRemote generated this registry key for testing purposes", "REG_SZ");

For this example, make sure to not enable the option 'Script requires SiteKiosk Object' as we want to first write to the HKEY_LOCAL_MACHINE (HKLM) part of the registry. If you enable the option, the script is executed with the rights of the user SiteKiosk is running under at the time of the script execution. Depending on the user rights writing to HKLM might not be possible. With the option disabled the script is executed with the full rights of the Local System Windows user.

The result will look like this if you view it with the Windows Registry Editor:

Note that the example uses the Software path, which means that on a 64-Bit system the entry will automatically be created under Wow6432Node as the client application executing the code is running in 32-Bit mode.

If you use the next example script as part of a SiteRemote script job you would change the entry that has been created by the code above:

var gk_WshShell = new ActiveXObject("WScript.Shell");
//Change the test registry key
gk_WshShell.RegWrite("HKLM\\Software\\SiteRemoteTest\\Test", "SiteRemote changed this registry key for testing purposes", "REG_SZ");

The next example would delete the test entry that has been created in the Windows registry:

var gk_WshShell = new ActiveXObject("WScript.Shell");
//Delete the test registry key
gk_WshShell.RegDelete("HKLM\\Software\\SiteRemoteTest\\");

As mentioned above, if you want to write to the registry hive of the user you are running SiteKiosk under, at the moment the job is executed on the client computer, you need to activate the option 'Script requires SiteKiosk Object'. This is normally used for executing SiteKiosk Object Model code, but it also means that the code is not executed with the System user the job would otherwise be running under.

The following example will do the same as the first one with the exception that it will write the key to the registry hive of the user (HKEY_CURRENT_USER or HKCU):

var gk_WshShell = new ActiveXObject("WScript.Shell");
//Create a test registry key 
gk_WshShell.RegWrite("HKCU\\Software\\SiteRemoteTest\\Test", "SiteRemote generated this registry key for testing purposes", "REG_SZ");

If you use HKCU and do not activate the option 'Script requires SiteKiosk Object' the key will be written to the hive of the System user.

Note that contrary to the examples that did not have the checkbox for the SiteKiosk Object enabled this one creates the key directly under the Software path, even on a 64-Bit system, as the client application responsible for executing the code under these circumstances is running in native mode.

Changing Individual SiteKiosk Configuration Elements with a SiteRemote Job

Often you just need to change a single SiteKiosk configuration setting. Even when using a great number of SiteKiosk machines this is not a problem, you can just use the configuration feature of SiteRemote to distribute the changed configuration file to the machines.

But what if your machines all use configurations that differ in parts, for example the configurations are all using a different start page to reflect their individual locations while the rest of the settings are the same. This challenge can be solved by making use of the fact that the SiteKiosk configuration files are built on the XML format. This enables you to create a Javascript file that can access and edit a specific element of the configuration file.

The following script examples do not use the SiteKiosk Object Model. They use common Javascript/JScript techniques as described for example in the Microsoft MSDN library.

The first example will enable the fullscreen mode of SiteKiosk. The script starts by creating the required ActiveX objects to access the Windows registry and to edit an XML document. Next it queries the path of the latest SiteKiosk configuration file from the registry, either of a 32 or a 64 bit system. It then loads the document and assigns the XML node for the fullscreen setting and changes its text. Finally the edited configuration file is being saved. For further information on the methods to work with an XML document see http://msdn.microsoft.com/en-us/library/System.Xml.XmlDocument_methods%28v=vs.110%29.aspx.

try{
	//Wsh Shell Object
	var WshShell = new ActiveXObject("WScript.Shell");

	//XML support
	var xmlDoc = new ActiveXObject("Msxml2.DOMDocument.3.0");

	//Path to the SiteKiosk configuration
	var OsType = WshShell.RegRead("HKEY_LOCAL_MACHINE\\SYSTEM\\CurrentControlSet\\Control\\Session Manager\\Environment\\PROCESSOR_ARCHITECTURE");
	if (OsType == "x86")
		var gstr_configpath = WshShell.RegRead("HKEY_LOCAL_MACHINE\\SOFTWARE\\PROVISIO\\SiteKiosk\\LastCfg"); //you may use an absolute path instead, e.g.: var gstr_configpath = "c:\\program files\\sitekiosk\\config\\myconfig.skcfg"
	else
		var gstr_configpath = WshShell.RegRead("HKEY_LOCAL_MACHINE\\SOFTWARE\\Wow6432Node\\PROVISIO\\SiteKiosk\\LastCfg"); //you may use an absolute path instead, e.g.: var gstr_configpath = "c:\\program files\\sitekiosk\\config\\myconfig.skcfg"

	if(xmlDoc.load(gstr_configpath)){
		var lk_nodeselection = xmlDoc.documentElement.selectSingleNode("//sitekiosk-configuration/browserbar/hidemode");
		//Changes the node text to 1 which enables permanent fullscreen mode (0 disables fullscreen, 2 enables fullscreen mode for specific URLs only).
		lk_nodeselection.text = "1";
		//Saves the  changes
		xmlDoc.save(gstr_configpath);
	}
	else{
		//Returns an error exit code to SiteRemote 
		ExitResult.Code = 1;
		ExitResult.Description = "Error opening configuration file.";
	}
}
catch(e){
	try	{
		if(e.number != 0)
			ExitResult.Code = e.number;
		else
			ExitResult.Code = 1;
		ExitResult.Description = e.description;
	}
	catch(e){}
}

After running the script the fullscreen setting of the SiteKiosk configuration looks like this:

The second example adds a URL excluded from filtering to the Content Filter of SiteKiosk. Again it starts by creating the required ActiveX objects and finding the path to the latest SiteKiosk configuration file. Next it adds a new XML node to an existing one for the URL that should be excluded from filtering. After that the document is being saved. For further information on the methods to work with an XML document see http://msdn.microsoft.com/en-us/library/System.Xml.XmlDocument_methods%28v=vs.110%29.aspx.

try{
	//Wsh Shell Object
	var WshShell = new ActiveXObject("WScript.Shell");

	//XML support
	var xmlDoc = new ActiveXObject("Msxml2.DOMDocument.3.0");

	//Path to the SiteKiosk configuration
	var OsType = WshShell.RegRead("HKEY_LOCAL_MACHINE\\SYSTEM\\CurrentControlSet\\Control\\Session Manager\\Environment\\PROCESSOR_ARCHITECTURE");
	if (OsType == "x86")
		var gstr_configpath = WshShell.RegRead("HKEY_LOCAL_MACHINE\\SOFTWARE\\PROVISIO\\SiteKiosk\\LastCfg"); //you may use an absolute path instead, e.g.: var gstr_configpath = "c:\\program files\\sitekiosk\\config\\myconfig.skcfg"
	else
		var gstr_configpath = WshShell.RegRead("HKEY_LOCAL_MACHINE\\SOFTWARE\\Wow6432Node\\PROVISIO\\SiteKiosk\\LastCfg"); //you may use an absolute path instead, e.g.: var gstr_configpath = "c:\\program files\\sitekiosk\\config\\myconfig.skcfg"

	if (xmlDoc.load(gstr_configpath)){
		var lobj_snglnode = xmlDoc.selectSingleNode("//plugin[@name='SiteCoach']");
		var lobj_newelelement,lstr_newtext;
		lobj_newelelement=xmlDoc.createNode(1, "exclude", lobj_snglnode.namespaceURI);
		lstr_newtext=xmlDoc.createTextNode("http://www.provisio.com");
		lobj_newelelement.appendChild(lstr_newtext);
		lobj_snglnode.appendChild(lobj_newelelement);
		//Saves the  changes
		xmlDoc.save(gstr_configpath);
	}
	else{
		//Returns an error exit code to SiteRemote 
		ExitResult.Code = 1;
		ExitResult.Description = "Error opening configuration file.";
	}
}
catch(e){
	try	{
		if(e.number != 0)
			ExitResult.Code = e.number;
		else
			ExitResult.Code = 1;
		ExitResult.Description = e.description;
	}
	catch(e){}
}

After running the script the Content Filter page of the SiteKiosk configuration looks like this:

To run such a script just go to the Jobs section of SiteRemote and create a new job and select Execute Script as action. Copy and paste the code into the text field and assign the job. Do not activate the checkbox Script requires SiteKiosk Object, as it would run the script within the SiteKiosk user context, who for security reasons does not have the necessary rights to edit the configuration.

Note that you should make changes to the configuration file with care and test them first before applying to a great number of terminals. E.g. writing XML incompatible values to the configuration will make the file unreadable, so SiteKiosk will then load the emergency configuration file instead.

In order to let the new configuration file become the active configuration you need to restart SiteKiosk.

LDAP User Mapping in SiteRemote and SiteKiosk Online

Note: The first part of this page applies to SiteRemote 6.2 and higher and SiteKiosk Online. For older versions please see the second part of this page.

SiteRemote Server 6.2 and higher and SiteKiosk Online include an LDAP configuration option on the Settings page of the SiteRemote/SiteKiosk Online server. SiteRemote/SiteKiosk Online support the LDAPv3 protocol, please make sure that your LDAP server supports this protocol version.

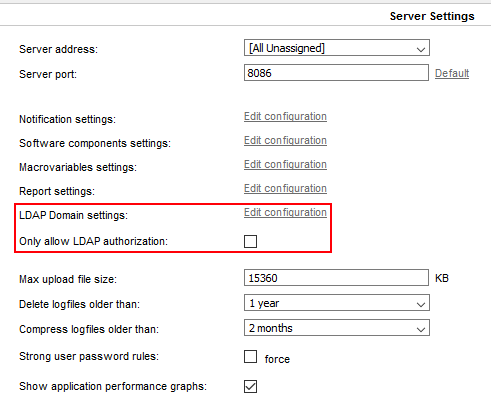
Click on Edit configuration to create a set of LDAP settings. If you only want LDAP authorization to be allowed on your SiteRemote/SiteKiosk Online server use the Only allow LDAP authorization checkbox, login with local SiteRemote users will then be deactivated.


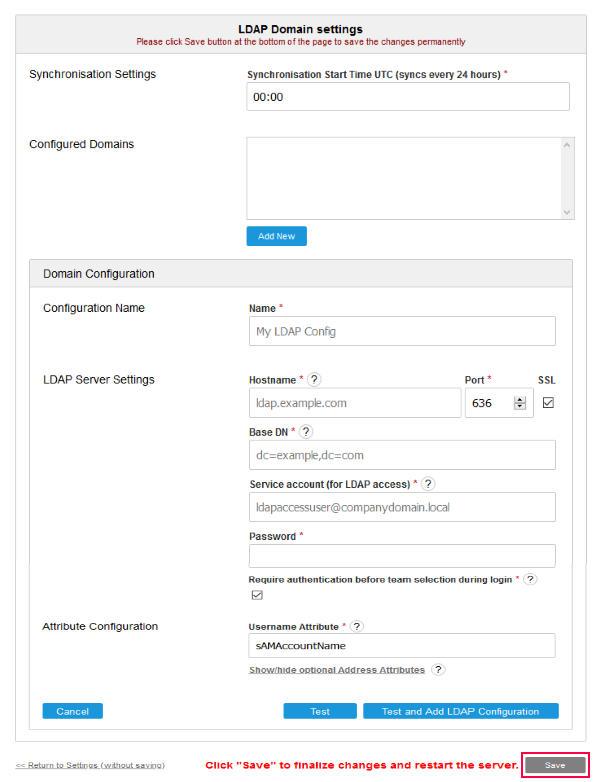
On the configuration page you can set the time for the daily LDAP synchronization. You can also add as many LDAP domains as you want, e.g. to assign different LDAP servers to your SiteRemote/SiteKiosk Online teams. You can edit or delete existing domains, note that you cannot delete a domain if it is assigned to a team. Click on Add New to add a domain configuration. Choose a name for your LDAP domain configuration and make the settings according to your LDAP environment. Use the help icons (?) for additional information for each setting. Click on the Test button to test your settings and click on the Test and Add LDAP Configuration button to test and save your LDAP configuration.

IMPORTANT: Once you are done with creating or editing the LDAP settings, click on the Save button (marked in red on the screenshot above) to fully save and activate your LDAP settings. The SiteRemote/SiteKiosk Online server will be restarted for that purpose.


Next go to the Teams page of the SiteRemote/SiteKiosk Online administration and create a team or choose an existing team. Please note that you first need to create a team before you can assign the LDAP settings to it. Click on Activate LDAP to assign LDAP authentication to a team or Modify/Deactivate LDAP to change or remove LDAP settings from a team.


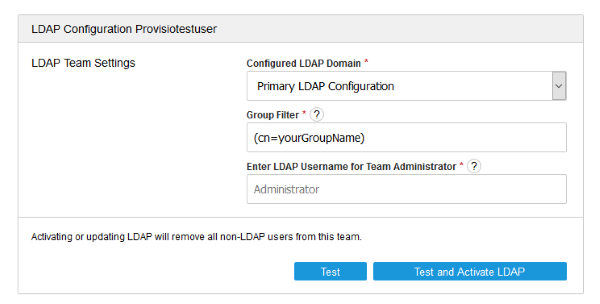
Choose an existing LDAP domain from the dropdown and assign one or more groups from your LDAP server. Choose one LDAP user that is part of a selected LDAP group to be the administrator of the SiteRemote/SiteKiosk Online team. Use the help icons (?) for additional information for each setting. Use the Test button to test your settings and the Test and Activate LDAP button to test and assign the LDAP settings. All local SiteRemote/SiteKiosk Online users will be removed from a team once LDAP is activated, the same applies to all LDAP users when disabling LDAP for a team. Login with the LDAP user that has been assigned as the team administrator to set the SiteRemote/SiteKiosk Online team rights for the other LDAP groups and users that have been assigned to the team.

Please note that the user name you need to use when registering or unregistering a client is ldapusername+siteremoteteamname, e.g. miller+yourcompteam (Note: this is not necessary when using the preconfigured SiteKiosk Online Windows client installer). SiteRemote/SiteKiosk Online maps the LDAP user to an internal user. Because you can assign the same LDAP user to different teams, the teamname is added with a plus sign to create the internal user name. This only applies to registering or unregistering a client, the SiteRemote/SiteKiosk Online login page will show a team selection drop down field if required to handle the LDAP login of the same user to different teams.

Please note that the SiteRemote Server needs to trust the LDAP server when using SSL for the connection, if you are using self-signed certifcates you may need to import your root certificate as a trusted certificate authority into the Windows certificate store.

Also note that the AutoRegister tool of SiteRemote does not support LDAP users due to technical limitations. The AutoRegister tool of SiteKiosk Online (and also the preconfigured Windows client installer) can be used in LDAP environments.


Note: The following applies to the release version 5.1.0.2188 up to 6.1. For compatibility reasons with OpenLDAP the syntax of the user.config section has been changed from the original release version 5.1.0.2186. The old syntax is no longer supported.

With SiteRemote Server 5.1 we introduced LDAP user mapping for customers running their own SiteRemote server. Now you can use user credentials provided by the directory service of your company's domain (q.v. Active Directory) for authentication in SiteRemote.

LDAP users and normal SiteRemote team users can be used together. At least one SiteRemote team user is required for each team you want to map LDAP users to.

Before you can map LDAP users to SiteRemote you need to create at least one team. You can do that for example on the Teams tab of the SiteRemote Server Administration. Note that while creating the team you need to specify a user, this user must not be an LDAP user but a normal SiteRemote Team user. This is the user responsible for a team and it cannot be deleted when logged in with an LDAP user. You can only delete this user from another SiteRemote team user account within a team (Note: it is planned for future SiteRemote versions to make the primary administration user permanent, so this behaviour might change).

After the team creation you can proceed to prepare your SiteRemote server to use LDAP authentication. You now need to manually edit the configuration file of the server. You will find the SiteRemoteServer.config file under ..\PROVISIO\SiteRemote\Config. Open it with an editor like Notepad and scroll down to the bottom. There you need to change the default User.config section right before the closing configuration tag:

<User.config LdapServerPort="0" LdapSecureSocketLayer="false" />

to something like this:

<?xml version="1.0" encoding="utf-8"?>
<Configuration>
	...
	
	...
	<SiteCaster.config VideoAudioAnalyzerPath="VideoAudioAnalyzer.exe" />
	<User.config>
		<LdapImportFullFilePath>c:\ldapuserlist.csv</LdapImportFullFilePath>
		<LdapServerHost>ldapserver.yourdomain.biz</LdapServerHost>
		<LdapServerPort>389</LdapServerPort>
		<LdapSecureSocketLayer>false</LdapSecureSocketLayer>
		<LdapUserPatterns>yourcompany\{0}</LdapUserPatterns>
	</User.config>
</Configuration>

The User.config section is the parent element for all LDAP related child elements in the SiteRemote configuration.

The LdapImportFullFilePath element must include the full path to the .csv file that includes the domain users you want to map to SiteRemote. More on that file a little later.

LdapServerHost includes the full host name of your LDAP server, you may also use an IP adress.

LdapServerPort specifies the port your LDAP server uses. The default LDAP port is 389 or 636 if using an SSL connection.

LdapSecureSocketLayer is a boolean value. It is true if the server uses SSL.

LdapUserPatterns defines the way SiteRemote queries the user with the LDAP server. There are three supported principal forms: LDAP DN, Kerberos and NTLM. Note that these forms cannot be mixed. {0} is a required part of the pattern and is replaced by SiteRemote to include the user name that is authenticated with the LDAP server. The same user data is also used to perform the LDAP request.
LDAP DN uses the LDAP distinguished name syntax. This is used for example in OpenLDAP installations like Novell eDirectory.

<LdapUserPatterns>cn={0},ou=users,ou=us,o=yourcompany</LdapUserPatterns>

Because that syntax is very specific in regards to the location that is queried within the LDAP structure, you can add more than one pattern. The patterns must be seperated by a semicolon.

<LdapUserPatterns>cn={0},ou=users,ou=california,ou=us,o=yourcompany;cn={0},ou=users,ou=de,o=yourcompany;cn={0},ou=users,ou=gb,o=yourcompany;</LdapUserPatterns>

Kerberos authentication is usually used in Windows Active Directory. This syntax does not require different patterns as it queries the complete LDAP tree.

<LdapUserPatterns>{0}@yourcompany.biz</LdapUserPatterns>

NTLM authentication is also commonly used in Windows Active Directory. This syntax does not require different patterns as it queries the complete LDAP tree.

<LdapUserPatterns>yourcompany\{0}</LdapUserPatterns>

Here is another full example that uses SSL and LDAP DN:

<?xml version="1.0" encoding="utf-8"?>
<Configuration>
	...
	
	...
	<SiteCaster.config VideoAudioAnalyzerPath="VideoAudioAnalyzer.exe" />
	<User.config>
		<LdapImportFullFilePath>c:\ldapuserlist.csv</LdapImportFullFilePath>
		<LdapServerHost>ldapserver.yourdomain.biz</LdapServerHost>
		<LdapServerPort>636</LdapServerPort>
		<LdapSecureSocketLayer>true</LdapSecureSocketLayer>
		<LdapUserPatterns>cn={0},ou=users,ou=california,ou=us,o=yourcompany;cn={0},ou=users,ou=de,o=yourcompany</LdapUserPatterns>
	</User.config>
</Configuration>

After making and saving the changes to the SiteRemoteServer.config file you need to restart the SiteRemote Server service in the Microsoft Management Console for Windows Services (services.msc).

Now its time to create and place the .csv file with your LDAP user list at the location you specified in the SiteRemote configuration file. Note that the file only needs to contain the LDAP users you actually want to use with SiteRemote and not all LDAP users in your domain. Each line of the .csv file represents one LDAP user. The syntax is as follows:

[<oldusername>],<username>,<team>,<role(s)>,[<group(s)>]

oldusername is optional and required if you want to rename a user and keep this user's assignments within a SiteRemote team. This can be useful due to a name change because of marriage for example. oldusername then specifies the existing name of the user and username would contain the new one. Providing a name in this field is optional, if you don't provide a name you still need to write the comma to separate this field from the next. Note that user names must be unique, each user name can only be used once.

username specifies the name of the user. This field is required. Note that user names must be unique, each user name can only be used once.

team specifies the SiteRemote team name you want to assign the user to. This field is required.

role(s) (optional since SiteRemote Server 5.2 or higher) specifies the role or roles that you want to assign to the user. The role names of the default roles are language specific and depend on the language that was assigned at the time the team was created. For example the default roles for English are Administrator, User and Guest, in German they are Administrator, Benutzer and Gast. Other roles can be created and individually named in a SiteRemote team under Administration -> User Roles. If you want to assign more than one role you need to use quotation marks and separate each role by a comma.

group(s) is optional and only available with SiteRemote Server 5.2 or higher. You can assign LDAP users to groups you have created. If you want to assign more than one group you need to use quotation marks and separate each group by a comma. Note that each user will be automatically assigned to the Everyone group of a SiteRemote team.

Generally quotation marks are recommended to be used for each field. Here is an example of how the file can look like:

,"LDAPuser1","team1","Administrator"
,"LDAPuser2","team1","Guest"

,"LDAPuser3","team2","Administrator"
,"LDAPuser4","team2","User,Team2Role1,Team2Role2"
"LDAPuser5","LDAPuser7","team2","Guest"

,"LDAPuser6","team3","Administrator","Admin Group"

Note that the empty lines between the teams are not required, yet they can be used to better visualize assignments for different teams.

Each time you edit and save the .csv file or overwrite the existing file with a new one, the changes are applied.

To remove a user, simply delete the line from the .csv file and save it. The following would remove LDAPuser4 from team2:

,"LDAPuser1","team1","Administrator"
,"LDAPuser2","team1","Guest"

,"LDAPuser3","team2","Administrator"
,"LDAPuser7","team2","Guest"

,"LDAPuser6","team3","Administrator","Admin Group"

To remove all LDAP users from a team, just remove them all from the file. Placing an empty file will remove all LDAP users from all teams. The next example will remove all LDAP users from team2:

,"LDAPuser1","team1","Administrator"
,"LDAPuser2","team1","Guest"

,"LDAPuser6","team3","Administrator","Admin Group"

In case you want to assign a group but no role, the line would look like this:

,"LDAPuser6","team3",,"Admin Group"

Status messages regarding the processing of the file can be found in the SiteRemote server log file. The file SiteRemote.log can be found under ..\PROVISIO\SiteRemote\Log.

For full functionality the LDAP user authentication requires SiteKiosk Android 2.2 or higher or SiteKiosk Windows 8.9 or higher. Older versions cannot be registered with the SiteRemote server using an LDAP user.

In case you are using the TerminalCommander tool please make sure you are using the version that comes with SiteRemote Server 5.1 or higher.

Please note that the AutoRegister tool of SiteRemote does not support LDAP users due to technical limitations. The AutoRegister tool of SiteKiosk Online (and also the preconfigured Windows client installer) can be used in LDAP environments.

SiteKiosk and SiteRemote Server not Affected by OpenSSL Heartbleed Bug

SiteKiosk does not use the OpenSSL library.

The OpenSSL library used by SiteRemote is not affected by the heartbleed bug. SiteRemote includes a version of the library that is not vulnerable. This applies to the cloud services provided by PROVISIO, e.g. www.siteremote.net, as well as the installer to setup your own SiteRemote Server.

OpenSSL is part of the XMPP component of SiteRemote Server, used for communication with SiteKiosk Android devices.

Setting a Default Color Value for VNC Connections

Please note that there is an updated version of the post for SiteRemote 5.1 or higher available here.

Usually SiteRemote establishes VNC connections from within the browser (Firefox or Internet Explorer) using the auto mode to choose the number of available colors for the VNC desktop. In rare occasions it might be helpful to limit the colors right from the start, e.g. the target client has a very large resolution and/or the connection to the client is rather bad.

To limit the colors right from the beginning of the VNC connection PROVISIO created a special version of the current 1.2.0.0 version of the SiteRemote UVNC Client Installer. You can download the modified dll files and an options file here: http://www.provisio.com/download/beta/VNCAddOns_withColorDefaults.zip.

The two dll files from the zip archive have to be copied into the installation folder of the UVNC Client. The UltraVncAx.dll has to be copied to ..\PROVISIO\VNCAddOns\ and the npVnc.dll to ..\PROVISIO\VNCAddOns\Extensions\Plugins\. The options_x.vnc file has to be copied into the folder C:\Users\[USERNAME]\AppData\Roaming\UltraVNC\, where USERNAME stands for the Windows user you are using the UVNC Client under.

To set the colors you have to edit the 8bit value from the options_x.vnc (you can open and edit it with an editor like Notepad). Possible values are:

rfbPFFullColors		0
rfbPF256Colors		1
rfbPF64Colors		2
rfbPF8Colors		3
rfbPF8GreyColors	4
rfbPF4GreyColors 	5
rfbPF2GreyColors	6

For example setting 8bit=4 uses 8 grey colors to render the desktop of the VNC connection.

Please note that the standard UVNC client also operates with an options file. It is called options.vnc. It is used to save user-defined values for an UVNC connection. It should be possible to use other values of that file in the options_x.vnc of the SiteRemote UVNC client as well. Please be aware that this is untested, but feel free to experiment.

Creating a Custom SiteRemote Alert

The SiteRemote server already offers a variety of alerts that help you maintain your kiosk systems. But for specific projects it is helpful to be able to create additional alerts that can trigger an email or sms to notify about a possible problem. Customers running their own SiteRemote server can create their own custom alerts. Creating such an alert requires work on the client side (SiteKiosk) and on the server side (SiteRemote). The following is a short guide to creating a custom alert:


1. SiteKiosk

To create new alerts you first have to write the alert event into the log file of the SiteKiosk client machine. To do this, you can use the SiteKiosk Object Model which can also be accessed from other programming languages. The log entry you create with the SiteKiosk Object Model will be used to trigger SiteRemote alerts.

The Write method of the SiteKiosk Object Model is used to create log entries for custom alerts: http://www.provisio.com/en-US/Help/ObjectModel/sitekiosk_object/logfile_write_mth.html

The Write method has the follwing parameters:

type

Short value that specifies the type.

level

Short value that specifies the level.

facility

String that specifies the facility.

text

String that specifies the text to write.


The Type property contains the type of the log file message. Possible types are: http://www.provisio.com/en-US/Help/ObjectModel/sitekiosk_object/logmessage_type_prop.html

The Level property contains the level of the log file message. Possible levels are: http://www.provisio.com/en-US/Help/ObjectModel/sitekiosk_object/logmessage_level_prop.html

The Facility property contains the description of the device, plugin or component (http://www.provisio.com/en-US/Help/ObjectModel/sitekiosk_object/logmessage_facility_prop.html).

The Text property contains the text of the log file message (http://www.provisio.com/en-US/Help/ObjectModel/sitekiosk_object/logmessage_text_prop.html).

See the LogMessage object for further information about the parameters (http://www.provisio.com/en-US/Help/ObjectModel/sitekiosk_object/logmessage_obj.html).


More information about the SiteKiosk Object Model can be found here: http://www.provisio.com/en-US/Help/HelpFrame.aspx?HelpFolder=ObjectModel.


The example code for our custom alert looks like this:

SiteKiosk.Logfile.Write(9999, 40, "CustomFacility", "Custom Text to write");


When adding this to an HTML example page we will get this:

<html>
	<head>
		<title>Write Log</title>
		<SCRIPT TYPE="text/javascript">
		window.external.InitScriptInterface();
		function WriteLog(){
			SiteKiosk.Logfile.Write(9999, 40, "CustomFacility", "Custom text to write");
		}
		</SCRIPT>
	</head>
	<body>
		<input type="button" value="SiteKiosk Logfile Write Button" onclick="WriteLog()">
	</body>
</html>

Copy & paste the code into an editor (e.g. Notepad) and store the html file (e.g. Alert.html) at the path “…\Sitekiosk\Html”. Configure the html file as the start page and run SiteKiosk to test. The log entry will be created when you click the button.


2. SiteRemote Server

With the example above you will see a log entry like this appearing on the SiteRemote Server:

40 9999 2012-07-17 13:51:22 +0200 [CustomFacility] Custom text to write

In order to get an alert notification from this log entry you created, you will need to edit the Notification settings on the Settings page of the Administration section of your SiteRemote server installation.

To receive an alert email and/or SMS, you need to create the corresponding entries under the “Notification settings”.  Create the entries by adding new strings with the text for the alert message (-->Users-->username-->Alert Notifications-->Notification options for results).

Please follow the next steps to configure your SiteRemote server to show a custom alert:

A. Open the SiteRemote Administration page and go to the “Strings” tab. Select the language and use the “Add new” button to create a new string. The next free ID will be chosen automatically.  Enter your message in the text field.

For our example (ID 3545 CustomEventTitleText / ID 3546 CustomEventBodyText / ID 3547 CustomEventGroupID):

Note that for SiteRemote Server 6 and higher you need to create the strings twice. Once under the Web-Strings tab and once under the Report-Strings tab. Both can be found on the Strings page of the Administration. Use the same IDs under both tabs.

The following variables can be used to get the server name, the alert text and the alert time from the client in your alert notification:

$(Server_name_short) receives the error "$(Alert:LogText)". Error occurred at $(Alert:LogLocalTime) local machine time.

Use the existing entries for “SiteCashError” as a reference:

B. After creating the new strings, open the “Settings” page.

Under “Notification settings” follow the “Edit configuration” link.

Press the “Add New” button at the “LogMessage options” section.

You will see a form like this:

Enter the corresponding values for your log entry with “Fire if message count > 0” and “Period (min): 0”. In this case we chose the event name “CustomEvent”:

Use the Save link to save the new entry.

C. Scroll down to the “Notification Events” and press the “Add New” button.

The “Name” value must be an exact match to the “Event name” that was used under LogMessage options section.

The value for "Bit" is a number to represent the ID of the Event.

Select the next free Bit number or the highest available number.

For the different IDs enter the string number(s) you have created.

- OnlineTitleId: Title text on the web page

- OnlineTextId: Body text on the web page

- MailTitleId: Title text Email

- MailTextId: Body text Email

- SMSTitleId: Title text SMS

- SMSTextId: Body text SMS

For our example this means:

Use the Save link to save the new entry.

D.  Scroll down to “Groups” and press the “Add New” button.

The “Events” value must be an exact match to the “Event name” that was used under the LogMessage options section.

The value for "Bit" is a number to represent the ID of the Event.

Select the next free Bit number or the highest available number.

Enter the string number you created for GroupID in the “TitleID” box.

For our example:

Use the Save link to save the new entry.

Click the OK button at the bottom of the page to save and move on to the next step.


Last, login to your SiteRemote team account and activate the new alert on the settings page (-->Users-->Username-->Alert Notifications-->Notification options for results).

For our example:


Now, when you press the button that was created to write the SiteKiosk log file entry, you will get an alert when logged into your team account and via email and/or SMS (if configured).


Example online text:

Example email text:

When an alert is triggered, it will be displayed in your team account and sent by email if that option is configured. If you do not receive the email even though the alert is displayed, you should check the “Delay” that is configured under “-->Settings-->General-->Alerting Delay” (default 15 minutes).

File synchronization on a SiteRemote Server that uses port forwarding

The following advice only applies if you run your own SiteRemote Server (3 and above) and you need to use port forwarding on the server side. This basically means that the address (IP or host name) you are using on the clients to reach the server is not the actual SiteRemote server itself.

Under the above circumstances you might notice that file synchronization (used for the File Manager and Digital Signage features) does not synchronize any content to the client. Should this be the case and the basic client server communication (registering the client on the SiteRemote server, client status updates etc.) is working, you can try to make a change to the SiteRemote server configuration file. The file is located under ..\PROVISIO\SiteRemote\Config and is named SiteRemoteServer.config. Before you edit the file you should stop the SiteRemote Server Windows service in the Service Management Console of Windows (services.msc) and make a backup of the original. Then open the file with Notepad or your preferred editor and look for the line:

<Torrent.config ClientPort="52138" />

This tag already includes the port used for file synchronization. You can add ClientIPAddress to that tag to force the client to contact the server under a specific IP, in this case the IP of the port forwarder in use. So after the change the line will look like this:

<Torrent.config ClientPort="52138" ClientIPAddress="12.12.12.12" />

Save the SiteRemoteServer.config file and start the SiteRemote Server Windows service again. The new information will be distributed to the clients on the next connection. Note that you may need to stop and restart running synchronizations to see the effect.