Activate webpage debugging on a SiteKiosk Online client

This devblog entry describes how to activate the DevTools window with advanced options to debug webpages in a SiteKiosk Online browser  

We start with the template browser and add an start URL to the webpage element.

Now we need to add two entries in the advanced settings of the project.

Go to >Settings > Client > Advanced and press the Add setting button.

Enter debug.showDebugWindow under Path and enable the checkbox under Value.

Press the save button

Press the Add setting button again.

Enter debug.showAdvancedOptionsInDebugWindow under Path and enable the checkbox under Value.

Press the save button

Finally, press the Save button to save the advanced settings.

Publish the project on the client.

Select the DevTools tab in the debug window.

Click on the Embedded UI Browser button to open the Devtools window.

In the Developer Tools select the tab Console to analyze possible Errors in the web page.

How to launch applications from the download manager

The following developer blog entry describes how to open certain file types in predefined applications over the download manager. This developer blog entry works only with SiteKiosk Online for Windows. 

We start by creating a project using the browser template.

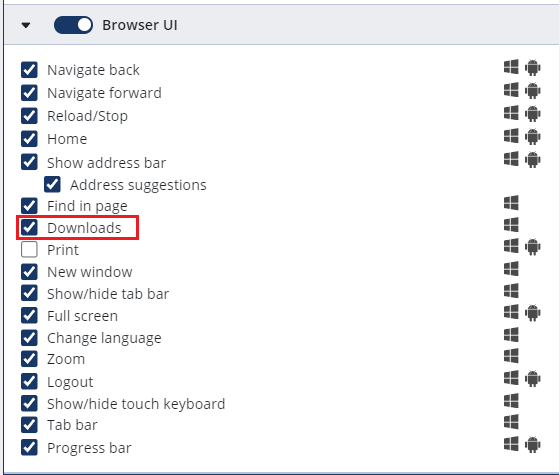
In the Webpage element settings, under Browser UI, select the Downloads checkbox and save the setting.
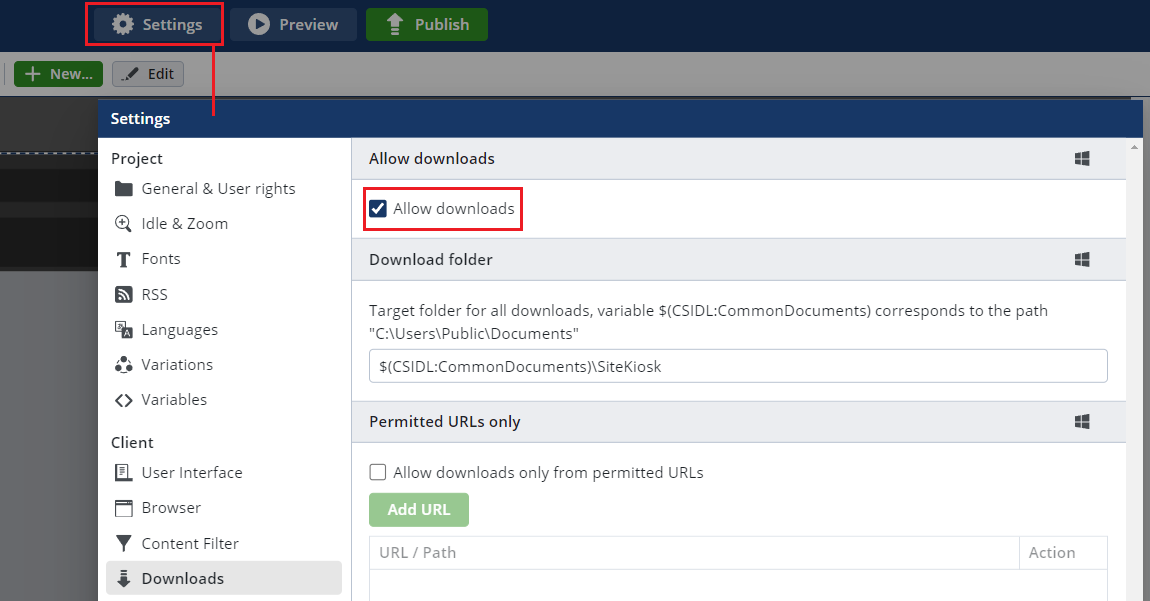
In the project, press the Settings button and in the Downloads section, select the Allow Downloads check box.
Go to Settings - Client - Advanced and press the Add settings button.

Enter the path downloads.downloadFileActions which offers you following default value:


[
    {
        "extension": "pdf",
        "customApplicationPath": "",
        "actionType": "openInSiteKiosk",
        "autoExecute": true
    },
    {
        "extension": "txt",
        "customApplicationPath": "",
        "actionType": "openInSiteKiosk",
        "autoExecute": true
    },
    {
        "extension": "png",
        "customApplicationPath": "",
        "actionType": "openInSiteKiosk",
        "autoExecute": true
    },
    {
        "extension": "gif",
        "customApplicationPath": "",
        "actionType": "openInSiteKiosk",
        "autoExecute": true
    },
    {
        "extension": "jpg",
        "customApplicationPath": "",
        "actionType": "openInSiteKiosk",
        "autoExecute": true
    },
    {
        "extension": "jpeg",
        "customApplicationPath": "",
        "actionType": "openInSiteKiosk",
        "autoExecute": true
    },
    {
        "extension": "exe",
        "customApplicationPath": "",
        "actionType": "downloadOnly",
        "autoExecute": false
    },
    {
        "extension": "zip",
        "customApplicationPath": "",
        "actionType": "downloadOnly",
        "autoExecute": false
    },
    {
        "extension": "7z",
        "customApplicationPath": "",
        "actionType": "downloadOnly",
        "autoExecute": false
    }
]

Copy the complete value section and enter the content to texteditor application.

Now you have two options to configure the file action: OpenWithCustomApplication to open Files with a defined extension over a custom application or OpenWithWindowsStandardApplication, to launch the standard application of the system. In the Following example we change the entry for the extension pdf from: 


{
        "extension": "pdf",
        "customApplicationPath": "",
        "actionType": "openInSiteKiosk",
        "autoExecute": true
    },

 to

{
        "extension": "pdf",
        "customApplicationPath": "C:\\Program Files\\Adobe\\Acrobat DC\\Acrobat\\Acrobat.exe",
        "actionType": "OpenWithCustomApplication",
        "autoExecute": false
    },


So with pressing the Open Button on a downloaded PDF file in the download manager the PDF will be opened with the Acrobat Reader.

In the second example, we add the following entry at the end of the array separated by a comma to the previous entry:


{

        "extension": "docx",
        "customApplicationPath": "",
        "actionType": "OpenWithWindowsStandardApplication",
        "autoExecute": false

    }

So with pressing the Open Button on a downloaded docx file in the download manager the file will be opened with the standard application Word. With these modification the value looks like this.

Example:

Path: downloads.downloadFileActions

Value:


[
    {

        "extension": "pdf",
        "customApplicationPath": "C:\\Program Files\\Adobe\\Acrobat DC\\Acrobat\\Acrobat.exe",
        "actionType": "OpenWithCustomApplication",
        "autoExecute": false
    },
    {
        "extension": "txt",
        "customApplicationPath": "",
        "actionType": "openInSiteKiosk",
        "autoExecute": true
    },
    {

        "extension": "png",
        "customApplicationPath": "",
        "actionType": "openInSiteKiosk",
        "autoExecute": true
    },
    {

        "extension": "gif",
        "customApplicationPath": "",
        "actionType": "openInSiteKiosk",
        "autoExecute": true
    },
    {
        "extension": "jpg",
        "customApplicationPath": "",
        "actionType": "openInSiteKiosk",
        "autoExecute": true
    },
    {

        "extension": "jpeg",
        "customApplicationPath": "",
        "actionType": "openInSiteKiosk",
        "autoExecute": true
    },
    {
        "extension": "exe",
        "customApplicationPath": "",
        "actionType": "downloadOnly",
        "autoExecute": false
    },
    {
        "extension": "zip",
        "customApplicationPath": "",
        "actionType": "downloadOnly",
        "autoExecute": false
    },
    {
        "extension": "7z",
        "customApplicationPath": "",
        "actionType": "downloadOnly",
        "autoExecute": false
    },
    {
        "extension": "docx",
        "customApplicationPath": "",
        "actionType": "OpenWithWindowsStandardApplication",
        "autoExecute": false
    }
]

Copy and paste the whole value to the advance setting dialogue and save the advanced setting.

Publish the project to the client on which Adobe Acrobat Reader is installed and Word is set the default app to open docx.

To test the file actions download a Word and a PDF file and open them over the download manager.

Trigger video play from another client

The following developer blog entry describes how to control videos across devices. In this setting one device acts as a remote control and the other device is the player of the video. This developer blog entry works with SiteKiosk Online for Windows and Android clients.

In this example the project consists of two pages. A player page for the client which displayes the video and a remote page for the client which displays the play button.

1. Create a project using the Empty template. 

2. Press the Settings button in the toolbar on the top and select "Variations" in the treeview.

3. Press the button "Create one variation per client" and check the checkbox Assigned clients for two clients. Close the dialog with save.


4. Select the page in the Pages section and press the Edit button. Go to the last section Label, user rights, playlog and give the page the title player.

5. Go to the section Assign variations, use the "Activate assignment" switch and select under "Select variations" the variation on which the video should be displayed.


6. Add a video element to the "player" page using the "+ New" button.

7. Press the Edit button to open the properties dialog of the video element.

8. In the Video settings section upload a video file and disable "Automatic playback start" and "Loop".

9. Go to the last section Label, user rights, playlog and give the video the tag name "video1" under Tags.


10. In the Pages section (upper right) add another page using the + button, select "Empty (no template)" and give it the title remote. 

11. Double click on the "remote" page, go to the "Assign variations" section, press the "Activate assignment" button and select variation (client/s) on which the play button for the video should be displayed under "Select variations".

12. Close the properties dialog with pressing the "Save" button.


13. Enter &expert in the URL address line at the end of the URL.


14. Select the URL and press Enter to reload the project.

15. Add an image element to the remote page using the "+ New Button" to create a play button for the video.

16. Double click to open the properties dialog of the image element.

17. Upload an image file in the Image section.

18. Press the Expert Edit button at the bottom left.


19. Go down in the Expert section and enter triggerActions  in the Add properties edit box.

20. Then add the following lines in the box on the bottom and select JSON object:

{
  "pressed": {
    "actions": [
      {
        "type": "sendCommand",
        "command": "call-element-method",
        "commandArguments": {
          "methodArgs": [
            true
          ],
          "methodName": "play",
          "targetTag": "video1"
        },
        "targetMachine": "tags=Remote,Player"
      }
    ]
  }
}


21. Press the Add button and close the properties dialog of the image element with pressing Save.

Note: Under methodName you can also use the following methods:

interactivePause pauses the video 

interactiveStop stops the video

22. Leave the "Projects" section, go to the "Monitoring" page and create two tags "Player" and "Remote" (without quotation marks)

23. Add the respective machine to the tag.


24. Go back to the project and publish the project to the two clients.

25. After publishing, the Remote page with the Play button is displayed on the Remote client and the Player page with the video is displayed on the Player client. 

Test whether clicking the created play button plays the video.


Build a button with which you can trigger a system shutdown or restart.

This devblog entry describes how to create a button in the editor to trigger a system restart or shutdown.

Note that this feature is only supported in SiteKiosk Online 1.2 and higher. For Android the device must be rooted.


1. For this example we create a project with the template Empty. 

2. Activate the Expert mode by entering "&expert" in the URL address line and reload the page. 

3. Insert an image element into the page and double-click on the element to open the element's properties dialog. 

4. In the properties dialog go to the Actions section and activate "Execute script".

5. In the input area add the following line:

try{siteKiosk.system.shutdown()}catch(e){console.log('Shutdown machine not possible or in preview')};

To trigger the restart of a client via a button you can use the following line:

try{siteKiosk.system.reboot()}catch(e){console.log('Shutdown machine not possible or in preview')};

6. Save the setting

7. Publish the project to a client to test the function of the button.

Display the device name of a SiteKiosk Online client in a project

The following developer blog entry describes how to create a button that shows the user the device name of the client he or she is using in an alert dialog. It also describes how to display the device name in a text element. 

This entry works with SiteKiosk Online for Windows and Android clients.

For the alert dialog, follow these steps:

Create a project using the Empty template. 

Add a text element using the New button. 

In the URL address line, type &expert at the end of the URL.


Select the URL and press Enter to reload the project.

Double click to open the properties dialog of the text element.

Press the Expert Edit button at the bottom left.

Go down in the Expert section and enter triggerActions in the Add properties edit box.

Select JSON Object from the dropdown menu on the right and then add the following lines in the box to the left of it:

{

  "pressed": {

    "actions": [

      {

        "type": "executeScript",

        "script": "alert(siteKiosk.remote.blackboard.getValue('StC.MachineInfo.Name')?.value)"

      }

    ]

  }

}

Press the plus button to add the setting. Then press Save to save the settings you have set.

Publish the project to an Android or Windows client and click on the text element to test the dialog.


Use the following steps to add the machine name to a text element:

Create a text element. 

Double click to open the properties dialog of the text element.

Write {$machineName} in the text element. 

Press the Expert Edit button at the bottom left.

Go down in the Expert area and enter onActivated in the edit box Add properties.

Select JSON Object from the dropdown menu on the right and enter the following lines in the box to the left:

{

  "takeFromTriggerActions": true

}


Press the plus button to add the setting. 

Enter the edit box Add properties triggerActions

Select JSON Object from the dropdown menu on the right and enter the following lines in the box to the left:

{
  "pressed": {
    "actions": [
      {
        "type": "executeScript",
        "script": "const id = this.element.id;const element = siteKiosk.content.getElementByName(id);const machineName = siteKiosk?.remote?.blackboard?.getValue('StC.MachineInfo.Name')?.value || 'unknown';element.replacePropertyPlaceholders('text', { machineName });"
      }
    ]
  }
}


Press the plus button to add the setting. Then press Save to save the settings you have set.

Publish the project to check the display of the client name in the text element

How to configure buttons to start external applications over the start menu and taskbar

This devblog entry describes how to generate buttons for launching external applications in the SiteKiosk Online Client for Windows via the Start menu or the taskbar. This is especially useful for full-screen browser projects where you want to launch external applications that are controlled by SiteKiosk.

The following entry works with SiteKiosk Online Client for Windows version 1.1.2539.6604 or higher (https://sitekiosk.online/). Note that it can only be used for windows clients. In this example Notepad is starting over customized buttons in the start menu and taskbar.

We start with generating a project with the template browser. 

Go to Settings - Client - Advanced and press the Add settings button

Enter the Path applications and following value:

[

    {

        "name": "notepad",

        "startParameters": {

            "kind": "executable",

            "executable": {

                "filePath": "C:\\WINDOWS\\system32\\notepad.exe",

                "arguments": null,

                "startAsChildProcess": false

            }

        }

    }

]


Save the setting.

To generate a taskbar button, press the Add settings button.

Enter the path ui.taskbar.taskbarEntries and add following value:

[

    {

        "name": "logoutSiteKiosk"

    },

    {

        "name": "startApplication",

        "startApplication": {

            "name": "notepad"

        }

    }

]


Save the setting.

To activate the start menu, press the Add settings button.

Enter the path ui.taskbar.showStartMenu and check the checkbox.


To generate a start menu entry, press the Add settings button.

Enter the path ui.taskbar.startMenuEntries and following value:

[

    {

        "name": "logoutSiteKiosk"

    },

    {

        "name": "startApplication",

        "startApplication": {

            "name": "notepad"

        }

    }

]


Save the setting and close the Clients setting dialog with pressing the button save.

Publish your project to test the settings.

Transfer a URL from a Kiosk to Another Device with a QR Code

This entry describes how you can generate a QR code from the web page displayed in the browser using a script. The QR code can e.g. be used to transfer the URL of the displayed web page to a smartphone. We start with the template empty and generate a browser with a webpage element. Double click on the webpage element and add the start URL https://www.sitekiosk.com/ .Then you create an image element next to the web page element. The image element must not overlap with the web page element, otherwise it will not be displayed. 

Now the image element must be adapted for the QR code display. To do this, you must start the expert mode by entering &expert in the URL address line and then pressing Enter to reload the project. 

Double-click on the image to open the image's properties dialog and press the Expert Edit button at the bottom left.

Go down in the properties dialog and add under Add property the setting qrCodeData with the value https://www.sitekiosk.com/ and the type auto. Then press the Plus button to add the setting.

Then go to the expert setting src and add the setting ,"fileName":"" after the entry "fillColor": "rgb(0,0,0)" value that it looks in the end like this:

{
  "fillColor": "rgb(0,0,0)",
  "fileName": ""
}

Save the settings. Select the image and assign the tag name qrCodeImage in the menu bar. 

Select the web page element and assign the tag name browser in the menu bar. 

Go to Settings - Content - Scripts and press the Add button. Give the script the name QRCodeUrlScript and add the following script lines:

siteKiosk.content.onContentInserted(() => {
	const qrCodeImage = siteKiosk.content.getElementByTag("qrCodeImage");
	const browserElement = siteKiosk.content.getElementByTag("browser").getDomElement();
	browserElement.addEventListener("page-finished-loading", url => {
		qrCodeImage.setPropertyValue("qrCodeData", url.detail);
	});
});

Save and publish the project. Now after changing the url in the webpage element, the displayed QR code will be automatically adjusted.

User Logoff on Screensaver Activation or SiteKiosk Logout Button Usage for SiteKiosk Online

This script example is suited for environments where SiteKiosk Online is started when users login to the kiosk terminal with their individual accounts instead of the default SiteKiosk user and the terminal should return to the Windows login screen once the user leaves the terminal. In most cases this means domain environments.

Instead of using the standard Auto Start mode from the SiteKiosk Quick Start menu click on "Settings" at Auto Start. Choose “Auto start with shell replacement for all users” and disable “Log on automatically at system startup”.

Then click “Save” and use the “Start” button at Auto Start. This leaves the kiosk terminal at the Windows login screen when turned on, where users can type in their credentials and SiteKiosk Online will start right after the login of the user.


In order for the kiosk terminal to return to the Windows login screen either when a user presses the default SiteKiosk logout button or the screensaver activates a custom setting can be added in the Advanced Client settings of SiteKiosk online:

Open your Project (e.g. Browser) on https://sitekiosk.online and go to ">Settings>Client>Advanced"


Then press the green "Add setting" button and enter the following in the "Path" input field.


system.startupScript


And at value insert this script code: 

siteKiosk.onLogoutCompleted(()=>{


      __siteKiosk.logoffUser();


}); 


Press the “Save"button and publish the project.

To test the setting wait for screensaver activation or press the logout out button.

Enabling Single Sign On with Azure Active Directory in SiteKiosk Online Windows

By default single sign on with Azure Active Directory is disabled for security reasons in SiteKiosk Online Windows. If you need this form of modern authentication in your kiosk project you can enable it in your SiteKiosk Online team.

Just login to your team, click on Projects in the menu on the left side. Create a project or select an existing one. At the top click on Settings and choose Client from the dropdown. Click on Advanced and press the Add setting button. In the Path field type:

system.browser.browserSso.enabled

Now tick the box under Value.

Single sign on with Azure Active Directory is now available in Webpage elements for this project on SiteKiosk Online Windows clients.

Please note that classic single sign on based on standard Active Directory is a built-in feature of the Electron framework that SiteKiosk Online uses.

Launching UWP Apps in SiteKiosk Online

The following works for the SiteKiosk Online Version 1 or higher. Note that it can only be used for Windows clients.

This example uses the Empty template o SiteKiosk Online with an image element added to start the UWP app from.

To find the required information needed to run the UWP app enter “run” in the Microsoft search field and select the run app.


Type shell:AppsFolder in the Open field and hit the OK button.

Look for your desired app and right click on it. 


Select “Create shortcut” and place it on the desktop when prompted.

To obtain the package name do a right click on the desktop shortcut.

Select “Properties” and open the shortcut tab. 


In both fields, Target type or Target, you will find the Package or Program Family Name. The Package or Program name will be the text before the underscore separator.

In this case, we want to use the Grooce Music app. We will need to use this part of the Target type: “Microsoft.ZuneMusic”.

In SiteKiosk Online open the properties dialog of the image element and go to the “Actions” section. 


Activate Start app/programm and enter the package name with the prefix uwp: uwp:Microsoft.ZuneMusic

Save the setting and publish the project to a Windows client to test the starting of the UWP app.