The SiteRemote server already offers a variety of alerts that help you maintain your kiosk systems. But for specific projects it is helpful to be able to create additional alerts that can trigger an email or sms to notify about a possible problem. Customers running their own SiteRemote server can create their own custom alerts. Creating such an alert requires work on the client side (SiteKiosk) and on the server side (SiteRemote). The following is a short guide to creating a custom alert:
1. SiteKiosk
To create new alerts you first have to write the alert event into the log file of the SiteKiosk client machine. To do this, you can use the SiteKiosk Object Model which can also be accessed from other programming languages. The log entry you create with the SiteKiosk Object Model will be used to trigger SiteRemote alerts.
The Write method of the SiteKiosk Object Model is used to create log entries for custom alerts: http://www.provisio.com/en-US/Help/ObjectModel/sitekiosk_object/logfile_write_mth.html
The Write method has the follwing parameters:
|
type
|
Short value that specifies the type.
|
|
level
|
Short value that specifies the level.
|
|
facility
|
String that specifies the facility.
|
|
text
|
String that specifies the text to write.
|
The Type property contains the type of the log file message. Possible types are: http://www.provisio.com/en-US/Help/ObjectModel/sitekiosk_object/logmessage_type_prop.html
The Level property contains the level of the log file message. Possible levels are: http://www.provisio.com/en-US/Help/ObjectModel/sitekiosk_object/logmessage_level_prop.html
The Facility property contains the description of the device, plugin or component (http://www.provisio.com/en-US/Help/ObjectModel/sitekiosk_object/logmessage_facility_prop.html).
The Text property contains the text of the log file message (http://www.provisio.com/en-US/Help/ObjectModel/sitekiosk_object/logmessage_text_prop.html).
See the LogMessage object for further information about the parameters (http://www.provisio.com/en-US/Help/ObjectModel/sitekiosk_object/logmessage_obj.html).
More information about the SiteKiosk Object Model can be found here: http://www.provisio.com/en-US/Help/HelpFrame.aspx?HelpFolder=ObjectModel.
The example code for our custom alert looks like this:
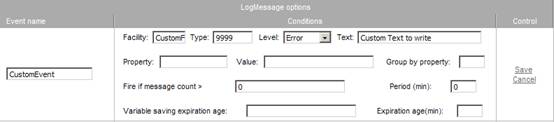
SiteKiosk.Logfile.Write(9999, 40, "CustomFacility", "Custom Text to write");
When adding this to an HTML example page we will get this:
<html>
	<head>
		<title>Write Log</title>
		<SCRIPT TYPE="text/javascript">
		window.external.InitScriptInterface();
		function WriteLog(){
			SiteKiosk.Logfile.Write(9999, 40, "CustomFacility", "Custom text to write");
		}
		</SCRIPT>
	</head>
	<body>
		<input type="button" value="SiteKiosk Logfile Write Button" onclick="WriteLog()">
	</body>
</html>
Copy & paste the code into an editor (e.g. Notepad) and store the html file (e.g. Alert.html) at the path “…\Sitekiosk\Html”. Configure the html file as the start page and run SiteKiosk to test. The log entry will be created when you click the button.
2. SiteRemote Server
With the example above you will see a log entry like this appearing on the SiteRemote Server:
40 9999 2012-07-17 13:51:22 +0200 [CustomFacility] Custom text to write
In order to get an alert notification from this log entry you created, you will need to edit the Notification settings on the Settings page of the Administration section of your SiteRemote server installation.
To receive an alert email and/or SMS, you need to create the corresponding entries under the “Notification settings”. Create the entries by adding new strings with the text for the alert message (-->Users-->username-->Alert Notifications-->Notification options for results).
Please follow the next steps to configure your SiteRemote server to show a custom alert:
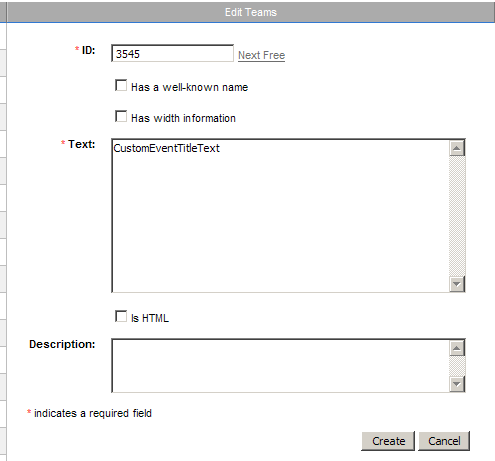
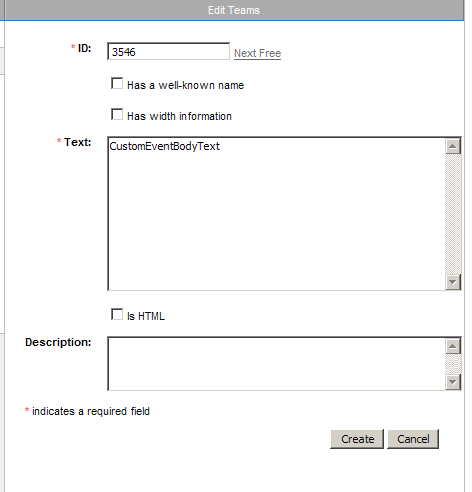
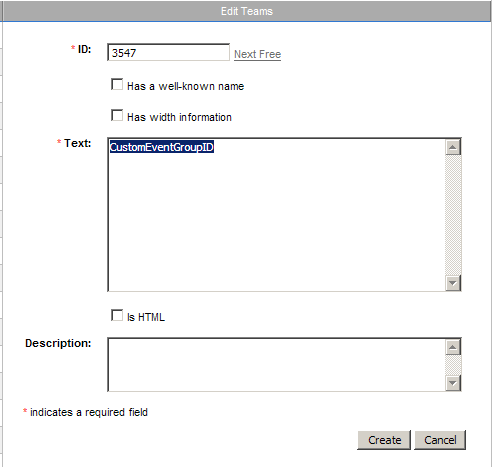
A. Open the SiteRemote Administration page and go to the “Strings” tab. Select the language and use the “Add new” button to create a new string. The next free ID will be chosen automatically. Enter your message in the text field.
For our example (ID 3545 CustomEventTitleText / ID 3546 CustomEventBodyText / ID 3547 CustomEventGroupID):
Note that for SiteRemote Server 6 and higher you need to create the strings twice. Once under the Web-Strings tab and once under the Report-Strings tab. Both can be found on the Strings page of the Administration. Use the same IDs under both tabs.
The following variables can be used to get the server name, the alert text and the alert time from the client in your alert notification:
$(Server_name_short) receives the error "$(Alert:LogText)". Error occurred at $(Alert:LogLocalTime) local machine time.
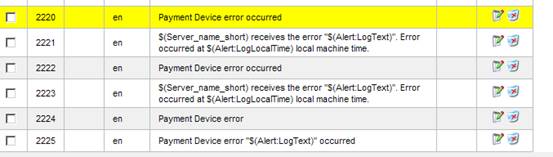
Use the existing entries for “SiteCashError” as a reference:

B. After creating the new strings, open the “Settings” page.
Under “Notification settings” follow the “Edit configuration” link.
Press the “Add New” button at the “LogMessage options” section.
You will see a form like this:
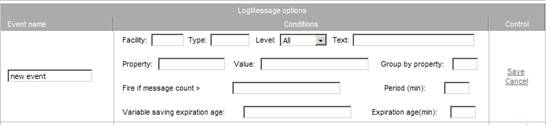
Enter the corresponding values for your log entry with “Fire if message count > 0” and “Period (min): 0”. In this case we chose the event name “CustomEvent”:
Use the Save link to save the new entry.
C. Scroll down to the “Notification Events” and press the “Add New” button.

The “Name” value must be an exact match to the “Event name” that was used under LogMessage options section.
The value for "Bit" is a number to represent the ID of the Event.
Select the next free Bit number or the highest available number.
For the different IDs enter the string number(s) you have created.
- OnlineTitleId: Title text on the web page
- OnlineTextId: Body text on the web page
- MailTitleId: Title text Email
- MailTextId: Body text Email
- SMSTitleId: Title text SMS
- SMSTextId: Body text SMS
For our example this means:

Use the Save link to save the new entry.
D. Scroll down to “Groups” and press the “Add New” button.
The “Events” value must be an exact match to the “Event name” that was used under the LogMessage options section.
The value for "Bit" is a number to represent the ID of the Event.
Select the next free Bit number or the highest available number.
Enter the string number you created for GroupID in the “TitleID” box.
For our example:

Use the Save link to save the new entry.
Click the OK button at the bottom of the page to save and move on to the next step.
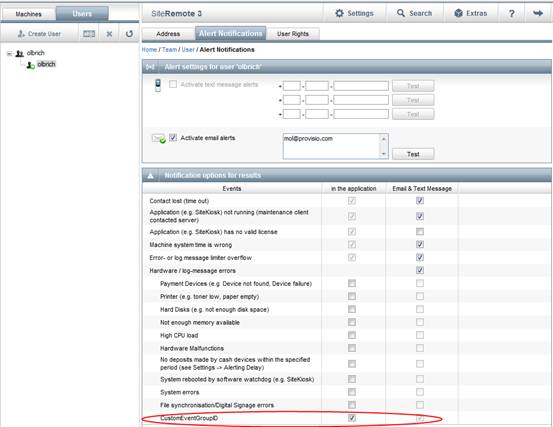
Last, login to your SiteRemote team account and activate the new alert on the settings page (-->Users-->Username-->Alert Notifications-->Notification options for results).
For our example:

Now, when you press the button that was created to write the SiteKiosk log file entry, you will get an alert when logged into your team account and via email and/or SMS (if configured).
Example online text:

Example email text:
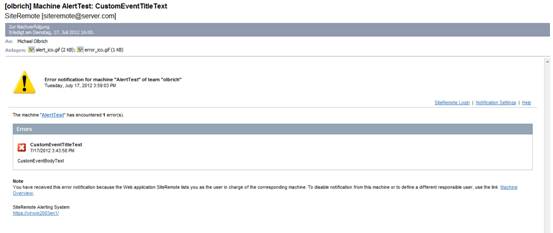
When an alert is triggered, it will be displayed in your team account and sent by email if that option is configured. If you do not receive the email even though the alert is displayed, you should check the “Delay” that is configured under “-->Settings-->General-->Alerting Delay” (default 15 minutes).