SiteKiosk Windows allows you to password protect the starting of external applications. For technical reasons this feature is not available for the Application link element of the Start Screen, which is the element you would normally use to add an application to the Start Screen. By using the HTML Widget element instead, the password protection for applications can be used with the Start Screen. Here is how.
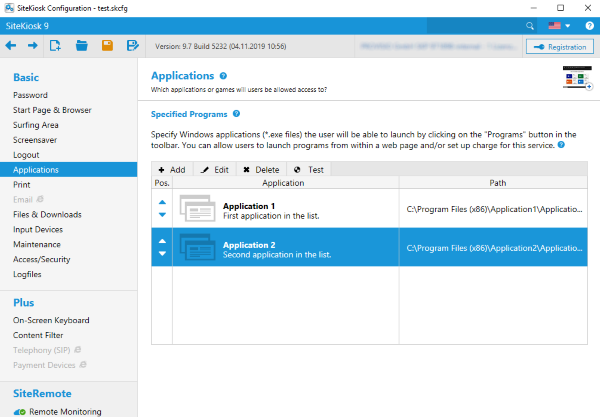
Open the SiteKiosk configuration and go to Applications. Add the external applications you need to the list. Note that you can use the arrows on the left side of the list to move applications up and down to rearrange the order.
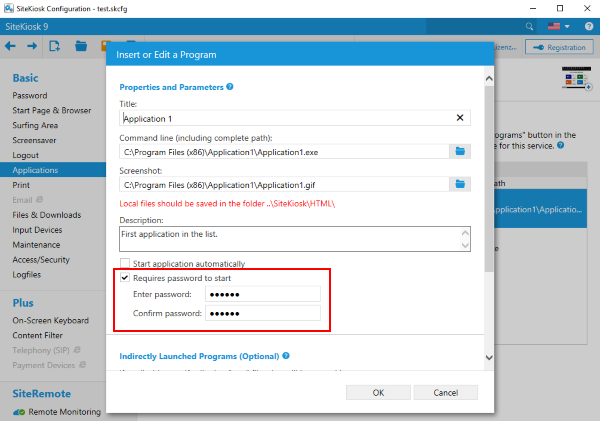
Use the settings dialog for an application to make the start of it password protected.
Next go to Start Page & Browser in the configuration of SiteKiosk and select the Start Screen. Click on Customize, select Start Screen Editor and use the Open Editor button. Choose the template you want to use and add an HTML Widget element. Copy the following lines:
<script type="text/javascript">
    function StartPWprotectedApp() {
        parent._siteKiosk.objectModel.callHostFunction("system.windows.skLegacy.executeScript", "SiteKiosk.ExternalApps.Item(1).Run(true);");
    }
</script>
<div style="background-color:FF235A;height:100%;padding:10px;font-family:Arial;cursor:pointer;" onclick="StartPWprotectedApp();">
    <div style="height:100%;width:100%;font-size:30px;text-align:center;margin-top:42%;">Start Password<br/>Protected App</div>
</div>
Paste the code into the HTML code box in the properties dialog of the HTML Widget.
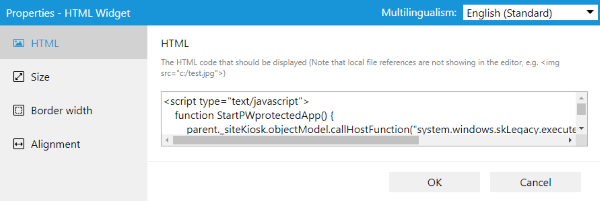
You can use the div tag to style the element to your liking. The line
parent._siteKiosk.objectModel.callHostFunction("system.windows.skLegacy.executeScript", "SiteKiosk.ExternalApps.Item(1).Run(true);");
is what calls the actual application. Note the number 1 as the argument for the Item method (more information can also be found here and here). This calls the actual application based on the position in the application list of the SiteKiosk configuration. 1 calls the first application in the list, 2 calls the second application and so on. Add as many HTML Widget elements as you need.
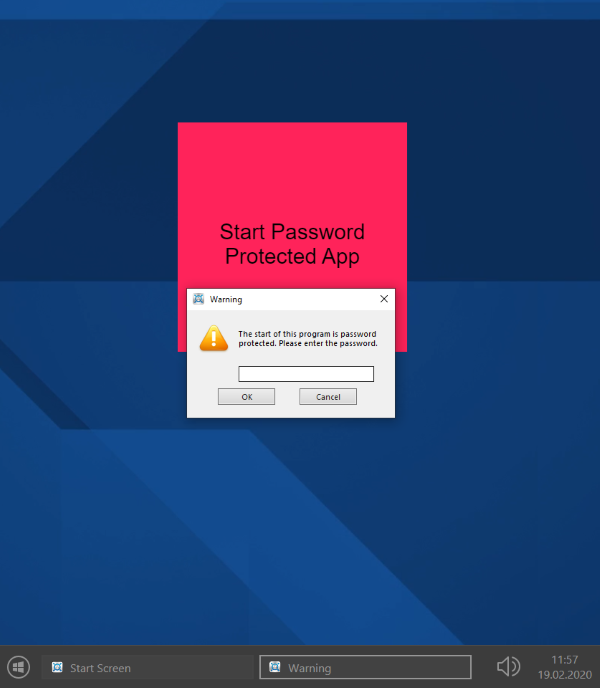
The final result based on the example code above will look like this in SiteKiosk:
0b74d3c7-25ae-4e30-8f50-4e76ec893862|0|.0