Display the device name of a SiteKiosk Online client in a project

The following developer blog entry describes how to create a button that shows the user the device name of the client he or she is using in an alert dialog. It also describes how to display the device name in a text element. 

This entry works with SiteKiosk Online for Windows and Android clients.

For the alert dialog, follow these steps:

Create a project using the Empty template. 

Add a text element using the New button. 

In the URL address line, type &expert at the end of the URL.


Select the URL and press Enter to reload the project.

Double click to open the properties dialog of the text element.

Press the Expert Edit button at the bottom left.

Go down in the Expert section and enter triggerActions in the Add properties edit box.

Select JSON Object from the dropdown menu on the right and then add the following lines in the box to the left of it:

{

  "pressed": {

    "actions": [

      {

        "type": "executeScript",

        "script": "alert(siteKiosk.remote.blackboard.getValue('StC.MachineInfo.Name')?.value)"

      }

    ]

  }

}

Press the plus button to add the setting. Then press Save to save the settings you have set.

Publish the project to an Android or Windows client and click on the text element to test the dialog.


Use the following steps to add the machine name to a text element:

Create a text element. 

Double click to open the properties dialog of the text element.

Write {$machineName} in the text element. 
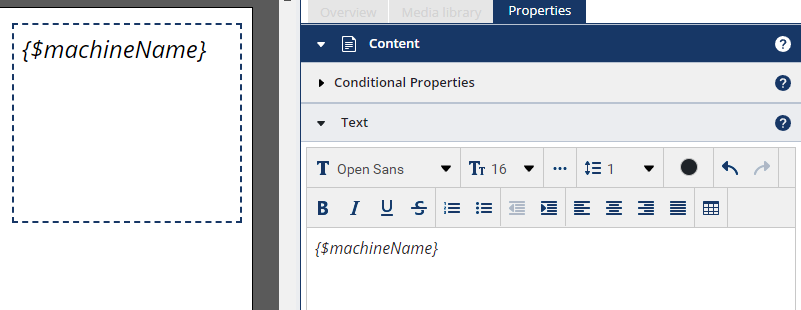
Press the Expert Edit button at the bottom left.

Go down in the Expert area and enter onActivated in the edit box Add properties.

Select JSON Object from the dropdown menu on the right and enter the following lines in the box to the left:

{

  "takeFromTriggerActions": true

}
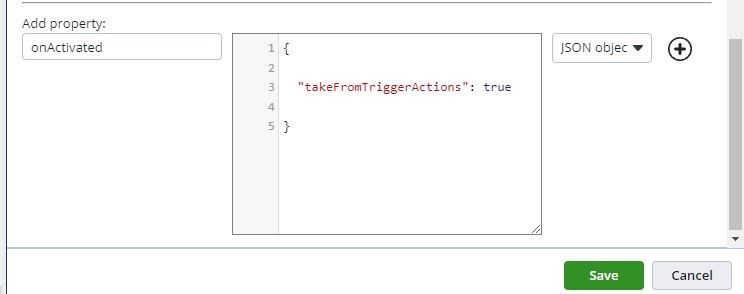
 

Press the plus button to add the setting. 

Enter the edit box Add properties triggerActions

Select JSON Object from the dropdown menu on the right and enter the following lines in the box to the left:

{
  "pressed": {
    "actions": [
      {
        "type": "executeScript",
        "script": "const id = this.element.id;const element = siteKiosk.content.getElementByName(id);const machineName = siteKiosk?.remote?.blackboard?.getValue('StC.MachineInfo.Name')?.value || 'unknown';element.replacePropertyPlaceholders('text', { machineName });"
      }
    ]
  }
}


Press the plus button to add the setting. Then press Save to save the settings you have set.

Publish the project to check the display of the client name in the text element

Identifiying Individual SiteKiosk Windows Computers

Identifying individual SiteKiosk Windows computers can be helpful to deliver specific content to these machines. You can use either native JavaScript or the SiteKiosk Object Model to retrieve that information.

To use native JavaScript you need to enable the computer identification feature in the SiteKiosk configuration. When using the SiteKiosk Chrome Browser for example, you can find this feature under Start Page & Browser -> Chrome Browser -> Customize -> Settings -> Computer Identification. Tick the Add SiteKiosk to user agent header option and more importantly the Customize user agent field option.

You can leave the default value $(ComputerName) as this is exactly what we want to work with to identify the SiteKiosk Windows machine. That global variable will be replaced by the individual computer name automatically, so you do not need a separate configuration for each of your SiteKiosk computers. The additional information will be added at the end of the user agent string of the browser seperated by a semicolon.

For the Internet Explorer engine you will find the setting under Start Page & Browser -> Internet Explorer -> Advanced -> Computer Identification.

Here is a simple example for a web page that makes redirects based on the extracted computer name.

<!DOCTYPE html>
<html>
<head>
	<meta charset="UTF-8">
	<script>
		//Get the SiteKiosk computer name by extracting the computer name from the user agent string.
		var SiteKioskComputerName = navigator.userAgent.substring(navigator.userAgent.lastIndexOf(";")+1);
		document.write("SiteKiosk Computer Name: " + SiteKioskComputerName);
		
		var url = "";
		
		//Assign different URLs based on the computer name.
		if (SiteKioskComputerName.includes("SITEKIOSK_COMPUTER_1")){
			url = "https://www.provisio.com/";
		}
		else if (SiteKioskComputerName.includes("SITEKIOSK_COMPUTER_2")){
			url = "https://www.siteremote.net/";
		}
		else{
			//Place code for no matching computer name here.
		}
		
		//Redirect to content for this specific SiteKiosk terminal.
		if (url !== "")
			document.location.href = url;
	</script>
	<title>Check ComputerName with User Agent</title>
</head>
<body>
<!-- Place code for your HTML body here -->
</body>
</html>

The example is using only native HTML and Javascript, so it will work both in SiteKiosk with a Chrome based browser and in SiteKiosk with an Internet Explorer based browser.

If for whatever reason you can't or don't want to use the customized user agent string option, you can also use the SiteKiosk Object Model. Note that the Object Model versions are different for the Chrome and Internet Explorer browser versions of SiteKiosk. The following example is for the Chrome browser version. The SiteKiosk Object Model for use in the Chrome Browser engine of SiteKiosk is still work in progress and does not offer all the features the classic SiteKiosk Object Model for the IE based engine offers. That is why the documentation is only available on request from our support department.

<html>
<head>
	<meta charset="UTF-8">
	<script>
		//Initialize the SiteKiosk Object Model for Chrome.
		(new Function(_siteKiosk.getSiteKioskObjectModelCode()))();
		
		//Get the SiteKiosk computer name by using the SiteKiosk Object Model.
		var SiteKioskComputerName = siteKiosk.system.environment.getVariable("computerName");;
		document.write("SiteKiosk Computer Name: " + SiteKioskComputerName);
		
		var url = "";
		
		//Assign different URLs based on the computer name.
		if (SiteKioskComputerName.includes("SITEKIOSK_COMPUTER_1")){
			url = "https://www.provisio.com/";
		}
		else if (SiteKioskComputerName.includes("SITEKIOSK_COMPUTER_2")){
			url = "https://www.siteremote.net/";
		}
		else{
			//Place code for no matching computer name here.
		}
		
		//Redirect to content for this specific SiteKiosk terminal.
		if (url !== "")
			document.location.href = url;
	</script>
	<title>Check ComputerName with User Agent</title>
</head>
<body>
<!-- Place code for your HTML body here -->
</body>
</html>

As you can see, the difference between this and the user agent variant is quite small. You need to initialize the Object Model and then use the getVariable method to retrieve the computer name.

If using a browser based on the Internet Explorer, please have a look at the documentation for the classic SiteKiosk Object Model. Specifically the ComputerName property.

Note that for security reasons you need to add pages that are using either version of the SiteKiosk Object Model to the list of URLs with SiteKiosk Object Model Permission in the configuration of SiteKiosk under Access/Security.

For a quick working demonstration of the above you may save the examples as HTML pages, put the in the html subfolder of your SiteKiosk directory and set them as the start page of SiteKiosk.