How to launch applications from the download manager

The following developer blog entry describes how to open certain file types in predefined applications over the download manager. This developer blog entry works only with SiteKiosk Online for Windows. 

We start by creating a project using the browser template.

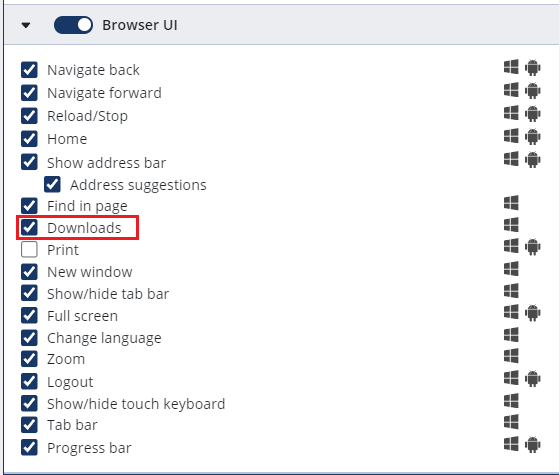
In the Webpage element settings, under Browser UI, select the Downloads checkbox and save the setting.
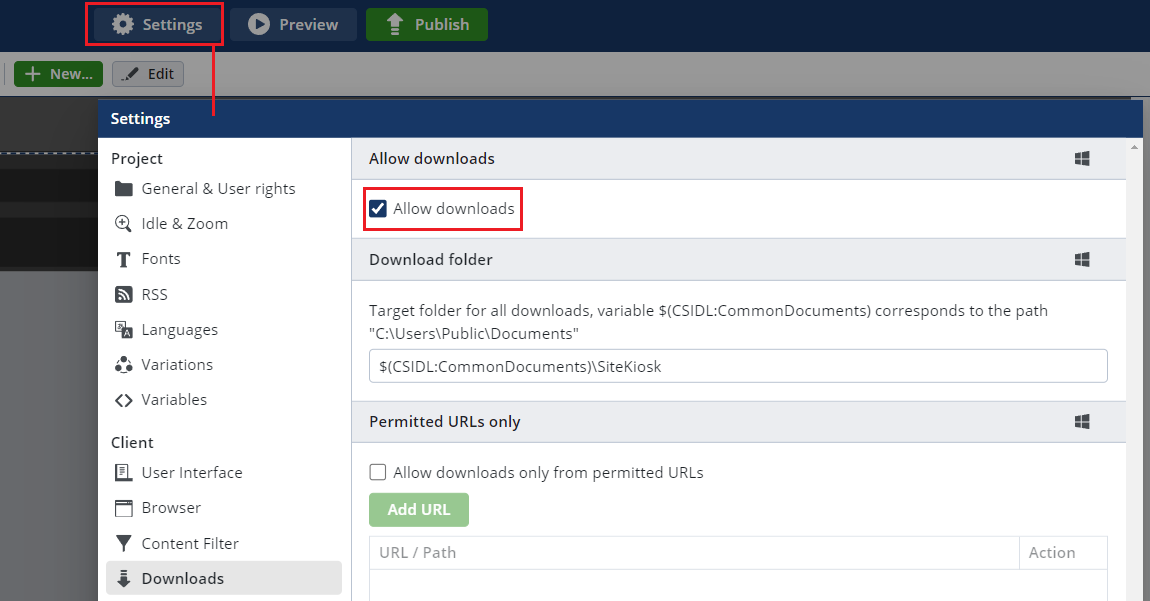
In the project, press the Settings button and in the Downloads section, select the Allow Downloads check box.
Go to Settings - Client - Advanced and press the Add settings button.

Enter the path downloads.downloadFileActions which offers you following default value:


[
    {
        "extension": "pdf",
        "customApplicationPath": "",
        "actionType": "openInSiteKiosk",
        "autoExecute": true
    },
    {
        "extension": "txt",
        "customApplicationPath": "",
        "actionType": "openInSiteKiosk",
        "autoExecute": true
    },
    {
        "extension": "png",
        "customApplicationPath": "",
        "actionType": "openInSiteKiosk",
        "autoExecute": true
    },
    {
        "extension": "gif",
        "customApplicationPath": "",
        "actionType": "openInSiteKiosk",
        "autoExecute": true
    },
    {
        "extension": "jpg",
        "customApplicationPath": "",
        "actionType": "openInSiteKiosk",
        "autoExecute": true
    },
    {
        "extension": "jpeg",
        "customApplicationPath": "",
        "actionType": "openInSiteKiosk",
        "autoExecute": true
    },
    {
        "extension": "exe",
        "customApplicationPath": "",
        "actionType": "downloadOnly",
        "autoExecute": false
    },
    {
        "extension": "zip",
        "customApplicationPath": "",
        "actionType": "downloadOnly",
        "autoExecute": false
    },
    {
        "extension": "7z",
        "customApplicationPath": "",
        "actionType": "downloadOnly",
        "autoExecute": false
    }
]

Copy the complete value section and enter the content to texteditor application.

Now you have two options to configure the file action: OpenWithCustomApplication to open Files with a defined extension over a custom application or OpenWithWindowsStandardApplication, to launch the standard application of the system. In the Following example we change the entry for the extension pdf from: 


{
        "extension": "pdf",
        "customApplicationPath": "",
        "actionType": "openInSiteKiosk",
        "autoExecute": true
    },

 to

{
        "extension": "pdf",
        "customApplicationPath": "C:\\Program Files\\Adobe\\Acrobat DC\\Acrobat\\Acrobat.exe",
        "actionType": "OpenWithCustomApplication",
        "autoExecute": false
    },


So with pressing the Open Button on a downloaded PDF file in the download manager the PDF will be opened with the Acrobat Reader.

In the second example, we add the following entry at the end of the array separated by a comma to the previous entry:


{

        "extension": "docx",
        "customApplicationPath": "",
        "actionType": "OpenWithWindowsStandardApplication",
        "autoExecute": false

    }

So with pressing the Open Button on a downloaded docx file in the download manager the file will be opened with the standard application Word. With these modification the value looks like this.

Example:

Path: downloads.downloadFileActions

Value:


[
    {

        "extension": "pdf",
        "customApplicationPath": "C:\\Program Files\\Adobe\\Acrobat DC\\Acrobat\\Acrobat.exe",
        "actionType": "OpenWithCustomApplication",
        "autoExecute": false
    },
    {
        "extension": "txt",
        "customApplicationPath": "",
        "actionType": "openInSiteKiosk",
        "autoExecute": true
    },
    {

        "extension": "png",
        "customApplicationPath": "",
        "actionType": "openInSiteKiosk",
        "autoExecute": true
    },
    {

        "extension": "gif",
        "customApplicationPath": "",
        "actionType": "openInSiteKiosk",
        "autoExecute": true
    },
    {
        "extension": "jpg",
        "customApplicationPath": "",
        "actionType": "openInSiteKiosk",
        "autoExecute": true
    },
    {

        "extension": "jpeg",
        "customApplicationPath": "",
        "actionType": "openInSiteKiosk",
        "autoExecute": true
    },
    {
        "extension": "exe",
        "customApplicationPath": "",
        "actionType": "downloadOnly",
        "autoExecute": false
    },
    {
        "extension": "zip",
        "customApplicationPath": "",
        "actionType": "downloadOnly",
        "autoExecute": false
    },
    {
        "extension": "7z",
        "customApplicationPath": "",
        "actionType": "downloadOnly",
        "autoExecute": false
    },
    {
        "extension": "docx",
        "customApplicationPath": "",
        "actionType": "OpenWithWindowsStandardApplication",
        "autoExecute": false
    }
]

Copy and paste the whole value to the advance setting dialogue and save the advanced setting.

Publish the project to the client on which Adobe Acrobat Reader is installed and Word is set the default app to open docx.

To test the file actions download a Word and a PDF file and open them over the download manager.

How to configure buttons to start external applications over the start menu and taskbar

This devblog entry describes how to generate buttons for launching external applications in the SiteKiosk Online Client for Windows via the Start menu or the taskbar. This is especially useful for full-screen browser projects where you want to launch external applications that are controlled by SiteKiosk.

The following entry works with SiteKiosk Online Client for Windows version 1.1.2539.6604 or higher (https://sitekiosk.online/). Note that it can only be used for windows clients. In this example Notepad is starting over customized buttons in the start menu and taskbar.

We start with generating a project with the template browser. 

Go to Settings - Client - Advanced and press the Add settings button

Enter the Path applications and following value:

[

    {

        "name": "notepad",

        "startParameters": {

            "kind": "executable",

            "executable": {

                "filePath": "C:\\WINDOWS\\system32\\notepad.exe",

                "arguments": null,

                "startAsChildProcess": false

            }

        }

    }

]


Save the setting.

To generate a taskbar button, press the Add settings button.

Enter the path ui.taskbar.taskbarEntries and add following value:

[

    {

        "name": "logoutSiteKiosk"

    },

    {

        "name": "startApplication",

        "startApplication": {

            "name": "notepad"

        }

    }

]


Save the setting.

To activate the start menu, press the Add settings button.

Enter the path ui.taskbar.showStartMenu and check the checkbox.


To generate a start menu entry, press the Add settings button.

Enter the path ui.taskbar.startMenuEntries and following value:

[

    {

        "name": "logoutSiteKiosk"

    },

    {

        "name": "startApplication",

        "startApplication": {

            "name": "notepad"

        }

    }

]


Save the setting and close the Clients setting dialog with pressing the button save.

Publish your project to test the settings.

How to Build a Script Watchdog for External Applications

The secure SiteKiosk browser offers an easy way to run external applications from within the restricted SiteKiosk context. You can just add the desired applications with the help of the SiteKiosk configuration. SiteKiosk will then provide means to start the applications through the SiteKiosk browser interface, it will also close these applications when the screensaver starts or a user logs out. The configuration of SiteKiosk even allows you to automatically start an application when SiteKiosk starts, the screensaver ends or after a user logout happend.

There can be situations where you may want to have even more control of the external application you want to run with SiteKiosk. For example you don't want to use the browser features of SiteKiosk but just want to use SiteKiosk to protect the operating system from being tampered with and your main goal is to permanently run a specific application.
The culprit is that this may be an existing application that for example allows to user to close it. This is where the SiteKiosk Object Model comes in. It is a proprietary Javascript extension that enables you to control nearly all aspects of SiteKiosk but also comes in very handy to create helpful custom scripts.

Let's summarize what we want to achieve with the script we are about to create. SiteKiosk should run in fullscreen mode in the background and on top of that an external application should always be visible.

The first step would be to create a blank page for SiteKiosk running in the background, alternatively you may of course as well use a page with a nice design. Here is the code for the blank page:

<html>
    <head>
    </head>
    <body>
    </body>
</html>

Save it as background.html (or whatever name you prefer) and make sure to put that file into the ..\SiteKiosk\html\ folder.

Next is the Javascript that we use to control the application. The first step is to start the application. For that we are using the Run method of the ExternalApps collection. Because we do need that code later on again, we will put it in a function:

function StartMyApp(){
    SiteKiosk.ExternalApps.Run("c:\\pathtomyapplication\\myapplication.exe", true);
}

The Run method basically expects the path to the application plus a boolean value that specifies if SiteKiosk is to check first if this application is already running. If it is already running, it will be maximized and focused. For the purposes of this script the boolean value should be true to ensure that no additional instances of the application are started.

SiteKiosk or the SiteKiosk Object Model cannot prevent the user from closing an application that provides the user with options to close it. Therefore we now need the code that monitors the application.

We will use the OnRemove event of the WindowList object. The OnRemove event fires whenever an application window (this means every Window that produces a tab in the Windows task bar) is removed. We assign a function to the OnRemove event, in this case also named OnRemove.

That function receives a parameter that is a WindowInfo object and includes information about the window that has just been closed. We use the ItemText property of that object to check if the window title of the window that has just been closed is from the monitored application. If that is the case our application has just been closed and we need to start it again, for that we call the function we already created that start our application. The code for all this looks as follows:

SiteKiosk.WindowList.OnRemove = OnRemove;

function OnRemove(skwin){
    if(skwin.ItemText === "WindowTitleOfApplicationToWatch"){
        StartMyApp();
    }
}

Depending on the speed of the process to start SiteKiosk and the application at the same time or the time the application needs to fully close, the application may not have the focus or start at all. To prevent this from happening we can add a slight delay to starting the application, you may need to test what the best timing is for your individual application. We add the AddDelayedEvent method of the Scheduler object to our controlapp.js script at all the places we want to start the application:

SiteKiosk.Scheduler.AddDelayedEvent(5000, StartMyApp);

We are done. When we put the parts together the complete code of our script looks like this:

SiteKiosk.WindowList.OnRemove = OnRemove; //fires if a window has been closed
SiteKiosk.Scheduler.AddDelayedEvent(5000, StartMyApp); //starts the desired application the first time after 5000 ms

function StartMyApp(){
    SiteKiosk.ExternalApps.Run("c:\\windows\\notepad.exe", true);
}

function OnRemove(skwin){
    //checks if the application that should run has been closed
    if(skwin.ItemText === "Untitled - Editor"){
        //the application has been closed, restart it again
        SiteKiosk.Scheduler.AddDelayedEvent(500, StartMyApp); //starts the desired application the next time after 500 ms
    }
}

Save the code as controlapp.js (or whatever name you prefer) and make sure to put that file into the ..\SiteKiosk\html\ folder.

Now open the SiteKiosk configuration tool and create a new configuration. Set a password, set the background.html file as your start page and then go to Browser Designs, click on Fullscreen and set SiteKiosk to use the permanent fullscreen mode. Still under Browser Designs click the Advanced button and add the conrolapp.js file as an external script (optional: on the same configuration page tick the option to 'Keep the SiteKiosk main window in the background').

Save the configuraion and test the script.


Another possibility is creating an external script that checks if the application EXE process is running in regular intervals.

For this you basically need the following methods:
- AddPeriodicEvent Method: http://www.provisio.com/helpconsole/SiteKiosk%20Object%20Model%20Help/en-US/default.htm?scheduler_addperiodicevent_mth.htm
- IsProcessRunning Method: http://www.provisio.com/helpconsole/SiteKiosk%20Object%20Model%20Help/en-US/default.htm?externalapps_isprocessrunning_mth.htm
- Run Method: http://www.provisio.com/helpconsole/SiteKiosk%20Object%20Model%20Help/en-US/default.htm?externalapps_run_mth.htm

The following example script will check if the “notepad.exe” process is running every 30 seconds (30000 ms).
If it is not running it starts notepad.exe again.

evtid = SiteKiosk.Scheduler.AddPeriodicEvent(30000, checkExecution);

function checkExecution(eventID){
   if (SiteKiosk.ExternalApps.IsProcessRunning("notepad.exe") == false){
    SiteKiosk.ExternalApps.Run("C:/Windows/notepad.exe", true);
    SiteKiosk.Logfile.Notification('Application started');
    }
}