Build a button with which you can trigger a system shutdown or restart.

This devblog entry describes how to create a button in the editor to trigger a system restart or shutdown.

Note that this feature is only supported in SiteKiosk Online 1.2 and higher. For Android the device must be rooted.


1. For this example we create a project with the template Empty. 

2. Activate the Expert mode by entering "&expert" in the URL address line and reload the page. 

3. Insert an image element into the page and double-click on the element to open the element's properties dialog. 

4. In the properties dialog go to the Actions section and activate "Execute script".

5. In the input area add the following line:

try{siteKiosk.system.shutdown()}catch(e){console.log('Shutdown machine not possible or in preview')};

To trigger the restart of a client via a button you can use the following line:

try{siteKiosk.system.reboot()}catch(e){console.log('Shutdown machine not possible or in preview')};

6. Save the setting

7. Publish the project to a client to test the function of the button.

Display the device name of a SiteKiosk Online client in a project

The following developer blog entry describes how to create a button that shows the user the device name of the client he or she is using in an alert dialog. It also describes how to display the device name in a text element. 

This entry works with SiteKiosk Online for Windows and Android clients.

For the alert dialog, follow these steps:

Create a project using the Empty template. 

Add a text element using the New button. 

In the URL address line, type &expert at the end of the URL.


Select the URL and press Enter to reload the project.

Double click to open the properties dialog of the text element.

Press the Expert Edit button at the bottom left.

Go down in the Expert section and enter triggerActions in the Add properties edit box.

Select JSON Object from the dropdown menu on the right and then add the following lines in the box to the left of it:

{

  "pressed": {

    "actions": [

      {

        "type": "executeScript",

        "script": "alert(siteKiosk.remote.blackboard.getValue('StC.MachineInfo.Name')?.value)"

      }

    ]

  }

}

Press the plus button to add the setting. Then press Save to save the settings you have set.

Publish the project to an Android or Windows client and click on the text element to test the dialog.


Use the following steps to add the machine name to a text element:

Create a text element. 

Double click to open the properties dialog of the text element.

Write {$machineName} in the text element. 
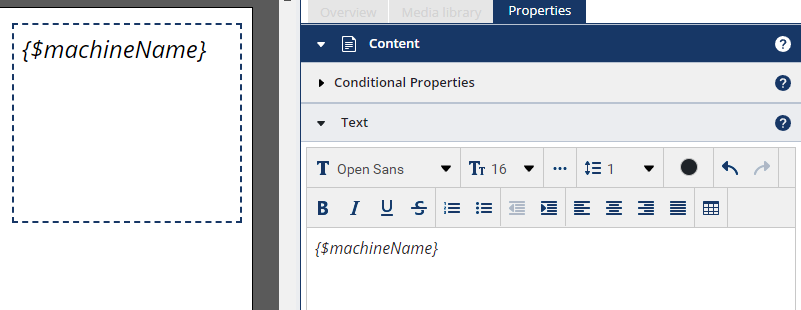
Press the Expert Edit button at the bottom left.

Go down in the Expert area and enter onActivated in the edit box Add properties.

Select JSON Object from the dropdown menu on the right and enter the following lines in the box to the left:

{

  "takeFromTriggerActions": true

}
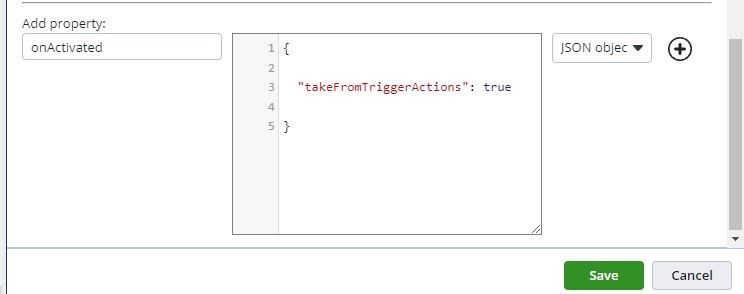
 

Press the plus button to add the setting. 

Enter the edit box Add properties triggerActions

Select JSON Object from the dropdown menu on the right and enter the following lines in the box to the left:

{
  "pressed": {
    "actions": [
      {
        "type": "executeScript",
        "script": "const id = this.element.id;const element = siteKiosk.content.getElementByName(id);const machineName = siteKiosk?.remote?.blackboard?.getValue('StC.MachineInfo.Name')?.value || 'unknown';element.replacePropertyPlaceholders('text', { machineName });"
      }
    ]
  }
}


Press the plus button to add the setting. Then press Save to save the settings you have set.

Publish the project to check the display of the client name in the text element

Smooth animations on Android

SiteKiosk for Android offers secured browsing preventing any misuse that could mess up your tablet configuration. But it's not only browsing that you can secure with SiteKiosk, also self service applications like for example menus, info terminals or customer surveys can be (and should be ;) run with SiteKiosk. An additonal advantage: you can use the powerful SiteKiosk Object Model to have even more control as normally possible with HTML pages. As I mentioned in an earlier post you can have access to local files via the sk:// protocol for example. We are adding more and more useful functionality to the Object Model in the future, so watch out for new versions. You can also post a comment here stating what you'd like to have us added to the SK Object Model.

Speaking of self service applications we realized early in our development process that android tablets are capable of many things, but still not comparable to desktop computers. Especially the browser component is a difficult story, since on one hand it supports many HTML5 features already (which is fantastic), but on the other hand still has some problems concerning completeness and performance of these new features. So you have to be a bit careful if you program web applications targeting android devices.

One example would be animations. Ever since JavaScript was introduced to the browser world, it has been used to program animations for web pages. Still it is widely used for that purpose on many pages and doing it quite well at least on desktop computers. Concerning Android, doing animations (like transitions) in JavaScript is not the best thing to do (even for desktop computer, but goes unnoticed most of the time). Say you want to create a sliding animation of a particular div containg some content that need to be exchanged when the user pressed a "next" button. You could use JavaScript's setInterval() and periodically update the div's left parameter. Unfortunately this results in poor results since the animation can be jerky on many Android tablets. A better way to do it is using CSS transforms and transitions. These will be hardware-accelerated even on Android tablets and therefore a lot smoother than JavaScript animations. 

An example would be:

<div style="-webkit-transform: translate(-600px, 0px); width=600px">Your content.</div>

This moves the div 600 pixel to the left relative to its normal position. Nice, but still no animation, right? Here you go:

<div style="-webkit-transition-duration: 500ms; -webkit-transform: translate(-600px, 0px); width=600px">Your content.</div>

Adding the "-webkit-transform-duration" will result in transition animations every time you change the "-webkit-transform" value. Obviously the transition will take 500 ms in this case. So Adding these two style properties results in a sliding animation moving the div from right to left by 600 pixels. There are a bunch of other transforms you can use for transitions like rotation, scaling and skewing. You could also use transitions for normal CSS style properties like "margin-left", but these might not be hardware-accelerated, so be aware.

Manipulation these style properties in JavaScript is not a big deal, but can be a bit cumbersome. My adivce is to use the free Move.js which makes adding these transitions dynamically very easy.