Extend the SiteKiosk Browser workspace to multiple screens (Combine several screens to one screen)

To extend the workspace of the SiteKiosk Windows browser to multiple screens that are configured as separate screens in Windows with "Extend these screens", proceed as follows:


A. In the SiteKiosk configuration under "-->Start Page & Browser-->Secondary Monitor", deactivate the "Restrict mouse pointer to first monitor browser area" option. (The option "Activate secondary monitor" must remain deactivated!).

B. Now you have to allow the display of new browser windows on the second monitor.
For this open the SiteKiosk configuration file you created (e.g. ...\SiteKiosk\Config\YourConfig.skcfg) with an editor (e.g. Notepad) and search for the following line:

<windowmanager>

Add the following content to the next line:

<disallow-window-clipping>true</disallow-window-clipping>

Like this:

<windowmanager> 
   <disallow-window-clipping>true</disallow-window-clipping>  
   <show-block-msg>true</show-block-msg> 
   <use-secure-user>false</use-secure-user>
</windowmanager>

For more information see "20. Remove restriction to limit windows to the SiteKiosk display area":
https://www.provisio.com/helpconsole/SiteKiosk%20Help/en-US/default.htm?manuell_editierbare_optionen.htm

C. The next step is to adjust the "workarea" of SiteKiosk to the resolution of all your monitors combined. To do this, use the setting described at "5. Restrict SiteKiosk to a Portion of the Screen":
https://www.provisio.com/helpconsole/SiteKiosk%20Help/en-US/default.htm?manuell_editierbare_optionen.htm

Example:
Two monitors side by side with a resolution of 2560x1440 px each give a workarea of 5120x1440px on both monitors.

The corresponding "workarea" adjustment looks like this:

<workarea enabled="true" absolute-coordinates="true">
      <capture-mouse>false</capture-mouse>
      <left>0</left>
      <top>0</top>
      <right>5120</right>
      <bottom>1440</bottom>
</workarea>

After saving the changes and starting SiteKiosk, the browser extends across both monitors.


NOTE:
Due to Windows User Account Control (UAC) restrictions, you may need to start the text editor as an administrator (right-click-->Run as administrator) to save the changes in the Programs directory.


Extend the SiteCaster workspace to multiple screens (Combine several screens to one screen)

In the case you want to extend the SiteCaster workspace to multiple screens, you have to edit the SiteKiosk configuration. In the following example the SiteCaster workspace is extended to 3840 px x 2160 px for using four HD displays (1920 px x1080 px).
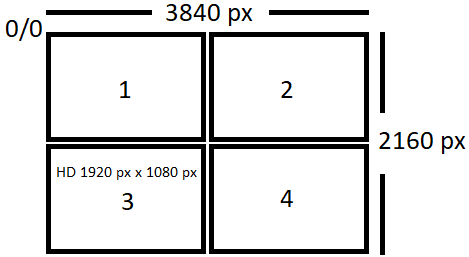


If you want to combine more than two screens to one screen you need a graphics card which supports the described scenario.

Start the SiteKiosk configuration tool and create a new configuration. Activate SiteCaster under Start Page & Browser and save the configuration. Open the configuration (C:\Program Files (x86)\SiteKiosk\Config) with Notepad ++ and search for following line:      "id": "App05" 

You have to change the following lines


{
      "appGuid": "8EB91F5F-D1E5-48BA-ADA0-A8E54F73131A",
      "id": "App05",
      "name": "SiteCaster CMS",
      "folder": "siteCasterCMS",
      "active": true,
      "dontRestartAtScreensaver": true,
      "dontRestartAtLogout": true,
      "remoteApps": [
        {
          "name": "siteCasterCMS",
          "remoteUrl": "https://$(SiteRemoteServerName)/sitecastercms/player/assets",
          "contentFilesFolder": "C:\\Users\\Public\\SiteKiosk\\cmscontent"
        }
      ],
      "config": {
        "allowMediaStreamAccess": false,
        "enablePinch": false,
        "handlePopupWindowsAsLinks": false,
        "useFlash": false,
        "zoom": 1.0,
        "projects": []
      },
      "instances": [
        {
          "mode": "startup",
          "screen": "primary",
          "appMainWindowRect": {
            "width": null,
            "height": null,
            "top": null,
            "left": null,
            "bottom": null,
            "right": null
          },
          "useAppMainWindowRect": false,
          "section": "0"
        }
      ]
    },


 into 

{
      "appGuid": "8EB91F5F-D1E5-48BA-ADA0-A8E54F73131A",
      "id": "App05",
      "name": "SiteCaster CMS",
      "folder": "siteCasterCMS",
      "active": true,
      "dontRestartAtScreensaver": true,
      "dontRestartAtLogout": true,
      "remoteApps": [
        {
          "name": "siteCasterCMS",
          "remoteUrl": "https://$(SiteRemoteServerName)/sitecastercms/player/assets",
          "contentFilesFolder": "C:\\Users\\Public\\SiteKiosk\\cmscontent"
        }
      ],
      "config": {
        "allowMediaStreamAccess": false,
        "enablePinch": false,
        "handlePopupWindowsAsLinks": false,
        "useFlash": false,
        "zoom": 1.0,
        "projects": []
      },
      "instances": [
        {
          "mode": "startup",
         "screen": "primary",
          "appMainWindowRect": {
            "width": "3840",
            "height": "2160",
            "top": "0",
            "left": "0",
 "bottom": null,
            "right": null          },
          "useAppMainWindowRect": true,
          "section": "0"
        }
      ]
    },

If you do not want to adjust the order of the screens horizontally or vertically in the Windows settings (Screen Resolution), you have the option to adjust the zero point of the SiteCaster desktop by setting the corresponding values for "top" and "left", whereby negative values can also be used. In the SiteCaster Editor, you must set the project resolution in the menu bar under Resolution / Zoom to the resolution used.

Please note that the described case is supported with SiteKiosk version 9.7.