There are two ways to present terms of use to the user of a SiteKiosk Windows kiosk system, one is also working for SiteKiosk Android. You can either make use of the Fullscreen feature which works in SiteKiosk Windows and SiteKiosk Android or create an overlay by using the SiteKiosk Object Model which works in SiteKiosk Windows only.
1. Fullscreen method (for SiteKiosk Windows and SiteKiosk Android)
The easiest way to present terms of use is to use the Fullscreen feature of SiteKiosk Windows and SiteKiosk Android. Just set your terms of use page as the start page for SiteKiosk.
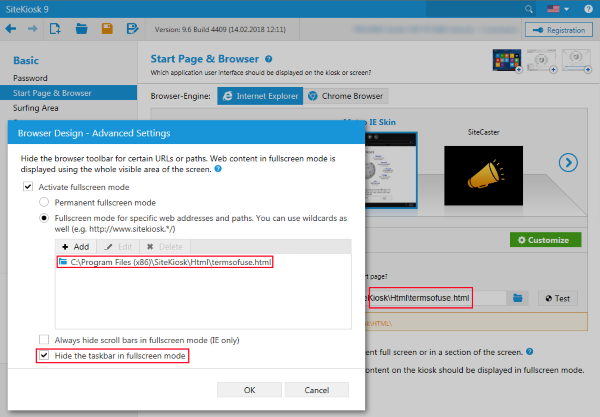
Under SiteKiosk Windows you then go to Start Page & Browser, click on Fullscreen and set the fullscreen mode for the same URL, you may also select the option to hide the task bar. This works for the Chrome and Internet Explorer browser engines.
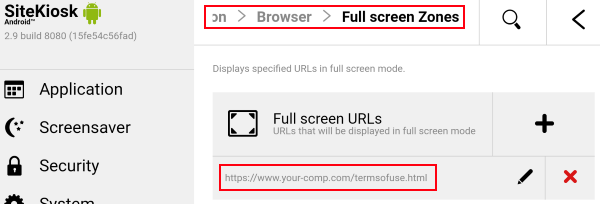
Under SiteKiosk Android you go to Application -> Browser -> Fullscreen Zones and also set your start page (which is your terms of use page) to be displayed in fullscreen mode.
Your terms of use page can be stored locally or online. The code for the terms of use page should include on option to accept the terms. If this option is selected the code of the terms of use page simply navigates to a different URL, which is then shown with the normal browser elements.
Sample code for such a page can look like this:
<!DOCTYPE html>
<html>
<meta charset="utf-8">
<head>
<script>
	//Terms of use accepted, close the dialog
    function acceptTermsofuse() {
        document.location = "https://www.provisio.com/";
	}
</script>
</head>
<body style="text-align:center;">
	Use at your own risk <input type="button" value="OK" onclick="acceptTermsofuse();" />
</body>
</html>
2. Overlay method (for SiteKiosk Windows only)
The other method to show terms of use is to use an overlay over your start page. This can be done by using the SiteKiosk Object Model. First we will create a javascript file, that shows the overlay with the help of the CreateHTMLDialog method. It also shows or hides the overlay on different events (please see the SiteKiosk Object Model documentation for further information). The code for this script file looks like this:
//Initialization of the terms of use dialog
var termsofuseDialog = SiteKiosk.SiteKioskUI.CreateHTMLDialog();
//Path to the terms of use page, this does not have to be local
termsofuseDialog.URL = SiteKiosk.SiteKioskDirectory + "Html/termsofuse.html";
termsofuseDialog.Parent = SiteKiosk.WindowList.MainWindow.Handle;
termsofuseDialog.TopMostWindow = true;
termsofuseDialog.Closable = false;
termsofuseDialog.Title = false;
termsofuseDialog.Border = true;
termsofuseDialog.Scrollbars = false;
termsofuseDialog.Sysmenu = false;
termsofuseDialog.Type = "TERMSOFUSE";
termsofuseDialog.Height = 800;
termsofuseDialog.Width = 1200;
termsofuseDialog.CloseOnInput = false;

//Function that calls the terms of use dialog
function showWindowDelay(){
	termsofuseDialog.ShowModal();
}

//Function that closes the terms of use dialog
function closeDialog(){
	try{
		SiteKiosk.SiteKioskUI.CloseHtmlDialogs('TERMSOFUSE');
	}
	catch(e){}
}

//Show the terms of use dialog when the screensaver ends
SiteKiosk.ScreenSaver.OnScreenSaverEnd = OnScreenSaverEnd;
function OnScreenSaverEnd(){
	SiteKiosk.Scheduler.AddDelayedEvent(1000, showWindowDelay);
}

//Close the terms of use dialog when the screensaver begins
SiteKiosk.ScreenSaver.OnScreenSaverBegin = OnScreenSaverBegin;
function OnScreenSaverBegin(){
	SiteKiosk.Scheduler.AddDelayedEvent(2000, closeDialog);
}

//Show the terms of use dialog when someone uses the logout button
SiteKiosk.OnReset = OnReset;
function OnReset(){
	//Make sure the screensaver is not running
	if (SiteKiosk.ScreenSaver.Active === false){
		SiteKiosk.SiteKioskUI.CloseHtmlDialogs('TERMSOFUSE');
		SiteKiosk.Scheduler.AddDelayedEvent(1000, showWindowDelay);
	}
}

//Show the terms of use dialog when SiteKiosk starts
OnReset();
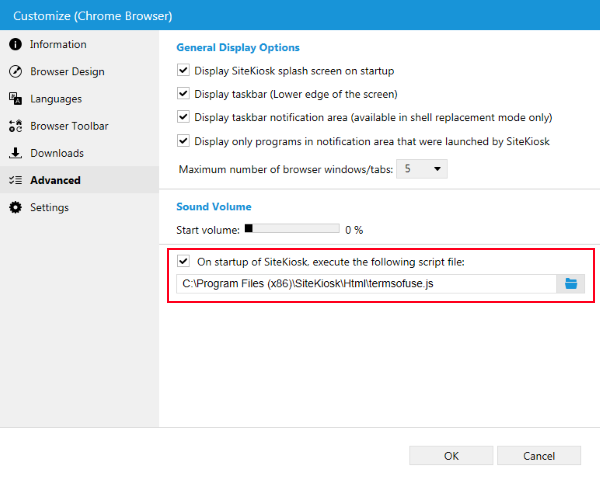
You can copy and paste the code and save it as a .js file. Put the file into the ..\SiteKiosk\html folder and then add it as an external script to SiteKiosk. For both Internet Explorer and Chrome this is under Start Page & Browser -> Advanced. The following image shows the setting for the Chrome browser engine:
For the actual terms of use page you have two options. The first option does not require any specific code within the terms of use page. Just change the line termsofuseDialog.CloseOnInput = false; to termsofuseDialog.CloseOnInput = true; and any user input, e.g. mouse click, will close the overlay. The second option requires to add SiteKiosk Object Model code to the terms of use page. It makes use of the CloseHtmlDialogs method to close the overlay when the user accepts the terms. Here is a code example of how this can look:
<!DOCTYPE html>
<html>
<meta charset="utf-8">
<head>
<script>
	//SiteKiosk Object Model initialization
	window.external.InitScriptInterface();

	//Terms of use accepted, close the dialog
    function acceptTermsofuse() {
        SiteKiosk.SiteKioskUI.CloseHtmlDialogs('TERMSOFUSE');
	}
</script>
</head>
<body style="text-align:center;background-color:red;">
	Use at your own risk <input type="button" value="OK" onclick="acceptTermsofuse();" />
</body>
</html>
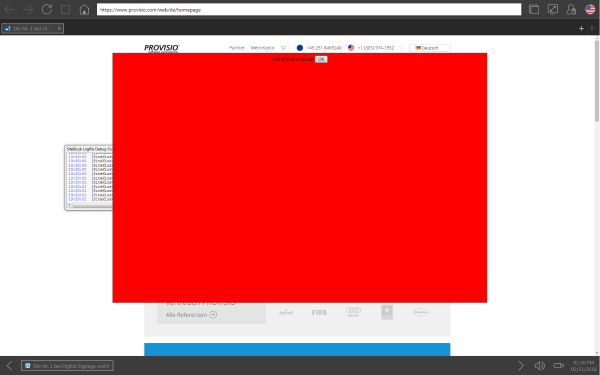
The page can be stored locally under ..\SiteKiosk\html or online. When you store it online or under another local path, you will need to give the URL script permission in the SiteKiosk configuration under Access/Security. Just make sure the line termsofuseDialog.URL = SiteKiosk.SiteKioskDirectory + "Html/termsofuse.html"; from the script above contains the correct path to your terms of use page.
Here is a picture of the above example code at work while using the Chrome browser engine of SiteKiosk Windows: