As a default option the SiteKiosk file manager is only available with IE-based skins. There are different ways to also start the file manager when using the Chrome browser of SiteKiosk Windows. How to start the SiteKiosk file manager when using the Chrome Browser and the Start Screen has been described here. Now we want to take a look at how to start the file manager using the custom button option.
First we need to create a local JavaScript file that takes care of the task of opening the File Manager. The code for that file can look like this:
function openFileManager(){
 //Defines the available Window styles for the File Manager window
 var WS_OVERLAPPED = 0x00000000;
 var WS_MAXIMIZEBOX = 0x00010000;
 var WS_MINIMIZEBOX = 0x00020000;
 var WS_THICKFRAME = 0x00040000;
 var WS_SYSMENU = 0x00080000;
 var WS_BORDER = 0x00800000;
 var WS_CAPTION = 0x00C00000;
 var WS_MAXIMIZE = 0x01000000;
 var WS_MINIMIZE = 0x20000000;
 var WS_POPUP = 0x80000000;
 var WS_OVERLAPPEDWINDOW = WS_OVERLAPPED | WS_CAPTION | WS_SYSMENU | WS_THICKFRAME | WS_MINIMIZEBOX | WS_MAXIMIZEBOX;
 var WS_EX_TOOLWINDOW = 0x00000080;

  //Creates the File Manager window and assigns its settings
  var mediabox = SiteKiosk.SiteKioskUI.CreateHTMLDialog();
  mediabox.URL = SiteKiosk.SiteKioskDirectory + "skins\\public\\Media\\FileManager\\Selector.html";
  mediabox.Styles = 13565952;
  mediabox.Icon = SiteKiosk.SiteKioskDirectory + "skins\\public\\Media\\FileManager\\Img\\Icons\\fms_ico.ico";
  mediabox.Width = 1024;
  mediabox.Height = 700;
  mediabox.ExStyles = 0;//
  mediabox.Border = true;
  mediabox.Type = "FileManagerDlg";
  mediabox.TopMostWindow = false;
  mediabox.CloseOnInput = false;
  mediabox.Parent = SiteKiosk.WindowList.MainWindow.SiteKioskWindow.Window;
  mediabox.ShowDialog();

}
Just copy and paste the code to an editor and save it for example as "OpenFileManager.js" at "…\SiteKiosk\Html".
Next it's time to open the SiteKiosk configuration and adding this script file at "Start Page & Browser-->Advanced-->On startup of SiteKiosk execute the following script file".
Then create an HTML file (e.g. OpenFileManager.html) with the following content and save it in the folder "...\SiteKiosk\Html":
<html>
<head>
<script>
    (new Function(_siteKiosk.getSiteKioskObjectModelCode()))();
    _siteKiosk.objectModel.callHostFunction("system.windows.skLegacy.executeScript", "SiteKiosk.ScriptDispatch.openFileManager();");
     window.close();
</script>
</head>
<body>
    <!-- Body is empty as this window is only used to open the File Manager //-->
</body>
</html>
The function OpenFileManagerExt is "Using the Classic SiteKiosk Object Model in SiteKiosk Windows Chrome Browser" in combination with the "ScriptDispatch Object" from classic SiteKiosk Object Model to call the external script function "openFileManager".
Now add a button in the Chrome Browser Skin under "Start Page & Browser-->Customize-->Browser Toolbar-->Individual Buttons-->Set individual weblink or program" which calls the above HTML file.
General Note:
Which directories are displayed in the File Manager (download folder, etc.) must be specified beforehand under "Files & Downloads", while you have selected the Metro IE Skin under "Start Page & Browser".
The path for the download folder should match the download folder in the Chrome Browser skin.
Since the download folder matches with the default settings "C:\Users\Public\Documents\SiteKiosk" you normally only need to activate the File Manager and Downloads.
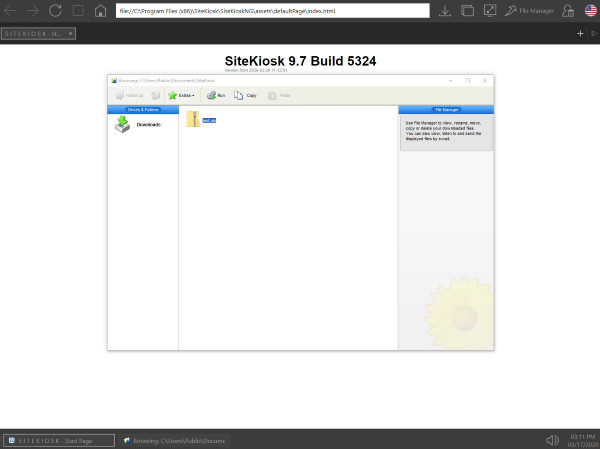
Finally it should look like this when the File Manager is opened:
d2edcdb6-89df-4e0b-ba46-9b9ecfd47d55|0|.0