Allowing Custom Fonts for SiteCaster Projects on a SiteRemote Server

When running your own SiteRemote Server, you can easily allow the upload of additional fonts for SiteCaster projects. The requirement is SiteCaster 1.6 or higher. New fonts should be in the .ttf file format.

If you want to allow uploads for all teams, go to C:\Program Files (x86)\PROVISIO\SiteRemote\Config and open the file serverConfig.json with an editor (e.g. Notepad). Look for the line

"uploadAdditionalWebpageFiles": false,

in the teamSettings. Add this line right after it:

"uploadAdditionalFontFiles": true,

Here is an example of the teamSettings with the new value added:

"teamSettings": {
    "variants": false,
    "uploadAdditionalWebpageFiles": false,
	"uploadAdditionalFontFiles": true,
    "richTextVariable": false,
    "createProofOfPlay": false,
    "deleteScreenshotsAfterDays": 14,
    "maxTeamFolderSize": 102400
  },

Alternatively the upload can only be allowed for certain teams. In this case, you have to go into the teamStorage folder of those teams to create a config.json file. To find the folder for a team, go to the Teams tab of the SiteRemote Administration web page. In the table on that page, you will find the ID column, which tells you the ID of a team. Use the ID to identify the correct team folder in C:\Program Files (x86)\PROVISIO\SiteRemote\Common\Teams\teamStorage, e.g. C:\Program Files (x86)\PROVISIO\SiteRemote\Common\Teams\teamStorage\1 (where 1 is the ID of the team).

Directly in that folder you need to create a file with the name config.json and this content:

{
    "uploadAdditionalFontFiles": true
}

Do this for every team, you want to allow uploads for. Note that the teamStorage folder of a team will only show up after the first project has been created.

After one of the above changes has been made, go to a SiteCaster project in a team and then to Settings -> Content Settings to find the new Fonts section with a Select file button.

Fonts uploaded there can then be found and used in all rich text editors of that project.

The team based font upload option is available on request for teams on https://www.siteremote.net as well.

How to trigger content on one monitor with actions on a second monitor

In the following example you have two HD screens with a 1920 x 1080 resolution. On the first screen you will be able to present Videos which are activated by buttons presented on the second screen.


First you have to select SiteCaster in the Startpage & Browser section in the tab Primary Monitor the SiteKiosk configuration.

In the tab Secondary Monitor, you have to uncheck the option Restict the mouse pointer to the first monitor browser area. Note that you don’t have to activate the secondary monitor in the Secondary monitor tab.

Then you have to adjust the SiteKiosk configuration manually as described in the devblog entry https://devblog.provisio.com/post/2019/10/29/Extend-the-SiteCaster-workspace-to-multiple-screens-(Combine-several-screens-to-one-screen).aspx to extent the a SiteCaster workspace to a resolution to 3840 x 1080.

In the next step you generate a in the SiteCaster editor a project with a 3840 px x 1080 px resolution.

Go into the View setting and open the Resolution / Zoom dialogue.

Activate the radio button Custom Width and enter 3840 px width and 1080 px height.

Then add a swap container with 1920 px x 1080 px on the left side (Screen 1) of the project view.

Add an image and two videos into the Swap container.

On the right side (Screen 2) of the project view add two images which represent the buttons to trigger the videos.

Open the properties dialogue of the first image, activate the navigation option and select the first video in the dropdown menu.

Do the same with the second image and select the second video in the dropdown menu.

Finally start SiteKiosk with the generated configuration and publish the project.

As a result, the Image in the swap container will be displayed when the system is idle. With pressing on one of the generated buttons on the second screen the corresponding video is displayed on the first screen.

Create a new project template from an existing project

It is possible to make existing SiteCaster projects in SiteCaster permanently available again as templates. This entry describes how to create a template from an existing project if you have an own server.

First you have to export the corresponding project:

1. Open the project in the editor and copy the project ID from the URL.

for example:

https://www.siteremote.net/sitecastercms/editor/assets/index.html#app-editor?projectId=5e7b5098415fcafc08348a01&variantId=5e7b5098415fcafc08348a03

2. Insert the project ID in the following line.

3. https://www.siteremote.net/sitecastercms/api/projects/5e7b5098415fcafc08348a01/export

4. Copy the URL

5. Open a new tab and paste the created export address – press Enter

6. Press Enter to download the zip file 

In the second part you have to modify the project folder and transfer it to a template folder:

1. Unpack the zip file.

2. Rename the content.json file located in the folder to content.original.json

3. Go to the following directory on the server:

C:\Program Files (x86)\PROVISIO\SiteRemote\Web.SiteCaster\server\projects\projectTemplates

4. Copy one of the existing template folders and paste it again.

5. Rename the folder (e.g. name of the template).

6. Replace the image file in the folder with an image file of your template, whereby the name preview must be retained and the file type has to be JPG.

7. Open the projectTemplate.manifest file in the folder with a text editor (e.g. Notepad)

8. Change the name of the template "name": "${string:StartScreenTemplate.name}", e.g. to "name": "TEST-Template”

9. Change the Project ID "projectID": "311f9e4eb2427f5ec02e32f1" in the file to create a unique new ID e.g. "projectID": "777f9e4eb2427f5ec02e32f1

10. Open the folder: 00000000000000000000

11. Delete the content of the folder

12. Add the complete content of the zip folder with the content.original.json file into the 00000000000000000000000000 folder

13. Open the SiteCaster Editor in a browser and click on the Create New Project button -> The new project template is now available

If you want to offer your template on your server in a team-specific manner, you must use the following path for the procedure described above:

C:\Program Files (x86)\PROVISIO\SiteRemote\Common\Teams\teamStorage\<TeamId>\projectTemplates

The team ID specified in the path is individual per team and can be found on the server administration page in the tab teams.

Using tags to display variants of a SiteCaster project on different machines

If you want to display variants of a SiteCaster project that differ only in a few elements, you can use the tag feature in SiteCaster as a display condition.

In the following example, a SiteCaster project is published on two machines to display two variants of a project:

Log into your SiteRemote team and select the Monitoring tab. To generate tags for your machines, right click on a machine in the tree view and select Assign Tags.


Then enter the name of your tags e.g. Terminal 1 and Terminal 2 press Add and select it using the checkbox. Confirm the setting with Save.In SiteCaster, generate your sample project using the empty template. Use the Add button to add a swap container to the project. Insert two different images into the swap container. In order to use the Tag display condition, you will need to enable the expert mode in SiteCaster. To do so, you need to insert &expert at the end of the URL in the URL address field of your browser and then press Enter to reload the project. 

After activation of the expert mode you see the Expert Edit button in the tool bar.  

Then select one of the images and open the properties dialog by double-clicking on the image. Go to the section Display condition and select the Display under these conditions option. Activate the check box Tag and enter the tag name Terminal 1. Close the properties dialog with pressing the Save button. Activate the same setting on the other image with the tag name Terminal 2. After publishing the project to both clients the first image is displayed on the device with the tag Terminal 1 and the second image on the device with the tag Terminal 2. The described scenario can be extended with further tags as you like.   

Unload a SiteCaster Webview when it is not displayed

Generally, SiteCaster loads webviews at the point where they first appear in a session in SiteCaster. In order to avoid reloading a webview each time again when it is displayed e.g. in container types like sequence, overflow container or swap container, it is always kept in the loaded state. This has the side effect that if the displayed webview contains audio elements these are also audible in the non-displayed state. If you want to prevent this you can use the expert setting shouldUnloadWhenHidden. Additionally you can use the setting shouldUnloadWhenHidden to bring certain webviews always in a newly loaded state when they are displayed.

To activate the expert setting shouldUnloadWhenHidden, open the project in the SiteCaster editor. In the URL address field of your browser you must add &expert at the end of the URL and then press Enter to reload the project.

After activation of the expert mode you see the Expert Edit button in the tool bar. Create a webpage element on your project page, select it and press the Expert Edit button.

At the bottom of the Expert Settings dialog box enter the property shouldUnloadWhenHidden. In the dropdown menu on the right side select Boolean and activate the checkbox. Then press the plus button and save the setting.


After pressing the expert setting there is an additional line shouldUnloadWhenHidden with activated checkbox displayed in the expert settings. Close the expert settings dialog with pressing the save button. After activation of this setting the webview will be unloaded when it is not displayed.


Extend the SiteCaster workspace to multiple screens (Combine several screens to one screen)

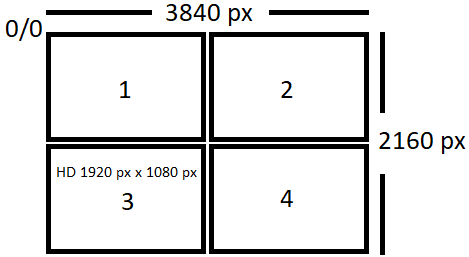
In the case you want to extend the SiteCaster workspace to multiple screens, you have to edit the SiteKiosk configuration. In the following example the SiteCaster workspace is extended to 3840 px x 2160 px for using four HD displays (1920 px x1080 px).


If you want to combine more than two screens to one screen you need a graphics card which supports the described scenario.

Start the SiteKiosk configuration tool and create a new configuration. Activate SiteCaster under Start Page & Browser and save the configuration. Open the configuration (C:\Program Files (x86)\SiteKiosk\Config) with Notepad ++ and search for following line:      "id": "App05" 

You have to change the following lines


{
      "appGuid": "8EB91F5F-D1E5-48BA-ADA0-A8E54F73131A",
      "id": "App05",
      "name": "SiteCaster CMS",
      "folder": "siteCasterCMS",
      "active": true,
      "dontRestartAtScreensaver": true,
      "dontRestartAtLogout": true,
      "remoteApps": [
        {
          "name": "siteCasterCMS",
          "remoteUrl": "https://$(SiteRemoteServerName)/sitecastercms/player/assets",
          "contentFilesFolder": "C:\\Users\\Public\\SiteKiosk\\cmscontent"
        }
      ],
      "config": {
        "allowMediaStreamAccess": false,
        "enablePinch": false,
        "handlePopupWindowsAsLinks": false,
        "useFlash": false,
        "zoom": 1.0,
        "projects": []
      },
      "instances": [
        {
          "mode": "startup",
          "screen": "primary",
          "appMainWindowRect": {
            "width": null,
            "height": null,
            "top": null,
            "left": null,
            "bottom": null,
            "right": null
          },
          "useAppMainWindowRect": false,
          "section": "0"
        }
      ]
    },


 into 

{
      "appGuid": "8EB91F5F-D1E5-48BA-ADA0-A8E54F73131A",
      "id": "App05",
      "name": "SiteCaster CMS",
      "folder": "siteCasterCMS",
      "active": true,
      "dontRestartAtScreensaver": true,
      "dontRestartAtLogout": true,
      "remoteApps": [
        {
          "name": "siteCasterCMS",
          "remoteUrl": "https://$(SiteRemoteServerName)/sitecastercms/player/assets",
          "contentFilesFolder": "C:\\Users\\Public\\SiteKiosk\\cmscontent"
        }
      ],
      "config": {
        "allowMediaStreamAccess": false,
        "enablePinch": false,
        "handlePopupWindowsAsLinks": false,
        "useFlash": false,
        "zoom": 1.0,
        "projects": []
      },
      "instances": [
        {
          "mode": "startup",
         "screen": "primary",
          "appMainWindowRect": {
            "width": "3840",
            "height": "2160",
            "top": "0",
            "left": "0",
 "bottom": null,
            "right": null          },
          "useAppMainWindowRect": true,
          "section": "0"
        }
      ]
    },

If you do not want to adjust the order of the screens horizontally or vertically in the Windows settings (Screen Resolution), you have the option to adjust the zero point of the SiteCaster desktop by setting the corresponding values for "top" and "left", whereby negative values can also be used. In the SiteCaster Editor, you must set the project resolution in the menu bar under Resolution / Zoom to the resolution used.

Please note that the described case is supported with SiteKiosk version 9.7.

Create buttons to control webviews in a SiteCaster project

In the case you want to create buttons like back, forward, reload or navigate to control a webview in SiteCaster (since version 1.5), you need to start the expert mode.


Open the project in the SiteCaster editor. In the URL address field of your browser you must add &expert at the end of the URL and then press Enter to reload the project.


After activation of the expert mode you see the Expert Edit button in the tool bar. Create a webpage element on your project page, select it and press the Expert Edit button. In the settings you need to copy the element id under name (e.g. id_13590531270_1568903718862) for the next step.

Example: Navigate button

Now add an image element (note that this will work with most other standard elements as well) on your project page, select the image and press the Expert Edit button. You can resize the inspector on the right via drag and drop to access the following lines easier.

Go to actions and select JSON object in the drop down menu. Then add following entry with the webview id behind the existing one:

{"enabled":true,"actionType":"webViewCommand","id":"id_13590531270_1568903718862","tag":"web","command":"back","url":"https://www.provisio.com"}

As a result you have following entry in the editbox:

[{"enabled":false,"actionType":"navigate"},{"enabled":true,"actionType":"webViewCommand","id":"id_13590531270_1568903718862","tag":"web","command":"navigate","url":"https://www.provisio.com"}]


In the same way you can use following values:

id (ID of the WebView that is to be navigated)

tag (tag of the WebViews that is to be navigated)

command: "back, "forward," "home," "reload," "navigate")

url (URL to navigate to)

Don’t edit or delete the first entry in the array, as it has to stay in there. Now close the settings dialog with pressing Save button. You can exit the expert mode with pressing the button “Leave expert mode” .


To target the webview you can enter the webpage id or a tag. With a tag you can also control several different webviews in the same time with one button. For using a tag you simply activate the expert mode. Double click on the webview element to open the settings dialog and enter the tag name under tags in the section Editor settings. If you want to use several tags for one webview they have to be separated with a comma.

You can use the button example images on the bottom to build your buttons. The CC0 Image source is https://pixabay.com


Create a SiteCaster project that can’t be deleted by restricted users but edited freely


The following entry describes how to generate a SiteCaster project which cannot be deleted, but can be freely designed with standard elements by a restricted user group. This example is working with two user groups. The Admin group with full rights to the project and the Editor group which gets the right to add, edit and delete elements. After logging into SiteRemote you have to create on the Users page in the User Groups tab the two user groups Admin and Editor with the assigned role SiteCaster User. Add to the SiteRemote Administrator the both created user groups (Admin, Editor) and to an additional created user (e.g. SiteCaster Editor) only the Editor user group.


Switch to SiteCaster over the sidebar. Starting on the projects page in the SiteCaster editor you have to create a new project with the offered template Empty. In the User rights section on the bottom of the Create project page you have to select the user group Admin in the drop down menu for the user group with full access. Activate the checkbox Enable restricted editing of properties for additional users below and press create.


 Select the Content layer in the overview and press the Edit button.


In the properties dialog of the content layer activate in the section Editor settings (title, template, rights) the checkboxes Users in this group can insert new Elements that are based on templates for this container and Allow these users to also add standard elements, page templates and clipboard elements. Additionally select the restricted user group Editor in the dropdown menu and press save.


With the same procedure you can edit the root node of a project (top of the overview) to allow restricted users to add new pages. The created project is directly visible after saving for the restricted user group and can be further edited.


Starting an External Application from a SiteCaster Project

In case you want to start an external application from your SiteCaster project, you need to switch to the SiteCaster expert mode.

Open the project in the SiteCaster editor. In the URL address field of your browser you must add &expert at the end of the URL and then press Enter to reload the project.

After activation of the expert mode you see the pen button in the menu bar. Now create an image (note that this will work with most other elements as well) on your project page, select the image and press the expert mode pen button. You can resize the inspector on the right via drag and drop to access the following lines easier.

Go to additionalLink and select JSON object in the dropdown menu. Then replace “image” with “script” in the text field.

Next go to linkActive to select Boolean from the dropdown menu and check the checkbox.

Finally go to scriptSource, select String and add the following line for SiteKiosk Windows with the path to the desired application
siteKiosk.system.windows.skLegacy.externalApps.run("PathToYourApplication", false);
to the scriptSource text field, e.g.
siteKiosk.system.windows.skLegacy.externalApps.run("C:\\Program Files\\Notepad++\\notepad++.exe", false);

Please note that from SiteCaster 1.5 the command is much shorter: siteKiosk.system.run("C:\\Program Files\\Notepad++\\notepad++.exe", false);
In both cases the second parameter of the run function is a boolean value that needs to be false if an existing instance of the application should be focused instead of opening a new one and true if an additional instance should be opened.

Should the scriptSource property not be available, scroll down to Add property and add it there by filling out the fields and hitting the plus button, e.g.:

It is strongly recommended to also add your external application in the SiteKiosk configuration under Applications so that SiteKiosk can close the application when the screensaver is activated.

Once the project is published to the client, a click on the element will open the application.

The above is the notation to make it work under SiteKiosk Windows. For SiteKiosk Android it is slightly different. In order to start the application you need to know its guid name, e.g. com.android.calculator2. Either you know this information for the app you would like to start or you can use the SiteKiosk logs to find this information. To do so, just add the desired app in the SiteKiosk configuration under Application -> Android App or Application -> Multiple Applications. Next start SiteKiosk and make sure the app has started at least once. Now close SiteKiosk and open the SiteKiosk log file in the ..\SiteKiosk\Logs folder. Look for an entry with the text System app launched, e.g. System app launched: com.android.calculator2. In our example the guid name we are looking for is com.android.calculator2. This information is required to start that specific app from SiteCaster.

With this information gathered we can compose the line that needs to be added as the scriptSource in SiteCaster to look like this:
__siteKiosk.system.apps.getByGuid("com.android.calculator2").launch("", "systemApp");

Please note that you need to add the app in the SiteKiosk Android configuration under Security -> Allow assigned apps, if it is not addd there it will be blocked.

Different Methods for Showing PDF Files with SiteCaster

The default method for showing PDF files with SiteCaster is the "linked document (pop-up)" method. This is available as a basic property of standard elements, e.g. an image. Once you click the element a closable pop-up opens, that shows the PDF. Note that on Android devices a PDF file will be opened full screen and not as a pop-up.

For example you could create a new image element for a content layer.

Then you would edit the linked document (pop-up) property and assign a PDF file.

Another method is to use the webpage element to display a PDF file. The PDF file can be located on the Internet or locally on the machine.

If the file is stored locally and you are using the file:// protocol, it is recommended to put the file into the html subfolder of your SiteKiosk installation folder, e.g. C:\Program Files (x86)\SiteKiosk\Html. Otherwise make sure that the location is accessible by changing the SiteKiosk surfing area settings.

When using the webpage element you can set the size properties to show the PDF full screen (again, note that the linked element option will already have this effect on Android devices). You can also use the parameters specified by Adobe to control the display of the PDF element. Just attach them to the URL as described in the Adobe document.

If you are using the webpage element, please keep in mind, that the PDF files will not be included when the content is distributed to the clients. The files must exist at the specified location for the client to be able to show them. For local files one option is to use the file synchronization of SiteRemote. The disadvantage to that is that you have to use both SiteCaster and file synchronization. The other option for local files is to use a little 4-step trick that enables you to only use SiteCaster to distribute the PDF files, even though you are using the webpage element.

1. Create an element with a linked PDF document as usual (see above).

2. Use the preview of the SiteCaster CMS editor, to note which internal file name is used in SiteCaster for the pdf. With Firefox use the download button at the top bar to get the download dialog with the file name, with Chrome just do a right mouse click on the PDF Display and then choose "Save as…".


3. Go back to the SiteCaster CMS Editor and set the element with the linked document to "Do not display (only visible in editor)" in the "Display conditions" settings of that element. This will essentially hide the original PDF file.


4. Now create a webpage element and add the following URL with the internal file name of the PDF identified in step 2:
http://localhost:8889/files/[internalfilename].pdf (e.g. http://localhost:8889/files/5c38667034427b1417f3229f_5c38667034427b1417f322a0.pdf)

That's it, now the PDF is distributed as SiteCaster content to the client and you can use the webpage element features like making the file full screen and using parameters to control how the PDF file is displayed.