There are many customization options for the SiteKiosk Windows Chrome Browser Toolbar. Both by simply using the configuration tool of SiteKiosk to enable or disable buttons or to change the colors as well as by editing files to give the toolbar a new look. There are several blog posts that deal with this topic, e.g. here and here. This time we are going to learn how to reposition buttons in the toolbar.
As an example, we will move the logout button from the left side of the language selection button the the right side. To do that, we need to open and edit a JSON (JavaScript Object Notation) file that is used by the Chrome Browser of SiteKiosk Windows. The file content.json is located in the folder C:\Users\Public\SiteKiosk\data\content\local\files\projects\d97aa96b962543fcb39625a3f8e8d8fb\000000000000000000000000. Open it with an editor like Notepad++. It is suggested that you make a backup copy of the file before editing it.
The buttons are defined in a number of attribute-value pairs that look like this for the logout button:
{
	"type": "content-button",
	"title": "{{$root.stringTable.strings.buttons.logout.$}}",
	"name": "logoutButton",
	"height": "60px",
	"width": "60px",
	"marginLeft": "0px",
	"marginRight": "0px",
	"_editor_canBeSelected": true,
	"_editor_canBeEdited": true,
	"_editor_canBeDeleted": true,
	"_editor_canAdd": true,
	"layout": {
	},
	"icon": {
		"src": "files/images/logout.svg",
		"color": "[[$root.colors.toolbarButton.icon]]",
		"hoverColor": "[[$root.colors.toolbarButton.iconHover]]",
		"pressedColor": "[[$root.colors.toolbarButton.iconPressed]]"
	},
	"backgroundImage": {
		"src": "files/images/button_background.svg",
		"color": "[[$root.colors.toolbarButton.background]]",
		"hoverColor": "[[$root.colors.toolbarButton.backgroundHover]]",
		"pressedColor": "[[$root.colors.toolbarButton.backgroundPressed]]"
	},
	"action": {
		"target": "{{%main}}",
		"value": "logout"
	},
	"_editor_propertiesToEdit": {
		"applyToAllContentGroups": true,
		"flex": true,
		"margin": true,
		"text": true
	},
	"_editor_propertiesToEditRestrictedUser": {}
},
And like this for the language selection button:
{
	"type": "content-button",
	"title": "{{$root.stringTable.strings.buttons.languages.$}}",
	"name": "languagesButton",
	"height": "60px",
	"width": "60px",
	"marginLeft": "0px",
	"marginRight": "0px",
	"_editor_canBeSelected": true,
	"_editor_canBeEdited": true,
	"_editor_canBeDeleted": true,
	"_editor_canAdd": true,
	"layout": {
	},
	"icon": {
		"src": "files/images/flags.png",
		"height": 32,
		"width": 32
	},
	"outlineImage": {
		"src": "files/images/circle.svg",
		"color": "[[$root.colors.toolbarButton.icon]]",
		"hoverColor": "[[$root.colors.toolbarButton.iconHover]]",
		"pressedColor": "[[$root.colors.toolbarButton.iconPressed]]"
	},
	"backgroundImage": {
		"src": "files/images/button_background.svg",
		"color": "[[$root.colors.toolbarButton.background]]",
		"hoverColor": "[[$root.colors.toolbarButton.backgroundHover]]",
		"pressedColor": "[[$root.colors.toolbarButton.backgroundPressed]]"
	},
	"action": {
		"target": "{{%main}}",
		"value": "showLanguages"
	},
	"_editor_propertiesToEdit": {
		"applyToAllContentGroups": true,
		"flex": true,
		"margin": true,
		"text": true
	},
	"_editor_propertiesToEditRestrictedUser": {}
},
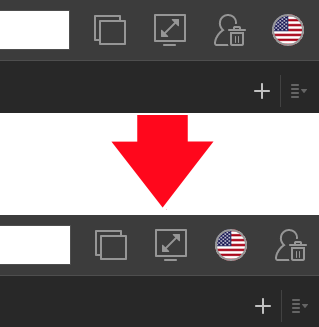
As you can see, the different buttons can be easily identified by the name attribute. All button definitions are in the same order in the JSON document as they appear on the screen if you start SiteKiosk. To reposition a button you simply have to move its definition to the new place you would like the button to have on the screen. In the case of the logout and the language selection button you would simply have to move the complete logout definition shown above behind the definition of the language selection button, also shown above.
This change results in the logout button being shown behind the language selection button, as pictured here:
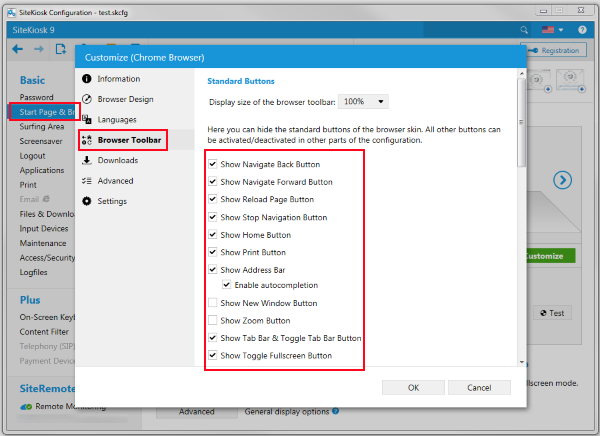
Please note that you can easily change the general appearance of the SiteKiosk Windows Chrome Browser through the SiteKiosk configuration. Just go to Start Page & Browser -> Chrome Browser -> Customize -> Browser Toolbar. Here you can show/hide the different buttons and also change the overall display size of the toolbar. You can also add custom buttons, if you need more than 2 of those, please have a look here.