Using Self-signed Certificates in a SiteKiosk Chrome Browser Skin

Note: The following is no longer required when using SiteKiosk 9.5.4033 or higher.

In case your kiosk deployment is depending on self-signed certificates here are a few usesful hints in handling those for the Chrome engine version of SiteKiosk.

The certificate store for the Chrome Browser variants of SiteKiosk is generated from the Windows certificate store. This means that you can easily install self-signed certificates into your Windows certificate store, e.g. into the Trusted Root Certification Authorities. Make sure that you install the certificate into the right store, either for a user or the computer, based on your needs.

On the first start of one of the Chrome Browser skins of SiteKiosk under a user SiteKiosk will generate its own certificate list from the Windows store. The file is named SiteKioskNGCef-CA.perm and placed in the Temp folder of the user SiteKiosk is running under (%tmp%\SiteKioskNGCef-CA.pem). In case you make changes to the certificates you need to delete this file in order for SiteKiosk to regenerate the list.

Depending on your needs the file can be deleted in many different ways to force SiteKiosk to generate a new version. For example you can delete it periodically by using a batch file and the Windows Task Scheduler. You can also use the SiteRemote job system to create a two step job that deletes the file and then restarts SiteKiosk.

Distributing the SiteKiosk Windows Start Screen with SiteRemote

The SiteKiosk Windows Start Screen is a powerful and easy to use tool to create a customized kiosk terminal experience. If you want to use the same Start Screen setup, either newly created or changed, on more than one kiosk system, you can distribute the required files using different methods. In case your environment only includes a handful of PCs at the same location you may just use a USB stick, otherwise the more comfortable method is to use SiteRemote.

For our test scenario we create a very simple Start Screen using Template 3, that only includes a monochrome background and a text. Note that the complexity of the Start Screen you create does not alter the described scenario in any way. This is what our starting design will look like:

Once you are done creating or changing your Start Screen you need to save it by clicking on the corresponding icon in the Start Screen Editor. Once this is done you are presented with a dialog that tells you where all the files associated with the Start Screen are located. It will be the same location on all your SiteKiosk Windows installations (C:\Users\Public\SiteKiosk\content):

You will get this information dialog whenever you make any changes. This is a reminder that you now may need to distribute the changed files to all your PCs. You can now copy the content folder onto a USB stick and then copy the folder to the exact same location on all your machines, overwriting the previous version or use SiteRemote to achieve this. How to use SiteRemote for this purpose is what we want to look at in a little more detail.

First we create a new simple Start Screen design that will look different than the original design to symbolize the changes:

Again the changes need to be saved when leaving the Start Screen Editor. Once this has been successfully done, we open the Windows Explorer and browser to the content folder at C:\Users\Public\SiteKiosk. If you right click the content folder you can select Send to and then choose Compressed (zipped) folder. This results in a content.zip file at this very location:

Now we need a small tool that will unzip the folder once we have distributed it through SiteRemote. You can for example use the command line version of 7-Zip. The application is called 7za.exe and is available here in the 7-Zip Extra package.

Next just login to your SiteRemote team, go to the SiteKiosk tab and select Jobs from the submenu. Create a new job (you may save it as a job template if you like):

Set Job Name and Description to your liking and select SiteKiosk Windows as the Client Type. Now you need to add three job steps. The first one will be a File Upload that will place the 7za.exe file in the C:\Users\Public\ folder. Make sure to use the slash at the end of the file path. Also choose Overwrite to make sure any existing version at that location is overwritten:

The second step will again be a File Upload and upload the content.zip file with the complete Start Screen content. Use the same settings as with the first step:

The third and last step will be of the Run Executable type. If will use the following command line to run 7za.exe and unzip the content of the content.zip archive to its final destination:

"C:\Users\Public\7za.exe" x "C:\Users\Public\content.zip" -aoa -oC:\Users\Public\SiteKiosk

Leave the other options as they are, especially leave Invisible execution with administrative rights selected:

Finally assign the jobs to the desired machines and wait for it to complete. Note that the changes will only come into play once the Start Screen is refreshed, to speed things up you can send another SiteRemote job that restarts SiteKiosk.

Using Adobe Flash with Chrome Browser Skins of SiteKiosk 8.91-9.1

Please note that the description below, describing how to manually make changes to the configuration of SiteKiosk to enable Flash, will no longer be required with the release of SiteKiosk 9.2. In SiteKiosk 9.2 you can enable Flash support in the configuration under Start Page & Browser -> Chrome Browser -> Customize -> Settings.

For security reasons using Adobe Flash with the Chrome Browser skins (“Chrome Browser” skin and “Chrome Fullscreen Browser” skin) is not supported by default in SiteKiosk 8.91-9.1.

If Adobe Flash is required you will normally need to switch to an Internet Explorer skin where Adobe Flash is supported with the corresponding Adobe Flash Plug-in for IE (for historical reasons).

If you require using Adobe Flash with the Chrome Browser skins you can proceed as follows:
1. First you need to download and install the 32-bit Adobe Flash Player “for Opera and Chromium – PPAPI” on your Windows operating system:
https://get.adobe.com/flashplayer/otherversions/

2. Next step is to add the Adobe Flash PPAPI Plug-In to SiteKiosk’s Chromium Engine.
To do this you need to edit the SiteKiosk configuration file (…\SiteKiosk\Config\YourConfig.skcfg).

- Open the SiteKiosk configuration file you want to use with an editor like Notepad or Notepad++.
- Search for the line
"showTaskBar": true,
- Then add these lines right before:

"browserEngine": {
        "commandLineArguments": {
            "set": ["ppapi-flash-path=C:\\Windows\\SysWOW64\\Macromed\\Flash\\pepflashplayer32_20_0_0_267.dll","ppapi-flash-version=20.0.0.267"],
            "remove": []
        }
    },


It should look like this:

…
"system": {
    "password": {
      "enabled": false
    },
    "browserEngine": {
        "commandLineArguments": {
            "set": ["ppapi-flash-path=C:\\Windows\\SysWOW64\\Macromed\\Flash\\pepflashplayer32_20_0_0_267.dll","ppapi-flash-version=20.0.0.267"],
            "remove": []
        }
    },
    "showTaskBar": true,
    "userAgent": {
…


"ppapi-flash-path" gives the information where to find the PPAPI Flash Plug-In
"ppapi-flash-version" reports the given version for the PPAPI Flash Plug-In

In this example we have installed the Adobe Flash PPAPI version 20.0.0.267 to the default path (32 Bit) "C:\Windows\SysWOW64\Macromed\Flash\pepflashplayer32_20_0_0_267.dll".

When installing other (newer) Adobe Flash versions you need to adjust these entries.

3. Finally save the changes and start SiteKiosk.
When you start SiteKiosk and e.g. go to http://www.adobe.com/de/software/flash/about/ you will see the Adobe Plug-In is activated:

Using Input Devices in the SiteKiosk Start Screen

The Start Screen start page of SiteKiosk is Chrome-based and allows you to freely configure a start page for SiteKiosk that matches your requirements. It also supports the SiteKiosk Object Model to further increase the customization options. Because the design is Chrome-based it uses the new SiteKiosk Object Model for the Chrome-based part of SiteKiosk. This Object Model is still in the making so the most current state of the preliminary documentation can be obtained through our support department. Interested developers can just send us a short email.

The following demonstration shows you how to use the SiteKiosk Object Model in the Start Screen (there is also one other example usage documented here). We will use the new SiteKiosk 9 feature to read input from any USB input device that uses keyboard emulation as an example how to achieve this goal.

First create a new configuration for SiteKiosk and select the Start Screen on the Start Page & Browser page. Click the customize button and for the purpose of this demonstration pick Template 3. Create a new HTML widget and edit it to add the code that contains the SiteKiosk Object Model.

The code to add is loosely based on the general Chrome-based example described in more detail in the SiteKiosk help. The code we will use for the Start Screen looks like this:

<script>
	var callbackFunc = function (data, deviceName) {
		parent.siteKiosk.log.info("TEST",0,deviceName + " registered the following data: " + data);
	};

	function registerDevice() {
		var deviceName = document.getElementById("devicename").value;

		if(deviceName == "")
			parent.siteKiosk.log.info("TEST",0,"No input device found!");

		var device = parent.siteKiosk.devices.getByName(deviceName);

		if(device == null)
			parent.siteKiosk.log.info("TEST",0,"No input device found!");

		device.valueChanged(callbackFunc);

		parent.siteKiosk.log.info("TEST",0,"Registered input device: " + JSON.stringify(device));
	}
</script>
<div style="background:white;padding:10px;">
	Test page for reading the input of keyboard emulation 
	devices configured in the configuration of SiteKiosk 
and writing the received data into the SiteKiosk log.<p />
	<div>
		Listen to input from this device that has been 
		configured in SiteKiosk: 
		<input id="devicename" tpye="text" /> (state the device name) <button onclick="registerDevice()">Register the listener</button>
	</div>
</div>

The most significant changes to the original code example are that you leave out the line that initializes the external script for the Object Model:

<script>(new Function(_siteKiosk.getSiteKioskObjectModelCode()))();</script>

This is because the Object Model is already initialized in the parent of the HTML widget, therefore you can access all objects, methods, etc. of the Chrome-based SiteKiosk Object Model by adding parent when you use it in the Start Screen:

parent.siteKiosk.log.info("TEST",0,deviceName + " registered the following data: " + data);

After you copied the code to the HTML widget you can save the changes to the Start Screen and go to the configuration page for Input Devices. Add an input device. For testing you may just attach an additional keyboard to your computer, but do not use the one attached to your computer already or a keyboard that is exactly the same model, as the device will be exclusively used for the input device feature and therefore does not accept keystrokes for normal usage, e.g. hitting Escape to close SiteKiosk, once you start SiteKiosk. Choose a display name for your device, this will be necessary to identify the device in the script, as it is used to register the device listener:

For this example you should also enable the debug output window under Logfiles in the configuration of SiteKiosk. Then save the configuration and start SiteKiosk in Run Once mode. Type the device name you used in the SiteKiosk configuration into the input field and click on the button to register the device listener. If the registration succeeded you will see a log entry. The same applies if you now create input from the attached device:

Opening New SiteKiosk Browser Windows from a Start Screen HTML Widget

The new Chrome-based SiteKiosk Start Screen allows you to select from a number of different element types to create your personal Start Screen design. One of these elements is an HTML Widget that can be used to freely create a part of the Start Screen with all the options HTML allows you to use. Your design may include links that you want to open in a new SiteKiosk Browser window. This can easily achieved with a single line of code.

The line you need to use to open links is:

parent.siteKiosk.system.windows.skLegacy.browserWindow.create(0, 0, 0, 0, link);

Note that the first four parameters of the create method are for internal use only und should be left at 0. The link parameter accepts a string in the form of http://www.your-comp.com/.

The following is a complete example that shows a 2 button list in a div-element. The buttons open links in new SiteKiosk browser windows.

<script type="text/javascript">
	function OpenTheLink(link) {
		parent.siteKiosk.system.windows.skLegacy.browserWindow.create(0, 0, 0, 0, link);
	}
</script>
<div style="background-color:white;height:100%;padding:10px;font-family:Arial;">
	A list of links that will open in a new browser window:<p />
	<button onclick="OpenTheLink('http://www.provisio.com/')">www.provisio.com</button><p />
	<button onclick="OpenTheLink('https://www.siteremote.net/')">www.siteremote.net</button>
</div>

To try out the code please go to the editor of the SiteKiosk Start Screen and select for example the empty Template 3. Next select to add a new HTML Widget.


Edit the widget and add the code from above.

Save your changes and start SiteKiosk. When you click the buttons the assigned link will open in a new SiteKiosk browser window.

Troubleshooting Guidelines for Using External Applications with SiteKiosk Windows

Under most circumstances you should be able to run external applications from within SiteKiosk just fine. Nonetheless there can be applications which do not run without making adjustments first. The following hints and tips should help you to pinpoint the most common problems that prevent an application from running as desired.

These guidelines apply to executable files (.exe) as well as to batch files (.bat or .cmd). When using a batch file, please also refer to this FAQ article about autostarting .bat or .cmd files, that includes some general usage rules for batch files. If you are generally interested in automatically starting your application when using SiteKiosk, please have a look at this FAQ.

When configuring an application or batch file always make sure that the path to the file is correct. If possible the application should be installed under a default application path like Program Files or Program Files (x86). Batch files should also be place in a common path like C:\Users\Public\Documents. It is not recommended to place either of the files on the desktop of any user, you might run into access problems otherwise, when using another user later on.

Your first troubleshooting step should always be to start SiteKiosk in "Run once" mode. Doing so will help to rule out whether user access rights or user dependent settings are a limiting factor, that come into play if you use the "Autostart" option that will use the restricted SiteKiosk user.

If the application or batch doesn't start in "Run once" mode, the most likely reason is the Windows & Dialogs managment of SiteKiosk. In that case you see a "For security reasons this action is not allowed" message on the screen and the application window will be blocked. This will also result in a helpful notification in the SiteKiosk log (…\SiteKiosk\Logfiles).
That notification will have the following format:

[SiteKiosk] Notification: According to the windows monitoring rule(Title:'xxxxxx' Class:'xxxx') the window (Title:'xxxxxxxx' Class:'xxxxxxxxx') will be closed

Based on that notification you should create a new allow entry in the configuration of SiteKiosk at Access/Security --> Block system critical windows & dialog boxes --> Settings with the corresponding title and class.
Further information about creating such an entry can be found here
http://www.provisio.com/helpconsole/SiteKiosk%20Help/en-US/default.htm?windows___dialoge.htm
and here
http://www.provisio.com/helpconsole/SiteKiosk%20Help/en-US/default.htm?handling_of_windows.htm

If your application or batch file works in "Run once" mode but doesn’t work in "Auto Start" mode you most likely have to adjust program access and/or directory access rights. These can for example include read AND write access to the corresponding directories of your application or batch file.

If necessary, you can use the System Security Wizard to adjust this and other rights for the SiteKiosk user (Customized-->Folder access):
http://www.provisio.com/helpconsole/SiteKiosk%20Help/en-US/default.htm?advanced.htm

You may also have to explicitely allow the executable you want to use if it is on a block list for the SiteKiosk user:
http://www.provisio.com/helpconsole/SiteKiosk%20Help/en-US/default.htm?access_rights1.htm

If all of the above has been taken care of and your application/batch works in "Run once" mode but still not in "Autostart" mode, you may try starting SiteKiosk automatically without shell replacement ("Customized" starting mode):
http://www.provisio.com/helpconsole/SiteKiosk%20Help/en-US/default.htm?select_starting_mode.htm
Some applications, especially older ones, won’t work properly when the default Windows shell (explorer.exe) is not present, which is the case when using "Autostart".

As a final note, please be aware that shortcuts (.lnk extensions) and Windows 8 apps will not work as external applications under SiteKiosk. Windows 8 (Modern UI) apps do not provide a way that enables another application like SiteKiosk to control them properly, therefore they cannot be managed by SiteKiosk.

Starting the SiteKiosk File Manager from the Start Screen

This time we are going to have a look at how to start the SiteKiosk File Manager directly from the SiteKiosk Start Screen.

First we need to create a local html file that takes care of the task of opening the File Manager. The code for that file can look like this:

<html>
    <script type='text/JScript'>
        //Initializes the SiteKiosk Object Model
		window.external.InitScriptInterface();
		
		//Checks the prerequisites for opening the File Manger
        function OpenMediaWindow()
        {
            try
            {
                //Initializes the payment features of SiteKiosk
				var lk_SiteCash = SiteKiosk.Plugins("SiteCash");
                
				//Checks if payment is in use and handles the opening of the File Manager accordingly
				if (lk_SiteCash == null || lk_SiteCash == undefined || lk_SiteCash.Enabled && !lk_SiteCash.PayApplications || lk_SiteCash.Enabled && lk_SiteCash.AccessStatus || lk_SiteCash.Enabled && lk_SiteCash.CurrentBalance > 0.0 || lk_SiteCash.Enabled && lk_SiteCash.ApplicationPrice == 0.0 || lk_SiteCash.Enabled && lk_SiteCash.AccessStatus || !lk_SiteCash.Enabled)
                {
                    OpenIntWindow();
                }
                else
                {
                    //Payment is active and inpayment is required
					SiteKiosk.Plugins("SiteCash").ShowPaymentInfoDialog(0, "", false);
                }
            }
            catch (e)
            {
                OpenIntWindow();
            }
        }
		
		//Opens the actual File Manager
        function OpenIntWindow()
        {
            //Defines the available Window styles for the File Manager window
			var WS_OVERLAPPED = 0x00000000;
            var WS_MAXIMIZEBOX = 0x00010000;
            var WS_MINIMIZEBOX = 0x00020000;
            var WS_THICKFRAME = 0x00040000;
            var WS_SYSMENU = 0x00080000;
            var WS_BORDER = 0x00800000;
            var WS_CAPTION = 0x00C00000;
            var WS_MAXIMIZE = 0x01000000;
            var WS_MINIMIZE = 0x20000000;
            var WS_POPUP = 0x80000000;
            var WS_OVERLAPPEDWINDOW = WS_OVERLAPPED | WS_CAPTION | WS_SYSMENU | WS_THICKFRAME | WS_MINIMIZEBOX | WS_MAXIMIZEBOX;
            var WS_EX_TOOLWINDOW = 0x00000080;
			
			//Creates the File Manager window and assigns its settings
            var mediabox = SiteKiosk.SiteKioskUI.CreateHTMLDialog();
            mediabox.URL = SiteKiosk.SiteKioskDirectory + "skins\\public\\Media\\FileManager\\Selector.html";
            mediabox.Styles = 13565952;
            mediabox.Icon = SiteKiosk.SiteKioskDirectory + "skins\\public\\Media\\FileManager\\Img\\Icons\\fms_ico.ico";
            mediabox.Width = screen.width > 800 ? 1024 : 800;
            mediabox.Height = screen.height > 600 ? 700 : 550;
            mediabox.ExStyles = 0;
            mediabox.Border = true;
            mediabox.Type = "FileManagerDlg";
            mediabox.TopMostWindow = true;
            mediabox.CloseOnInput = false;
            mediabox.Parent = SiteKiosk.WindowList.MainWindow.SiteKioskWindow.Window;
            mediabox.ShowDialog();
			
			//Closes this window after the File Manger has been started
            window.close();
        }
    </script>
    <body onload="OpenMediaWindow();">
    <!-- Body is empty as this window is only used to open the File Manager //-->
	</body>
</html>

Just copy and paste the code to an editor and save it as for example as openfilemanager.html. Now place the file in the html subfolder of your SiteKiosk installation folder.

Next it's time to open the SiteKiosk configuration and under Start Page & Browser select the Start Screen. Click on Customize and open the Start Screen editor. Select one of the three templates and create a new web link element. Edit the element to your liking (icon, color, caption, etc.) and link to the newly created file.

The following example of the result used Template 3 with just a single link element to open the File Manager.

Using the Windows Screen Saver to Show Digital Signage Content

Some of our customers have asked us, if they can use the Digital Signage solution that is part of SiteRemote without starting the SiteKiosk application on the client. Instead of SiteKiosk they had the Windows screen saver in mind. A scenario for this would be that a company wants to show non-critical internal information on the desktops of their employees, e.g. information about social events.

The simple answer is: yes, that is possible. Just install SiteKiosk Windows on the client PC and register it with your SiteRemote team. The SiteKiosk installation is required as it contains the Digital Signage and remote management elements required to place and monitor the content on the client PC. Note that you need a SiteRemote license but as long as you don't want to secure the PC by starting the SiteKiosk browser and only use Digital Signage for the Window screen saver you do not need a SiteKiosk license.

On the client computer you need to open the Windows screen saver management and select SiteCaster from the dropdown menu of available screen savers. Set the screen saver time to the desired value.

Under your SiteRemote team you can create the Digital Signage content as usual and then assign it to the registered clients. Every time the Windows screensaver starts, it will display your Digital Signage files.

Note that you can mix these client PCs with others on which you are using SiteKiosk to protect the computer, so you can effortlessly manage both from your SiteRemote team.

Different Ways to Create SiteKiosk Windows and Android Logfile Entries

SiteKiosk logfiles are text files that contain runtime information about SiteKiosk. The logs are stored on the SiteKiosk client by default. If a SiteKiosk client is registered with a SiteRemote Server the log information is also transferred to the server, where it is used for the remote monitoring and management features of SiteRemote. This applies to SiteKiosk Windows (information can be found here) as well as SiteKiosk Android (the logs are under SiteKiosk\Logs on the sdcard of the device).

Besides containing information about SiteKiosk the logs can also be used to include entries from a website or an external application. This way you could for example generate a custom alert on a SiteRemote Server.

There are different ways to create SiteKiosk log entries from an external source, depending on the client, Windows or Android, and the type of the external source, either html code running in the SiteKiosk browser or another application.

In html code you can use the SiteKiosk Object Model, which is available in a Windows version and one for Android (the Android documentation is not publicly available yet but a preliminary version can be obtained by contacting PROVISIO support).

Note that all html examples require that the pages using the code are allowed to use the SiteKiosk Object Model. In the SiteKiosk Windows configuration you can configure this option under Access/Security -> URLs with Script Permission. In SiteKiosk Android you will find the option under Application -> Browser -> Script Permission (if you use another application option the path will vary).

Our first example demonstrates how to write a log message from a web page running in SiteKiosk Android:

<html>
<head>
	<title></title>
	<script src="sitekiosk.min.js"></script>
</head>
	<body>
		<input id="id_write" type="button" value="Write SiteKiosk Android Log Entry" />
	</body>
	<script type="text/javascript">
		siteKiosk.ready(function (){
			document.getElementById("id_write").onclick = function () {writeLog();};
			
			function writeLog(){
				var lk_logfile = siteKiosk.log;
				lk_logfile.log(20,"TEST",0,"A test log message.");
			}
		}());
	</script>
</html>

The sitekiosk.min.js script file that is referenced in the above example can be obtained from PROVISIO support. If you are using SiteKiosk Android 2.4.118 you do not need the external script anymore, instead you can reference the internal script file that is included in the installation:

<script type="text/javascript" src="sk:///siteKiosk/siteKiosk.js"></script>

With the release of SiteKiosk Android 2.5 you have a third option to access the SiteKiosk Object Model, that does not require to link a script file at all:

<script>
	//method to initialize the SK Object Model as of SKA 2.5
	(new Function(_siteKiosk.getSiteKioskObjectModelCode()))();
</script>

The log method that is used to create the log entry has four parameters. The first is the log level, possible values are 0 (verbose), 10 (debug), 20 (info), 30 (warning) and 40 (error). Mostly you will work with either 10, 20 or 30. The second parameter is the facility that triggered the log message. For most log entries this is usually SiteKiosk. If you generate your own log entries you should use your own facility name, you can choose whatever name you want for it (though you should stick to a standard character set ;-)). The next parameter is the log type, you should either use 0, which stands for a generic log message, or choose one above 9000 as the rest is already used by SiteKiosk for internal log messages. The final parameter is the text string of the actual log entry.

The example for SiteKiosk Windows (see below for a script example for the new SiteKiosk Chrome Fullscreen Browser) is similar to the Android example with slight variations due to differences in the two SiteKiosk Object Model versions:

<html>
	<SCRIPT TYPE="text/javascript">
		window.external.InitScriptInterface();
		function WriteToLog()
		{
			SiteKiosk.Logfile.Write(9001,20,"TEST","A test log message.");
		}
	</SCRIPT>
	<body>
		<input type="button" value="WriteToLog" onclick="WriteToLog()">
	</body>
</html>

The method used here is named Write and expects the same parameters as the Android log method, allthough in a different order. Further information can be found here.

Next is a script example for the new SiteKiosk Chrome Fullscreen Browser (available since SiteKiosk 8.91). The Object Model for the Chrome-based SiteKiosk browser is still in the making, but you can already write log messages. As you may note, this script has a lot of similarities with the Android version:

<!DOCTYPE html>
<html>
<head>
	<title></title>
	<script type="text/javascript" src="file://C:/Program Files (x86)/SiteKiosk/SiteKioskNG/assets/siteKiosk/sitekiosk.js"></script>
</head>
	<body>
		<input id="id_note" type="button" value="note" />
		<input id="id_warn" type="button" value="warn" />
		<input id="id_error" type="button" value="error" />
	</body>
	<script type="text/javascript">
		siteKiosk.ready(function (){
			 document.getElementById("id_note").onclick = function () {writeLog('note');};
			 document.getElementById("id_warn").onclick = function () {writeLog('warn');};
			 document.getElementById("id_error").onclick = function () {writeLog('error');};
			
			function writeLog(caseid){
				var lk_logfile = siteKiosk.log;
				
				switch(caseid){
					case "note":
						lk_logfile.info("TEST",0,"A test notification.");
						break;
					case "warn":
						lk_logfile.warn("TEST",0,"A test warning.");
						break;
					case "error":
						lk_logfile.error("TEST",0,"A test error.");
						break;
					default:
						break;
				}
			}
		}());
	</script>
</html>

There are three different methods, info for informational messages, warn for warning messages and error for error messages. They all accept three parameters. The first is a string for the facility that triggered the log message. For most log entries this is usually SiteKiosk. If you generate your own log entries you should use your own facility name, you can choose whatever name you want for it (though you should stick to a standard character set ;-)). The next parameter is the log type, you should either use 0, which stands for a generic log message, or choose one above 9000 as the rest is already used by SiteKiosk for internal log messages. The final parameter is the text string of the actual log entry.

The SiteKiosk Object Model can also be used from other applications to generate log messages, e.g. applications written in C#. SiteKiosk must run in order for the other application to write to the log files and both applications must run under the same user. A C# example that writes to the SiteKiosk logs has a few more lines than the html versions:

using System;
using System.Collections.Generic;
using System.Text;
using System.Runtime.InteropServices;
using SiteKioskRuntimeLib;

namespace SKControl
{
    class Program
    {
        [DllImport("ole32.dll", CallingConvention = CallingConvention.StdCall)]
        public static extern int CoGetClassObject(ref Guid rclsid, uint dwClsContext, IntPtr pServerInfo, ref Guid riid, out IntPtr ppv);

        public bool IsSiteKioskActive()
        {

            /*
                returns false, if SiteKiosk is not currently running
                returns true, if SiteKiosk is running
            */


            // initialize GUID's for classes and interfaces
            Guid lr_FactoryGuid = typeof(ISiteKioskFactory).GUID;
            Guid lr_FactoryClass = typeof(SiteKioskFactoryClass).GUID;
            Guid lr_SiteKioskGuid = typeof(ISiteKiosk).GUID;

            ISiteKiosk mk_pSiteKiosk;

            // try to get the ISiteKioskFactory interface of the instance
            // of SiteKioskFactoryClass
            IntPtr lk_FactoryPtr = new IntPtr();
            CoGetClassObject(ref lr_FactoryClass, 4, new IntPtr(), ref lr_FactoryGuid, out lk_FactoryPtr);
            if (lk_FactoryPtr == IntPtr.Zero)
                // SiteKiosk is not running
                return false;

            // convert the received IntPtr to the requested ISiteKioskFactory
            // interface
            ISiteKioskFactory lk_Factory = (ISiteKioskFactory)Marshal.GetObjectForIUnknown(lk_FactoryPtr);

            if (lk_Factory == null)
                return false;

            // call CreateSiteKiosk to get the ISiteKiosk interface of the
            // current instance of SiteKiosk
            IntPtr lk_SiteKioskPtr = new IntPtr();
            lk_Factory.CreateSiteKiosk(ref lr_SiteKioskGuid, out lk_SiteKioskPtr);

            if (lk_SiteKioskPtr == IntPtr.Zero)
                return false;

            // convert the received IntPtr to the requested
            // ISiteKioskFactory interface
            mk_pSiteKiosk = (ISiteKiosk)Marshal.GetObjectForIUnknown(lk_SiteKioskPtr);

            if (mk_pSiteKiosk == null)
                return false;

            // write to the SiteKiosk log file
            ILogfile2 lk_SKLog = (ILogfile2)mk_pSiteKiosk.Logfile;
            lk_SKLog.Write(9001, 20, "TEST", "A test log message from an external application.");

            return true;
        }

        static void Main(string[] args)
        {
            bool lb_ReturnValue = false; //false if SiteKiosk is not running, true if SiteKiosk is running; not used in this example
            
            Program lk_Prog = new Program();
            lb_ReturnValue = lk_Prog.IsSiteKioskActive();
        }
    }
}

As the C# example is basically using the SiteKiosk Windows Object Model the syntax of the Write method is the same as if you would use it in html code. Make sure to read the part about using the SiteKiosk Object Model in C# from the SiteKiosk Object Model documentation. Running the example code from within Visual Studio while SiteKiosk is running and the debug output window is enabled (SiteKiosk Windows configuration -> Logfiles -> Show output window) will give you something like this:

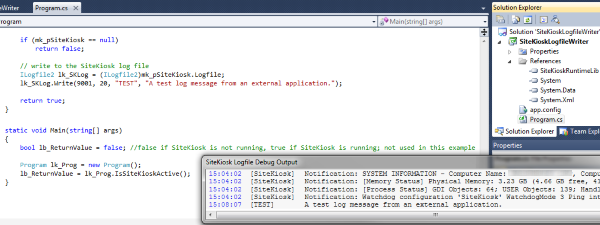
Note that you may need to build your C# application for an x86 target platform rather than any cpu, otherwise it may fail to detect SiteKiosk on a 64-bit system, because SiteKiosk runs as a 32-bit application.

Using the Blackboard to Transfer Machine Information from SiteRemote to SiteKiosk Windows

A team on the remote management solution SiteRemote enables you to manage your SiteKiosk machines by assigning them to folders and tags. You can also assign address information like the location of the machine or the responsible maintenance person. This information can also come in handy on the client machines. For example you may use it to display different content based on the location address or the assignment to a specific folder or tag. This also means, that whenever you change this information on the server you can directly make use of that change on the client.

Let's find out how to get the information from the SiteRemote server. We will use the SiteKiosk Object Model inside an HTML page running in the SiteKiosk Windows browser. The SiteKiosk Object Model provides the ReadBlackboardAsString method. We will use that method to get the name of the SiteRemote team the machine is registered to, the SiteRemote display name of the machine, the folder and tags the machine is associated to and the address information assigned to the machine. For our example the setup lools like this:

The ReadBlackboardAsString method accepts a string as parameter that specifies the requested information (see the Remarks part here for further information) as shown in this example excerpt:

//Get the name of the SiteRemote team the machine is registered with.
document.getElementById("teamname").innerHTML = SiteRemotePlugin.ReadBlackboardAsString('StC.TeamInfo.Name');
//Get the display name of the machine in the SiteRemote team it is registered with.
document.getElementById("machinename").innerHTML = SiteRemotePlugin.ReadBlackboardAsString('StC.MachineInfo.Name');
//Get the folders and tags the machine is part of.
document.getElementById("groupstags").innerHTML = SplitBlackBoardStrings(SiteRemotePlugin.ReadBlackboardAsString('StC.MachineInfo.LocationInTreeview'));
//Get address information for the machine, e.g. location, maintenance contact.
document.getElementById("supportinfo").innerHTML = SplitBlackBoardStrings(SiteRemotePlugin.ReadBlackboardAsString('StC.MachineInfo.SupportInfo'));

The method returns a string with the SiteRemote blackboard information. Be aware that the string is in JSON format. You can either handle it as a normal string, just like in the above example, which is why the information for the group/tag membership and the address information is processed in an additional method (see the full example code below to see the code of that method) that splits the string at every comma. You can also work with the string in JSON format, for which you may need to add additonal script, see the Examples part here for more information.

The full example code we can build around the reading of the SiteRemote blackboard looks like this:

<html>
	<head>
		<title>SiteKiosk Blackboard Example</title>
		
		<style type="text/css">
			div { color:black; font-style:arial; font-size:18px; }
			span { color:red; font-style:arial; font-size:24px; }
		</style>

		<script type="text/javascript">
			window.external.InitScriptInterface();
			
			SiteRemotePlugin = SiteKiosk.Plugins("SiteRemote");
			
			//First check if the machine is registered with SiteRemote.
			if (SiteRemotePlugin.IsRegistered){
				//Registered. Trigger the initial blackboard request. Note: the first request will most likely come back empty.
				ReadSiteRemoteBlackboard();
			}
			else{
				//Not registered. Show message on screen.
				document.getElementById("registered").stlye.display = "none";
				document.getElementById("notregistered").stlye.display = "inline";
			}
			
			function ReadSiteRemoteBlackboard(){
				try{
					//Get the name of the SiteRemote team the machine is registered with.
					document.getElementById("teamname").innerHTML = SiteRemotePlugin.ReadBlackboardAsString('StC.TeamInfo.Name');
					//Get the display name of the machine in the SiteRemote team it is registered with.
					document.getElementById("machinename").innerHTML = SiteRemotePlugin.ReadBlackboardAsString('StC.MachineInfo.Name');
					//Get the folders and tags the machine is part of.
					document.getElementById("groupstags").innerHTML = SplitBlackBoardStrings(SiteRemotePlugin.ReadBlackboardAsString('StC.MachineInfo.LocationInTreeview'));
					//Get address information for the machine, e.g. location, maintenance contact.
					document.getElementById("supportinfo").innerHTML = SplitBlackBoardStrings(SiteRemotePlugin.ReadBlackboardAsString('StC.MachineInfo.SupportInfo'));
				}catch(e){
					//Blackboard information is not yet available, try again in 10 seconds.
					window.setTimeout("ReadSiteRemoteBlackboard()", 10000);
				}
			}
			
			function SplitBlackBoardStrings(blackboardstring){
				//Split the Blackboard string for better readability.
				var blackboardstringelements = blackboardstring.split(",");
				var composedelements = "";
				
				for (var i = 0; i < blackboardstringelements.length; i++){
					composedelements += blackboardstringelements[i] + "<br />";
				}
				
				return composedelements;
			}
		</script>
	</head>
	<body>
		<div id="registered" style="display:inline;">
			This machine is part of the SiteRemote Team <span id="teamname">[Information not yet available. Please wait.]</span> and 
			its display name on the SiteRemote server is <span id="machinename">[Information not yet available. Please wait.]</span>.
			<br /><br />
			The machine is assigned to the following groups and tags:
			<br />
			<span id="groupstags">[Information not yet available. Please wait.]</span>
			<br /><br />
			These addresses are available for the machine:
			<br />
			<span id="supportinfo">[Information not yet available. Please wait.]</span>
		</div>
		<div id="notregistered" style="display:none;">
			This machine is not registered with SiteRemote!
		</div>
	</body>
</html>

If you save the example code as an HTML page and place it in the html subfolder of your SiteKiosk installation and then configure SiteKiosk to use it as a start page you will get output similar to this:

Note that of course this requires that you register your SiteKiosk Windows client with a SiteRemote server and assign tags and address information to it. As you can see above the address information may include empty fields, if those values have not been provided when creating the address information. You can sort through those with standard Javascript string handling procedures.

For further reading you may want to have a look at the AttachBlackboardListener and DetachBlackboardListener methods, that will enable you to automatically and continously listen for changes to blackboard information on the SiteRemote server, so that the client can immediately react to those changes.