Starting Password Protected Applications from the Start Screen of SiteKiosk Windows

SiteKiosk Windows allows you to password protect the starting of external applications. For technical reasons this feature is not available for the Application link element of the Start Screen, which is the element you would normally use to add an application to the Start Screen. By using the HTML Widget element instead, the password protection for applications can be used with the Start Screen. Here is how.

Open the SiteKiosk configuration and go to Applications. Add the external applications you need to the list. Note that you can use the arrows on the left side of the list to move applications up and down to rearrange the order.


Use the settings dialog for an application to make the start of it password protected.


Next go to Start Page & Browser in the configuration of SiteKiosk and select the Start Screen. Click on Customize, select Start Screen Editor and use the Open Editor button. Choose the template you want to use and add an HTML Widget element. Copy the following lines:

<script type="text/javascript">
    function StartPWprotectedApp() {
        parent._siteKiosk.objectModel.callHostFunction("system.windows.skLegacy.executeScript", "SiteKiosk.ExternalApps.Item(1).Run(true);");
    }
</script>
<div style="background-color:FF235A;height:100%;padding:10px;font-family:Arial;cursor:pointer;" onclick="StartPWprotectedApp();">
    <div style="height:100%;width:100%;font-size:30px;text-align:center;margin-top:42%;">Start Password<br/>Protected App</div>
</div>

Paste the code into the HTML code box in the properties dialog of the HTML Widget.


You can use the div tag to style the element to your liking. The line

parent._siteKiosk.objectModel.callHostFunction("system.windows.skLegacy.executeScript", "SiteKiosk.ExternalApps.Item(1).Run(true);");

is what calls the actual application. Note the number 1 as the argument for the Item method (more information can also be found here and here). This calls the actual application based on the position in the application list of the SiteKiosk configuration. 1 calls the first application in the list, 2 calls the second application and so on. Add as many HTML Widget elements as you need.

The final result based on the example code above will look like this in SiteKiosk:

Extend the SiteKiosk Browser workspace to multiple screens (Combine several screens to one screen)

To extend the workspace of the SiteKiosk Windows browser to multiple screens that are configured as separate screens in Windows with "Extend these screens", proceed as follows:


A. In the SiteKiosk configuration under "-->Start Page & Browser-->Secondary Monitor", deactivate the "Restrict mouse pointer to first monitor browser area" option. (The option "Activate secondary monitor" must remain deactivated!).

B. Now you have to allow the display of new browser windows on the second monitor.
For this open the SiteKiosk configuration file you created (e.g. ...\SiteKiosk\Config\YourConfig.skcfg) with an editor (e.g. Notepad) and search for the following line:

<windowmanager>

Add the following content to the next line:

<disallow-window-clipping>true</disallow-window-clipping>

Like this:

<windowmanager> 
   <disallow-window-clipping>true</disallow-window-clipping>  
   <show-block-msg>true</show-block-msg> 
   <use-secure-user>false</use-secure-user>
</windowmanager>

For more information see "20. Remove restriction to limit windows to the SiteKiosk display area":
https://www.provisio.com/helpconsole/SiteKiosk%20Help/en-US/default.htm?manuell_editierbare_optionen.htm

C. The next step is to adjust the "workarea" of SiteKiosk to the resolution of all your monitors combined. To do this, use the setting described at "5. Restrict SiteKiosk to a Portion of the Screen":
https://www.provisio.com/helpconsole/SiteKiosk%20Help/en-US/default.htm?manuell_editierbare_optionen.htm

Example:
Two monitors side by side with a resolution of 2560x1440 px each give a workarea of 5120x1440px on both monitors.

The corresponding "workarea" adjustment looks like this:

<workarea enabled="true" absolute-coordinates="true">
      <capture-mouse>false</capture-mouse>
      <left>0</left>
      <top>0</top>
      <right>5120</right>
      <bottom>1440</bottom>
</workarea>

After saving the changes and starting SiteKiosk, the browser extends across both monitors.


NOTE:
Due to Windows User Account Control (UAC) restrictions, you may need to start the text editor as an administrator (right-click-->Run as administrator) to save the changes in the Programs directory.


Disabling Flash Support for SiteKiosk Windows

Because of security concerns regarding the use of Flash a growing number of users wants to disable it. This can be achieved differently based on the browser engine that is being used in SiteKiosk Windows.

For the Chrome engine of SiteKiosk Flash support is already disabled by default. It can be controlled in the configuration of SiteKiosk under  Start Page & Browser -> Chrome Browser -> Customize -> Settings -> Flash support.

The Internet Explorer engine is based on the WebBrowser Control provided by Microsoft and uses the same Flash settings as the Internet Explorer installed on the system. Since Windows 8 Flash is part of the Windows operating system and cannot be uninstalled. But it can be disabled. This is done by compatibility flags in the Windows registry.

Windows Registry Editor Version 5.00
[HKEY_LOCAL_MACHINE\SOFTWARE\Microsoft\Internet Explorer\ActiveX Compatibility\{D27CDB6E-AE6D-11CF-96B8-444553540000}]
"Compatibility Flags"=dword:00000400
[HKEY_LOCAL_MACHINE\SOFTWARE\Wow6432Node\Microsoft\Internet Explorer\ActiveX Compatibility\{D27CDB6E-AE6D-11CF-96B8-444553540000}]
"Compatibility Flags"=dword:00000400

You can copy the above into an editor like Notepad and save it as a .reg file, e.g. as turn_flash_off.reg. On the SiteKiosk machine you want to disable Flash just run the .reg file under an administrator account by double-clicking it and follow the on-screen instructions.

Here is a before and after comparison in SiteKiosk using the https://get.adobe.com/flashplayer/about/ information page of Adobe.


Note that you can also use SiteRemote to distribute the registry settings to your SiteKiosk Windows machines. Please have a look here (http://devblog.provisio.com/post/2014/08/14/Using-SiteRemote-to-Change-Windows-Registry-Settings.aspx) and here (http://devblog.provisio.com/post/2015/11/03/Accessing-64-Bit-System-Folders-and-Registry-from-the-SiteRemote-Job-System.aspx) for more information.


Starting the SiteKiosk File Manager from the Start Screen with Chrome Browser Skin

This time we are going to have a look at how to start the SiteKiosk File Manager directly from the SiteKiosk Start Screen. But in opposite to the older article here we now also make it work when using the Start Screen with Chrome Browser skin.

First we need to create a local JavaScript file that takes care of the task of opening the File Manager. The code for that file can look like this:


function openFileManager(){
 //Defines the available Window styles for the File Manager window
 var WS_OVERLAPPED = 0x00000000;
 var WS_MAXIMIZEBOX = 0x00010000;
 var WS_MINIMIZEBOX = 0x00020000;
 var WS_THICKFRAME = 0x00040000;
 var WS_SYSMENU = 0x00080000;
 var WS_BORDER = 0x00800000;
 var WS_CAPTION = 0x00C00000;
 var WS_MAXIMIZE = 0x01000000;
 var WS_MINIMIZE = 0x20000000;
 var WS_POPUP = 0x80000000;
 var WS_OVERLAPPEDWINDOW = WS_OVERLAPPED | WS_CAPTION | WS_SYSMENU | WS_THICKFRAME | WS_MINIMIZEBOX | WS_MAXIMIZEBOX;
 var WS_EX_TOOLWINDOW = 0x00000080;
             
  //Creates the File Manager window and assigns its settings
  var mediabox = SiteKiosk.SiteKioskUI.CreateHTMLDialog();
  mediabox.URL = SiteKiosk.SiteKioskDirectory + "skins\\public\\Media\\FileManager\\Selector.html";
  mediabox.Styles = 13565952;
  mediabox.Icon = SiteKiosk.SiteKioskDirectory + "skins\\public\\Media\\FileManager\\Img\\Icons\\fms_ico.ico";
  mediabox.Width = 1024;
  mediabox.Height = 700;
  mediabox.ExStyles = 0;//
  mediabox.Border = true;
  mediabox.Type = "FileManagerDlg";
  mediabox.TopMostWindow = false;
  mediabox.CloseOnInput = false;
  mediabox.Parent = SiteKiosk.WindowList.MainWindow.SiteKioskWindow.Window;
  mediabox.ShowDialog();
			
}

Just copy and paste the code to an editor and save it as for example as "OpenFileManager.js" at "…\SiteKiosk\Html".
Next it's time to open the SiteKiosk configuration and adding this script file at "Start Page & Browser-->Advanced-->On startup of SiteKiosk execute the following script file".

Under "Start Page & Browser" select the Start Screen. Click on "Customize" and open the Start Screen editor. Select one of the three templates and create a new HTML Widget link element. Edit the element and add the following code that calls the external script function openFileManager:


<script>
    (new Function(_siteKiosk.getSiteKioskObjectModelCode()))();
    function openFileManagerExt() {
		_siteKiosk.objectModel.callHostFunction("system.windows.skLegacy.executeScript", "SiteKiosk.ScriptDispatch.openFileManager();");			
    }
</script>
<div style="background-color:2DA7FF;height:100%;padding:10px;font-family:Arial;cursor:pointer;" onclick="openFileManagerExt();">
    <div style="height:100%;width:100%;font-size:30px;text-align:center;margin-top:3%;">Open<br/>File Manager</div>
</div>


The function OpenFileManagerExt is "Using the Classic SiteKiosk Object Model in SiteKiosk Windows Chrome Browser" in combination with the "ScriptDispatch Object" from Classic Object Model to call the external script function "openFileManager".


In the <div></div> part you can use HTML code of your choice to change the element to your liking (text, color, etc.).

General Note:
Which directories are displayed in the File Manager (download folder, etc.) must be specified beforehand under "-->Files & Downloads", while you have selected the Metro IE Skin under "-->Start Page & Browser".
The path for the download folder should match the download folder in the Chrome Browser skin.
Since the download folder matches with the default settings "C:\Users\Public\Documents\SiteKiosk", you normally only need to activate the File Manager and Downloads.

At the end it should look like this when the File Manager is opened:

Manipulating the DOM within the SiteKiosk Windows Chrome Browser

Editing the DOM of a website displayed in the Chrome Browser of SiteKiosk Windows (please have a look here for the Internet Explorer browser of SiteKiosk) can be easily achieved by adding the DOM manipulation script to the file C:\Program Files (x86)\SiteKiosk\SiteKioskNG\assets\customScriptExtension.js.

The file is empty be default and will be executed for every webpage displayed in the Chrome Browser of SiteKiosk Windows. You should therefore make sure to add script code to identify the page you want to manipulate.

The DOM manipulation does not require SiteKiosk specific script code. Plain Javascript can be used.

The following example code edits the main search page of Google to include SiteKiosk as the search term and to change the text of the Search button to "Search for SiteKiosk". Note that the code already does a basic check, if the website is a Google website before it executes the rest of the Javascript code.

if (document.URL.indexOf("https://www.google.") !== -1) {
	document.addEventListener('DOMContentLoaded', documentLoadedFunc);
}

function documentLoadedFunc(e) {
	document.getElementsByName('q').item(0).value = "SiteKiosk";
	document.getElementsByName('btnK').item(1).value = "Search for SiteKiosk";
}

Just copy and paste the above example script to the file C:\Program Files (x86)\SiteKiosk\SiteKioskNG\assets\customScriptExtension.js and then start SiteKiosk with a basic configuration file. Open google.com. The result of the example DOM manipulation will look like this:

Note that when using the above example you should make sure to take care of local laws, ownership rights, copyright etc. Also note that the above example only works as long as Google does not change the code of their page.

How to Rearrange the Layout of the SiteKiosk Chrome Browser

Here is a quick way to completely move around the main parts of the SiteKiosk Chrome browser. This for example can be used to show the tool bar not at the top but at the bottom.

Open the file C:\Users\Public\SiteKiosk\data\content\local\files\projects\d97aa96b962543fcb39625a3f8e8d8fb\000000000000000000000000\content.json with an editor, e.g. Notepad. And look for the lines

"templates": {
	"main": {

A few lines below you will see the start of the elements segment, that by default lists the element with the name topContainer first.

"elements": [
	{
		"type": "content-container-linear",
		"name": "topContainer",
		...
		"_editor_propertiesToEditRestrictedUser": {}
	},
	{
	...

There are 6 elements that can be separated by their names. In an unedited content.json file the order is topContainer (this element represents the tool bar), tabBarContainer (this element represents the tab bar), loadProgress (this element represents the progress bar), tabPageArea (this element represents the area where web pages are rendered), surfTimeContainer (this element is for internal use only) and popupWindow (this element represents the popups used for the zoom and language selections of the tool bar).

The 4 elements topContainer, tabBarContainer, loadProgress and tabPageArea are those that can be rearranged to change the overall look of the browser. The other two elements can be left untouched.

All element definitions are in the same order in the JSON document as they appear on the screen if you start SiteKiosk. To reposition an element you simply have to move its complete definition from opening bracket ({) to closing bracket (}) to the new place you would like the element to have on the screen.

If the elements are rearranged in the order tabPageArea, loadProgress, tabBarContainer, topContainer and the content.json file is saved, you will see this user interface when you start SiteKiosk:

Note that depending on how you reposition the elements and the SiteKiosk configuration you are using, there may be minor side effects, e.g. overlapping parts. Also note that the task bar of the SiteKiosk Chrome browser is not part of the content.json file, it can be found in this folder instead C:\Program Files (x86)\SiteKiosk\Skins\Chrome_NG_Skin.

How to Reposition Buttons in the SiteKiosk Windows Chrome Browser Toolbar

There are many customization options for the SiteKiosk Windows Chrome Browser Toolbar. Both by simply using the configuration tool of SiteKiosk to enable or disable buttons or to change the colors as well as by editing files to give the toolbar a new look. There are several blog posts that deal with this topic, e.g. here and here. This time we are going to learn how to reposition buttons in the toolbar.

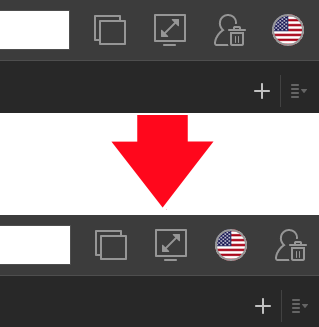
As an example, we will move the logout button from the left side of the language selection button the the right side. To do that, we need to open and edit a JSON (JavaScript Object Notation) file that is used by the Chrome Browser of SiteKiosk Windows. The file content.json is located in the folder C:\Users\Public\SiteKiosk\data\content\local\files\projects\d97aa96b962543fcb39625a3f8e8d8fb\000000000000000000000000. Open it with an editor like Notepad++. It is suggested that you make a backup copy of the file before editing it.

The buttons are defined in a number of attribute-value pairs that look like this for the logout button:

{
	"type": "content-button",
	"title": "{{$root.stringTable.strings.buttons.logout.$}}",
	"name": "logoutButton",
	"height": "60px",
	"width": "60px",
	"marginLeft": "0px",
	"marginRight": "0px",
	"_editor_canBeSelected": true,
	"_editor_canBeEdited": true,
	"_editor_canBeDeleted": true,
	"_editor_canAdd": true,
	"layout": {
	},
	"icon": {
		"src": "files/images/logout.svg",
		"color": "[[$root.colors.toolbarButton.icon]]",
		"hoverColor": "[[$root.colors.toolbarButton.iconHover]]",
		"pressedColor": "[[$root.colors.toolbarButton.iconPressed]]"
	},
	"backgroundImage": {
		"src": "files/images/button_background.svg",
		"color": "[[$root.colors.toolbarButton.background]]",
		"hoverColor": "[[$root.colors.toolbarButton.backgroundHover]]",
		"pressedColor": "[[$root.colors.toolbarButton.backgroundPressed]]"
	},
	"action": {
		"target": "{{%main}}",
		"value": "logout"
	},
	"_editor_propertiesToEdit": {
		"applyToAllContentGroups": true,
		"flex": true,
		"margin": true,
		"text": true
	},
	"_editor_propertiesToEditRestrictedUser": {}
},

And like this for the language selection button:

{
	"type": "content-button",
	"title": "{{$root.stringTable.strings.buttons.languages.$}}",
	"name": "languagesButton",
	"height": "60px",
	"width": "60px",
	"marginLeft": "0px",
	"marginRight": "0px",
	"_editor_canBeSelected": true,
	"_editor_canBeEdited": true,
	"_editor_canBeDeleted": true,
	"_editor_canAdd": true,
	"layout": {
	},
	"icon": {
		"src": "files/images/flags.png",
		"height": 32,
		"width": 32
	},
	"outlineImage": {
		"src": "files/images/circle.svg",
		"color": "[[$root.colors.toolbarButton.icon]]",
		"hoverColor": "[[$root.colors.toolbarButton.iconHover]]",
		"pressedColor": "[[$root.colors.toolbarButton.iconPressed]]"
	},
	"backgroundImage": {
		"src": "files/images/button_background.svg",
		"color": "[[$root.colors.toolbarButton.background]]",
		"hoverColor": "[[$root.colors.toolbarButton.backgroundHover]]",
		"pressedColor": "[[$root.colors.toolbarButton.backgroundPressed]]"
	},
	"action": {
		"target": "{{%main}}",
		"value": "showLanguages"
	},
	"_editor_propertiesToEdit": {
		"applyToAllContentGroups": true,
		"flex": true,
		"margin": true,
		"text": true
	},
	"_editor_propertiesToEditRestrictedUser": {}
},

As you can see, the different buttons can be easily identified by the name attribute. All button definitions are in the same order in the JSON document as they appear on the screen if you start SiteKiosk. To reposition a button you simply have to move its definition to the new place you would like the button to have on the screen. In the case of the logout and the language selection button you would simply have to move the complete logout definition shown above behind the definition of the language selection button, also shown above.

This change results in the logout button being shown behind the language selection button, as pictured here:
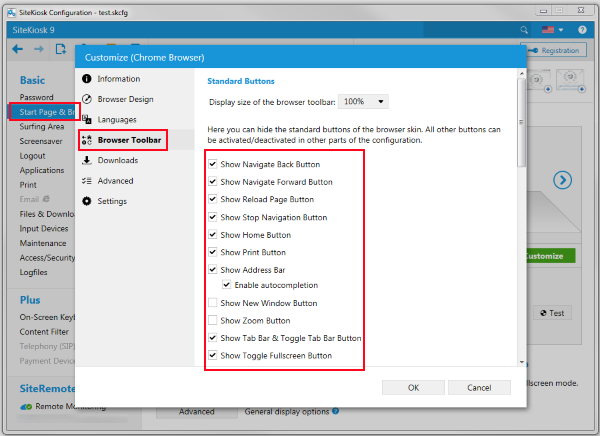
Please note that you can easily change the general appearance of the SiteKiosk Windows Chrome Browser through the SiteKiosk configuration. Just go to Start Page & Browser -> Chrome Browser -> Customize -> Browser Toolbar. Here you can show/hide the different buttons and also change the overall display size of the toolbar. You can also add custom buttons, if you need more than 2 of those, please have a look here.
Changing the Date and Time Format in Chrome Browser of SiteKiosk Windows

When using English as the language setting for the Chrome Browser of SiteKiosk Windows the time is shown in AM/PM format and the date is shown as Month/Day/Year. To change that a quick file edit can be done.

Open the file ..\SiteKiosk\Skins\Chrome_NG_Skin\TrayWnd.html with an editor, e.g. Notepad. Look for these lines:

} else {
	// US
	curDateStr = "" + (curDate.getHours() > 12 ? utils.ensureTrailing0(curDate.getHours() - 12) : utils.ensureTrailing0(curDate.getHours()));
	curDateStr += ":" + utils.ensureTrailing0(curDate.getMinutes(), true);
	curDateStr += (curDate.getHours() >= 12 ? " PM" : " AM");
	curDateStr += "<br />"+utils.ensureTrailing0(curDate.getMonth()+1)+"/"+utils.ensureTrailing0(curDate.getDate())+"/"+utils.ensureTrailing0(curDate.getFullYear());
}

Change the code to:

} else {
	curDateStr = utils.ensureTrailing0(curDate.getHours()) + ":" + utils.ensureTrailing0(curDate.getMinutes(), true);
	curDateStr += "<br />"+utils.ensureTrailing0(curDate.getDate())+"/"+utils.ensureTrailing0(curDate.getMonth()+1)+"/"+utils.ensureTrailing0(curDate.getFullYear());
}

The first line displays the time, the second is the date. Both are assigned to the same variable by way of string concatenation. The string basically contains html code to display the time and date section. Feel free to make changes as you wish.

The above example will change the time and date display to this:

SiteRemote-Controlled Alert System for SiteKiosk Windows

The kiosk management solution SiteRemote can be used to create an alert message system for kiosk systems running SiteKiosk Windows. An alert message will overlay the default SiteKiosk user inferface informing users of special events. Note that the solution described in this blog post is intended as a sort of emergency system. If you just want to show changing information you should consider using SiteCaster.

Two files are needed on the SiteKiosk terminal. One is a JavaScript file (named alertswitch.js in this example) the second is an HTML file (named alert.html in this example). Both should be placed in a folder called alert that should be placed in the HTML folder of the SiteKiosk installation path.

Let's start with the alertswitch.js JavaScript file. The code of the file is as follows:

//Periodic event to check alert conditions every 25 seconds
//The lower this value the harder to use the local SiteKiosk escape menu to close SiteKiosk
SiteKiosk.Scheduler.AddPeriodicEvent(25000, CheckAlertValue);

//Shell object used to read the registry
var WshShell = new ActiveXObject("WScript.Shell");

//Global variable for the event id of the periodic alert text check
var PeriodicEventID = 0;

//Alert dialog properties
var gk_Emergency = SiteKiosk.SiteKioskUI.CreateHTMLDialog();
//Path to the html file used for the alert
gk_Emergency.URL = "file://" + SiteKiosk.SiteKioskDirectory + "Html\\Alert\\Alert.html";
gk_Emergency.TopMostWindow = true;
gk_Emergency.Closable = false;
gk_Emergency.Title = false;
gk_Emergency.Border = false;
gk_Emergency.Scrollbars = false;
gk_Emergency.Sysmenu = false;
gk_Emergency.CloseOnInput = false;
gk_Emergency.OnClose = onClose;
gk_Emergency.Maximize();

function CheckAlertValue(){
	try{
		//Check registry value !NOTE! The following registry path is for 64-Bit systems!
		if (WshShell.RegRead("HKLM\\SOFTWARE\\Wow6432Node\\PROVISIO\\SiteKiosk\\AlertValue") !== ""){
			//Resets the screensaver idle timeout to make sure the screensaver is not interfering with the alert
			SiteKiosk.ScreenSaver.Reactivate();
			//Show the alert
			gk_Emergency.ShowDialog();
			//Force hiding of the task bar during the alert (Note: Not required when running SiteKiosk in full screen mode)
			SiteKiosk.SiteSkin.TaskbarVisible = false;
		}
		else{
			if (PeriodicEventID !== 0)
			//Remove the periodic event that checks for alert text changes	
				SiteKiosk.Scheduler.RemoveEvent(PeriodicEventID);
			
			//Show the taskbar again (Note: Not required when running SiteKiosk in full screen mode)
			SiteKiosk.SiteSkin.TaskbarVisible = true;
			
			//Close the alert
			gk_Emergency.CloseDialog();
		}
			
	}
	catch(e){
		//No matching registry value, do nothing
	}
}

//Return the registry value to the alert dialog on request
function GetRegistryValue(){
    return WshShell.RegRead("HKLM\\SOFTWARE\\Wow6432Node\\PROVISIO\\SiteKiosk\\AlertValue");
}

//Allow the alert to write the event id of the periodic event that checks for alert text changes
function SetPeriodicEventID(evtid){
    PeriodicEventID = evtid;
}

function onClose(){
	if (PeriodicEventID !== 0)
	//Remove the periodic event that checks for alert text changes because dialog has been closed from outside of the script
		SiteKiosk.Scheduler.RemoveEvent(PeriodicEventID);
}

The file must be added to SiteKiosk as an external script file. This can be done in the configuration of SiteKiosk under Start Page & Browser -> Advanced. The file uses the AddPeriodicEvent method of the SiteKiosk Object Model to periodically check a registry value (in our example HKLM\\SOFTWARE\\Wow6432Node\\PROVISIO\\SiteKiosk\\AlertValue). The registry value is either an empty string or contains the alert text that should be displayed. If the check does not return an empty string, the ShowDialog method is used to show the dialog defined with the CreateHTMLDialog method. One of the properties of the dialog is the path to the alert.html file explained below in this document. If the alert is shown the taskbar of SiteKiosk is switched off (only required if no full screen mode is used) using the TaskbarVisible property. Additionally the SiteKiosk screensaver will be prevented during the display of the alert to minimize any possible interference with the alert message, which is why the Reactivate method is used. Once an empty string is detected in the registry the alert is switched off by means of the CloseDialog method.

The external script also contains two methods to provide the HTML file that displays the actual alert with the alert message (GetRegisryValue method) and to receive the event id of the periodic event used in the HTML file to check for changes in the alert text. The id is used to stop the periodic event once the alert message is no longer displayed with the help of the RemoveEvent method.

The alert.html HTML file that accompanies the external script is used to display the alert message. You might change the design of that page to whatever you like. The code of the HTML file is as follows:

<!DOCTYPE html>
<html>
<meta charset="utf-8">
<head>
	<style> 
	html { 
		background: red no-repeat center fixed; 
		background-size: cover;
	}
	body { 
		font-family: arial;
		text-align:center;
		font-size: 100px;
		color: white; 
	}
	div {
		margin-top: 15%;
		padding: 20px;
	}
	</style>
	</head>
	<body style="margin:0px;"> 
		<div id="Alert-Text">
			... 
		</div>
	</body>
	<script type="text/JScript">
		//Initialize the SiteKiosk Object Model
		window.external.InitScriptInterface();
		
		//Get the alert text from the external script
		function GetAlertValue(){
			document.getElementById("Alert-Text").innerHTML = SiteKiosk.ScriptDispatch.GetRegistryValue();
		}
		
		GetAlertValue();
		//Check the alert text every 5 seconds for changes
		var evtid = SiteKiosk.Scheduler.AddPeriodicEvent(5000, GetAlertValue);
		//Write event id to external script to remove event when closing the alert
		SiteKiosk.ScriptDispatch.SetPeriodicEventID(evtid);
	</script>
</html>

After the initialization of the SiteKiosk Object Model the ScriptDispatch object is used to retrieve the alert message from the external script. The AddPeriodicEvent method is used to periodically request the alert message to quickly react to changes. The id for that event is passed to the external script so that the event can be canelled once the alert is closed.

Note that the times for the periodic events in the script can be changed to your liking and the requirements of your environment.

With the two files required on the SiteKiosk terminal in place we can now focus on the SiteRemote part. Obviously the SiteKiosk terminal needs to be registered with a SiteRemote server. Within your SiteRemote team go to the SiteKiosk tab and select Jobs. Scroll all the way down and select New template. For the alert system to work we need at least two templates. One that switches the alert on and one to switch it off. The template that switches the alert on includes the string for the alert message. In case you have different predefined alert messages that you want to display with the alert system based on different situations, you can create different templates for each of the messages.

The create an ON template provide a job name, select SiteKiosk Windows as client type and Execute Script as action type. Click Add next to the selected action type and paste the following script into the script field. Make sure that you do not select the option Script requires SiteKiosk Object:

//ON !NOTE! The following registry path is for 64-Bit systems!
var gk_WshShell = new ActiveXObject("WScript.Shell");
gk_WshShell.RegWrite("HKLM\\SOFTWARE\\Wow6432Node\\PROVISIO\\SiteKiosk\\AlertValue", "Alert Text", "REG_SZ");

This will write the string Alert Text to the registry of a SiteKiosk terminal the job will be assigned to. Change the string to whatever you like and make as many different ON templates as you require. Note that you can also change the text each time you assign the job template to a machine.

The OFF template simply writes an empty string to the terminal's registry:

//OFF !NOTE! The following registry path is for 64-Bit systems!
var gk_WshShell = new ActiveXObject("WScript.Shell");
gk_WshShell.RegWrite("HKLM\\SOFTWARE\\Wow6432Node\\PROVISIO\\SiteKiosk\\AlertValue", "", "REG_SZ");

Each time you want to activate or deactivate an alert on one machine or a number of machines click one of the templates and assign it. If you assign the ON template from this example to a machine that runs the required files described above you will get an alert like this:

Note that for the alert message to be displayed, SiteKiosk must be running, which is the normal state on a SiteKiosk kiosk terminal.

Identifiying Individual SiteKiosk Windows Computers

Identifying individual SiteKiosk Windows computers can be helpful to deliver specific content to these machines. You can use either native JavaScript or the SiteKiosk Object Model to retrieve that information.

To use native JavaScript you need to enable the computer identification feature in the SiteKiosk configuration. When using the SiteKiosk Chrome Browser for example, you can find this feature under Start Page & Browser -> Chrome Browser -> Customize -> Settings -> Computer Identification. Tick the Add SiteKiosk to user agent header option and more importantly the Customize user agent field option.

You can leave the default value $(ComputerName) as this is exactly what we want to work with to identify the SiteKiosk Windows machine. That global variable will be replaced by the individual computer name automatically, so you do not need a separate configuration for each of your SiteKiosk computers. The additional information will be added at the end of the user agent string of the browser seperated by a semicolon.

For the Internet Explorer engine you will find the setting under Start Page & Browser -> Internet Explorer -> Advanced -> Computer Identification.

Here is a simple example for a web page that makes redirects based on the extracted computer name.

<!DOCTYPE html>
<html>
<head>
	<meta charset="UTF-8">
	<script>
		//Get the SiteKiosk computer name by extracting the computer name from the user agent string.
		var SiteKioskComputerName = navigator.userAgent.substring(navigator.userAgent.lastIndexOf(";")+1);
		document.write("SiteKiosk Computer Name: " + SiteKioskComputerName);
		
		var url = "";
		
		//Assign different URLs based on the computer name.
		if (SiteKioskComputerName.includes("SITEKIOSK_COMPUTER_1")){
			url = "https://www.provisio.com/";
		}
		else if (SiteKioskComputerName.includes("SITEKIOSK_COMPUTER_2")){
			url = "https://www.siteremote.net/";
		}
		else{
			//Place code for no matching computer name here.
		}
		
		//Redirect to content for this specific SiteKiosk terminal.
		if (url !== "")
			document.location.href = url;
	</script>
	<title>Check ComputerName with User Agent</title>
</head>
<body>
<!-- Place code for your HTML body here -->
</body>
</html>

The example is using only native HTML and Javascript, so it will work both in SiteKiosk with a Chrome based browser and in SiteKiosk with an Internet Explorer based browser.

If for whatever reason you can't or don't want to use the customized user agent string option, you can also use the SiteKiosk Object Model. Note that the Object Model versions are different for the Chrome and Internet Explorer browser versions of SiteKiosk. The following example is for the Chrome browser version. The SiteKiosk Object Model for use in the Chrome Browser engine of SiteKiosk is still work in progress and does not offer all the features the classic SiteKiosk Object Model for the IE based engine offers. That is why the documentation is only available on request from our support department.

<html>
<head>
	<meta charset="UTF-8">
	<script>
		//Initialize the SiteKiosk Object Model for Chrome.
		(new Function(_siteKiosk.getSiteKioskObjectModelCode()))();
		
		//Get the SiteKiosk computer name by using the SiteKiosk Object Model.
		var SiteKioskComputerName = siteKiosk.system.environment.getVariable("computerName");;
		document.write("SiteKiosk Computer Name: " + SiteKioskComputerName);
		
		var url = "";
		
		//Assign different URLs based on the computer name.
		if (SiteKioskComputerName.includes("SITEKIOSK_COMPUTER_1")){
			url = "https://www.provisio.com/";
		}
		else if (SiteKioskComputerName.includes("SITEKIOSK_COMPUTER_2")){
			url = "https://www.siteremote.net/";
		}
		else{
			//Place code for no matching computer name here.
		}
		
		//Redirect to content for this specific SiteKiosk terminal.
		if (url !== "")
			document.location.href = url;
	</script>
	<title>Check ComputerName with User Agent</title>
</head>
<body>
<!-- Place code for your HTML body here -->
</body>
</html>

As you can see, the difference between this and the user agent variant is quite small. You need to initialize the Object Model and then use the getVariable method to retrieve the computer name.

If using a browser based on the Internet Explorer, please have a look at the documentation for the classic SiteKiosk Object Model. Specifically the ComputerName property.

Note that for security reasons you need to add pages that are using either version of the SiteKiosk Object Model to the list of URLs with SiteKiosk Object Model Permission in the configuration of SiteKiosk under Access/Security.

For a quick working demonstration of the above you may save the examples as HTML pages, put the in the html subfolder of your SiteKiosk directory and set them as the start page of SiteKiosk.